To enable Storage Sense, go to Start > Settings > System > Storage and set Storage Sense to On, then select Storage Sense to choose a schedule and cleanup rules.
This guide covers the full setup on Windows 11 and Windows 10, what Storage Sense deletes and leaves alone, how to clean up right away, and fixes for a missing or greyed-out toggle.
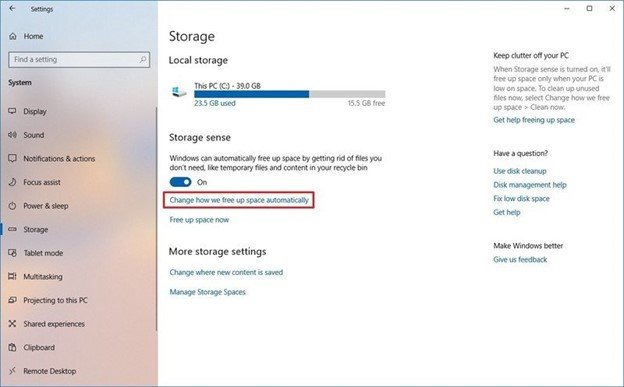
Enable and use Storage Sense to auto-clean disk space on Windows 10/11
The toggle lives in the same place on both versions. With default settings, Storage Sense runs when the PC is low on disk space and removes unnecessary temporary files.
- Select Start > Settings > System > Storage.
- Set Storage Sense to On.
- Select Storage Sense to open its settings page.
- Under Run Storage Sense, pick how often it should run.
- Choose the Recycle Bin and Downloads folder time limits you are comfortable with.
Prerequisites
| Requirement | Detail |
|---|---|
| Windows version | Windows 11 or Windows 10; Storage Sense was introduced in Windows 10 |
| Drive | System drive only, usually C:. Other drives are handled under Advanced storage settings > Storage used on other drives, and you can also open Disk Management to manage them |
| Signed in and online | Storage Sense cannot run unless you are signed in and online for more than 10 minutes |
| Per-user settings | Your choices apply only to your account; other users manage their own |
| Cloud account | Cloud content options appear only when you are signed in to OneDrive or another cloud provider |
| Policy control | On work or school PCs, an administrator can enable, disable or preset Storage Sense |
Step-by-step: Enable and configure Storage Sense (Windows 11)
The Storage Sense page in Windows 11 groups its options under Cleanup of temporary files, Automatic User content cleanup, Locally available cloud content and Cleanup schedules.
- Open Storage settings: select Start > Settings > System > Storage.
- Turn Storage Sense on: set the Storage Sense toggle to On, then select Storage Sense to configure how it runs.
- Keep Cleanup of temporary files selected so app temporary files are removed.
- Turn on Automatic User content cleanup so Storage Sense runs on its own.
- Choose a cleanup schedule under Run Storage Sense: every day, every week, every month, or during low free disk space.
- Set Recycle Bin cleanup behavior under Delete files in my recycle bin if they have been there for over:.
- Optional: configure Downloads folder cleanup under Delete files in my Downloads folder if they haven't been opened for more than:. Leave it at never if you keep installers or documents there.
- Optional: free up cloud content for OneDrive under Content will become online-only if not opened for more than:.
- Run Storage Sense immediately as a test with the run button on the same page, then check Storage for the new free space.
Starting in Windows 11, version 22H2, the default for OneDrive files is to go online-only if not opened for more than 30 days.
Step-by-step: Enable and configure Storage Sense (Windows 10)
Windows 10 uses the same Settings path and the same rule set, with a shorter page.
- Open Storage settings: select Start > Settings > System > Storage.
- Turn Storage Sense on with the Storage Sense toggle.
- Select the Storage Sense link below the toggle to configure its rules.
- Under Run Storage Sense, choose how often it runs.
- Set the temporary files rules: how long items stay in the Recycle Bin and in the Downloads folder before deletion.
- If OneDrive is signed in, choose when unopened files become online-only.
- Run it immediately with the run option at the bottom of the page to clean up now.
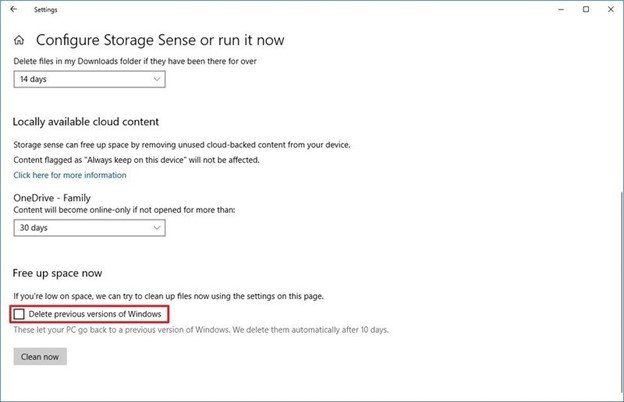
What Storage Sense cleans (and what it doesn't)
| Item | Cleaned by default? | Notes |
|---|---|---|
| Unneeded temporary files | Yes | Controlled by Cleanup of temporary files |
| Recycle Bin items | Yes, after a set time | You choose how many days they stay |
| Downloads folder | No | Only if you set a Downloads time limit |
| OneDrive and other cloud files | No, until you set it | Made online-only, never deleted; still in the cloud |
| Files marked Always keep on this device | No | Exempt from Storage Sense |
| Previous Windows installation (Windows.old) | No | Remove it from Storage > Temporary files |
| Other drives (D:, external) | No | Storage Sense works on the system drive only |
| Documents, pictures, apps | No | Use Cleanup recommendations or File Explorer |
Free up space now with Temporary files and Cleanup recommendations
When you need space immediately, the Storage page can clean up system files on demand without waiting for the schedule.
- Select Start > Settings > System > Storage.
- Under disk usage, select Temporary files.
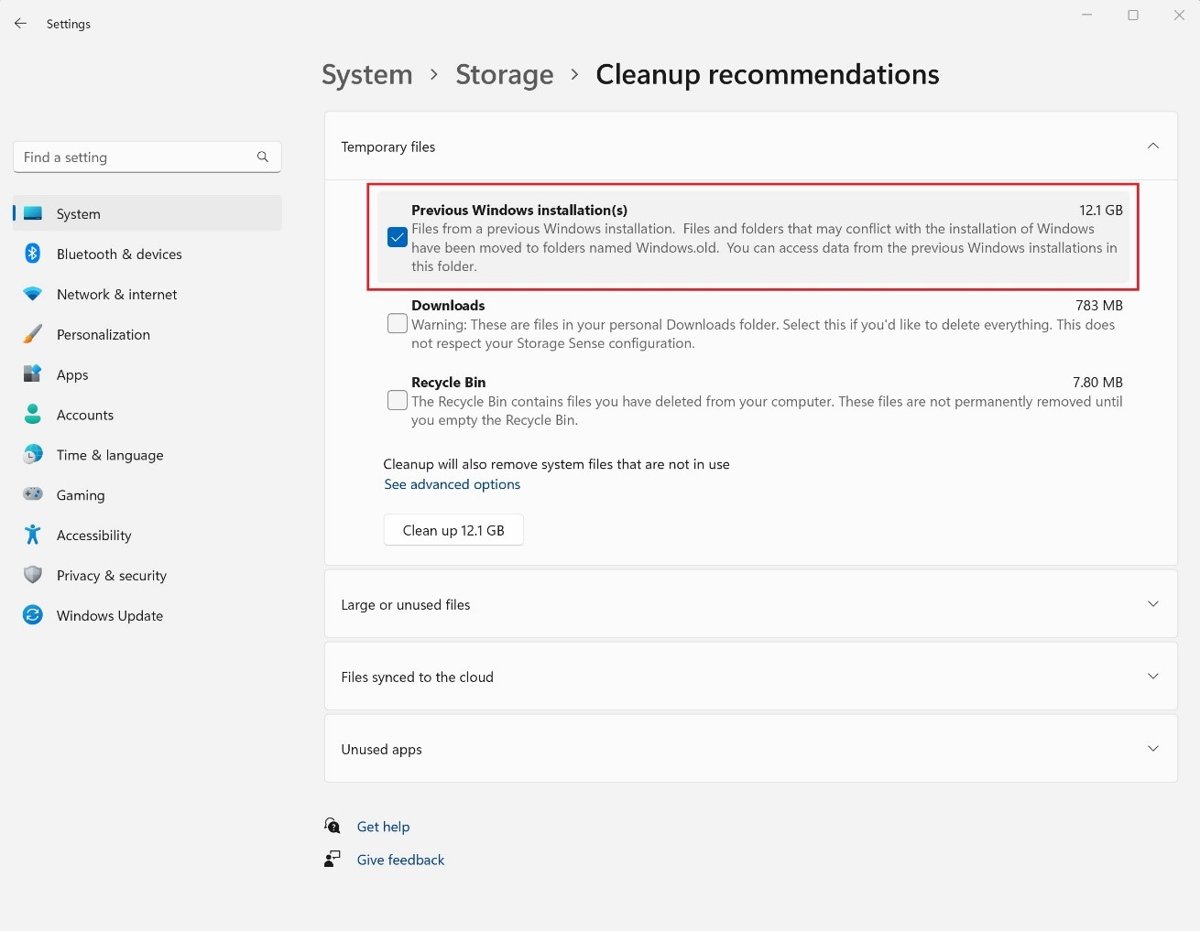
- Check the categories you want gone, such as Previous Windows Installation(s), then select Remove files.
- Go back and select Cleanup recommendations.
- Review Temporary files, Large or unused files, Files synced to the cloud and Unused apps.
- Select the items to remove and select Clean up for each section.
Deleting the previous Windows installation removes the option to go back to your earlier version. That cannot be undone.
Tips for best results (beginner-friendly)
| Tip | What to do | Why |
|---|---|---|
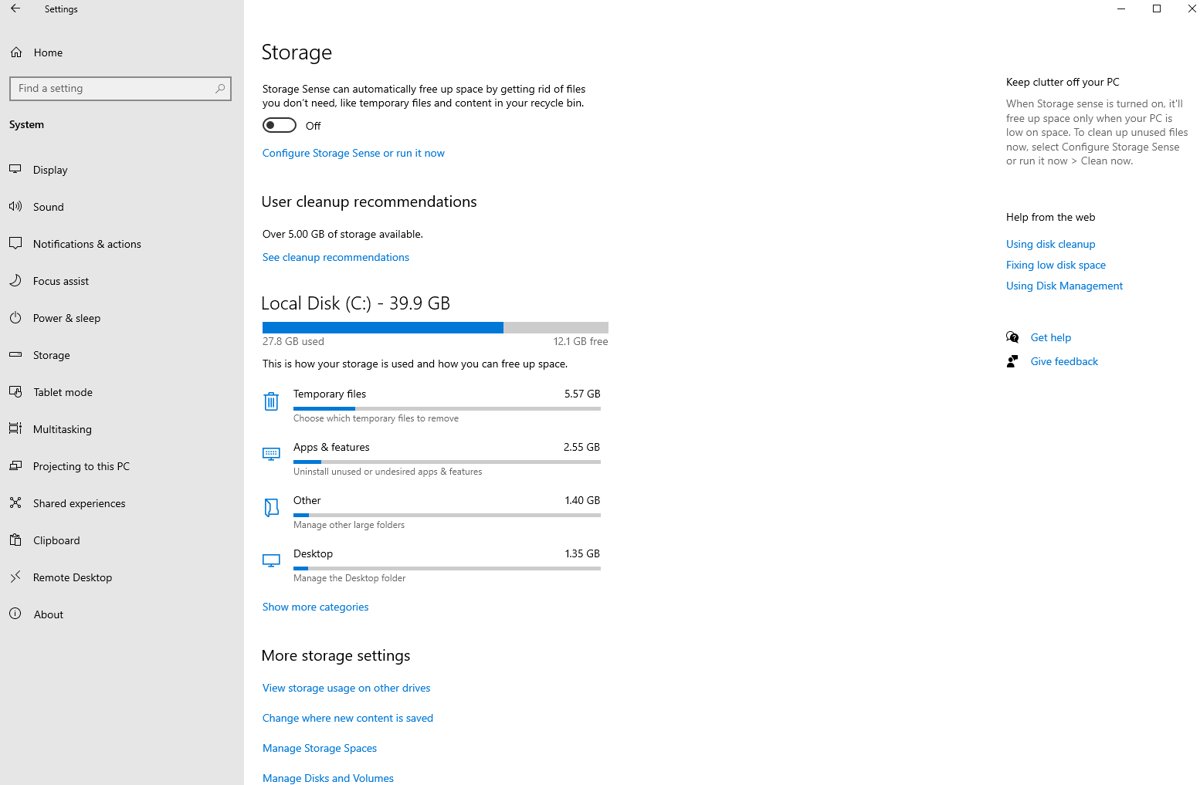
| Tip 1: Pair Storage Sense with the storage breakdown | Check the usage bar and categories on the Storage page before and after a run | Shows which category actually fills the drive |
| Tip 2: Be conservative with Downloads | Leave Downloads cleanup off, or set a long limit such as 60 days | Installers and saved documents often live there |
| Tip 3: Don't rely on Storage Sense for huge space recovery | Move large videos and photos to another drive or turn on OneDrive Files On-Demand | Temporary files rarely account for most used space |
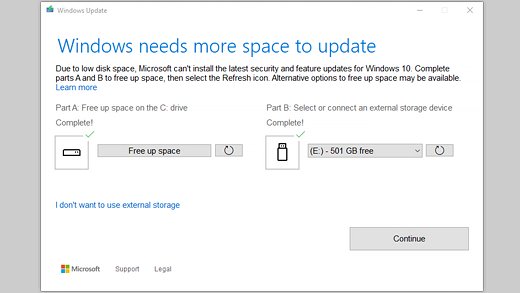
| Tip 4: Keep enough free space for Windows updates | Clean up before a feature update, or use external storage when Windows asks for more space | Low disk space can stop updates from installing |
To see what fills the drive, check disk space on Windows 11 before deciding what to delete.
How to tell Storage Sense is working
- Open Start > Settings > System > Storage and confirm Storage Sense shows On.
- Note the used and free space on the capacity bar.
- Run a cleanup, then reopen Storage and compare the free space.
- Open the Recycle Bin after the set number of days and confirm older items are gone.
- Watch the capacity bar: if it turns red, the drive is in a low disk state and needs more cleanup to free up disk space.
Troubleshooting & common questions
Low disk space error keeps returning after a cleanup
The Temp folder can fill with Microsoft Store app (.appx) files.
- Select Start > Settings > System > Troubleshoot > Other troubleshooters, then Run next to Windows Store Apps.
- Press Windows logo key + R, type
wsreset.exeand select OK to clear the Store cache. - Run the Windows Update troubleshooter from the same page, then restart.
Storage Sense ran, but I didn't gain much space
Free space barely changed after a run
Default settings clean only temporary files and old Recycle Bin items; Downloads and cloud files are untouched.
- Set a Downloads time limit if old downloads are safe to delete.
- Set a time for OneDrive content to become online-only.
- Run Cleanup recommendations to find large or unused files and unused apps.
- Move personal videos, music and photos to an external drive.
I'm worried it will delete something important
Worried about losing files
Storage Sense deletes only the categories you enable, and cloud files are made online-only, not deleted.
- Leave Downloads cleanup off.
- Set a longer Recycle Bin period so you have time to restore items.
- Right-click important OneDrive files and choose Always keep on this device to exempt them.
Storage Sense option is missing or greyed out
Setting is greyed out or not listed
A Group Policy or Intune policy manages Storage Sense on the PC, or you are viewing the settings for a non-system drive.
- On a work or school PC, ask the administrator: the setting Allow Storage Sense controls it.
- On a Pro PC you manage, open the Local Group Policy Editor and go to Computer Configuration\Administrative Templates\System\Storage Sense.
- Set Allow Storage Sense to Not Configured or Enabled, then reopen Settings.
- Confirm you are signed in, since Storage Sense settings are per user.
OneDrive files became online-only and won't open offline
Cloud files will not open offline
Storage Sense made unopened cloud files online-only after the time you set.
- Connect to the internet and open the file; OneDrive downloads it again when there is free space.
- Right-click files you need offline and select Always keep on this device.
- Change Content will become online-only if not opened for more than: to a longer period or never.
Storage Sense on Windows 10 and 11 FAQ
Is Storage Sense on by default?
Storage Sense is off by default on home PCs. If the PC runs low on disk space and you have never used Storage Sense, Windows can turn it on to clean select temporary files and notify you. You can turn it off again afterwards.
Does Storage Sense delete my personal files?
Only if you allow it. Default settings remove temporary files and old Recycle Bin items. The Downloads folder and cloud files are managed only when you set a time limit, and cloud files are made online-only rather than deleted.
Can Storage Sense run if I'm not signed in?
No. Storage Sense runs only when you are signed in and the PC has been online for more than 10 minutes. Its settings also apply only to the signed-in user, so each account on the PC configures its own rules.
Does Storage Sense clean drives other than C:?
No. Storage Sense works on the system drive only, which holds Windows and is usually C:. For other drives, go to Settings > System > Storage > Advanced storage settings > Storage used on other drives.
How do I delete the Windows.old folder?
Go to Start > Settings > System > Storage, select Temporary files, check Previous Windows Installation(s) and select Remove files. Removing it means you can no longer go back to your earlier Windows version.
Why do I get notifications to turn on Storage Sense?
Windows shows these notifications when the system drive is running out of free space. Low space can slow the PC and make it difficult to install Windows updates, so turning on Storage Sense or freeing space clears the warning.
How often can Storage Sense run?
You can set Storage Sense to run every day, every week, every month, or only during low free disk space, which is the default. Administrators set the same choices through the Config Storage Sense Global Cadence policy.
Is Storage Sense the same as Disk Cleanup?
They overlap. Disk Cleanup, cleanmgr.exe, is the older manual tool, while Storage Sense is the automated cleanup feature introduced in Windows 10 and enhanced in Windows 11.