Restart into UEFI from Settings > System > Recovery > Advanced startup, choose Troubleshoot > Advanced options > UEFI Firmware Settings, then set Intel Virtualization Technology (VT-x) or SVM Mode (AMD) to Enabled or Disabled and save.
The steps below cover every way into the firmware, the setting name on Dell and ASUS PCs, the Windows features that sit on top of it, and the errors that appear when it is off.
Disable or enable hardware virtualization in Windows 11/10
Open these steps on a phone or a second PC first, because the firmware screen replaces Windows until you exit it.
On Windows 10 the same button sits under Settings > Update & Security > Recovery.
- Open Settings and select System > Recovery.
- Under Recovery options, next to Advanced startup, select Restart now.
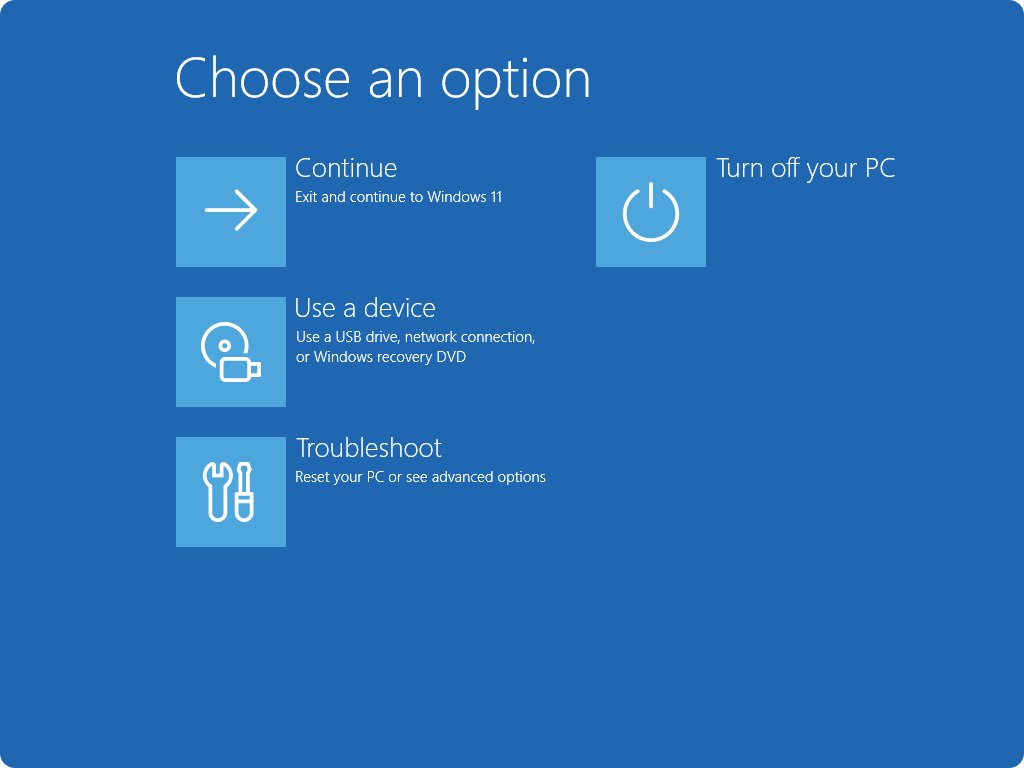
- On the blue menu, select Troubleshoot > Advanced options > UEFI Firmware Settings > Restart.
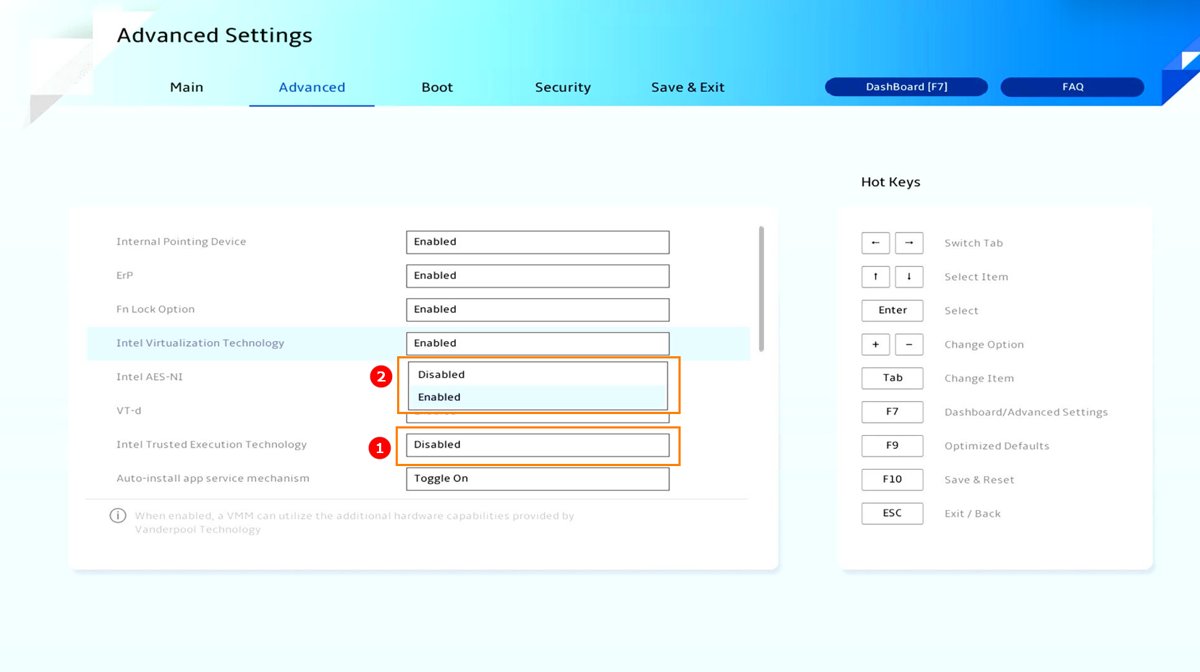
- In the firmware, open the CPU or virtualization menu, for example Advanced > Virtualization on Dell or Advanced > CPU Configuration on ASUS desktop boards.
- Set Intel Virtualization Technology (Intel) or SVM Mode (AMD) to Enabled to turn it on, or Disabled to turn it off.
- Choose the firmware's save-and-exit option (Dell labels it Save and Exit) and let the PC restart into Windows.
What is hardware virtualization?
Hardware virtualization is a set of processor features that let one physical PC run several isolated virtual machines. The switch lives in UEFI because the CPU has to expose the features before Windows starts.
| Term | What it is | Where you see it |
|---|---|---|
| Intel VT-x | Intel Virtualization Technology. Both the processor and the BIOS must support it before it can be switched on. | Intel Virtualization Technology or Intel (VMX) Virtualization Technology in firmware |
| AMD-V | AMD Virtualization, the on-chip features AMD processors use to run virtual machines. | SVM Mode (Secure Virtual Machine) in firmware |
| Intel VT-d / AMD-Vi (IOMMU) | Virtualization for directed I/O. It needs chipset, BIOS and processor support, and virtualization-based security uses it to guard memory against DMA attacks. | Virtualization for Direct-IO on Dell |
| SLAT (Intel EPT, AMD RVI) | Second Level Address Translation. Hyper-V, virtualization-based security and WSL 2 all require it. | The Hyper-V section of systeminfo |
| Windows hypervisor | The software layer that uses VT-x or AMD-V. Hyper-V, memory integrity and Credential Guard run on it. | "A hypervisor has been detected" in systeminfo or System Information |
Check if virtualization is enabled on Windows 11
Check before you restart. Many Windows PCs ship with virtualization already on, and Surface devices always have it enabled.
- Press Ctrl + Shift + Esc to open Task Manager.
- Select the Performance tab, then CPU.
- Find the Virtualization line in the CPU details.
- Read the value: Enabled means the firmware switch is on, Disabled means it is off or the processor lacks it.
Intel's Processor Identification Utility gives a second reading on its CPU Technologies tab. Task Manager showing Enabled while the utility leaves VT-x unchecked means another program, such as Hyper-V, already holds the hypervisor. Both showing off means the processor does not support VT-x.
Check virtualization with systeminfo in Command Prompt
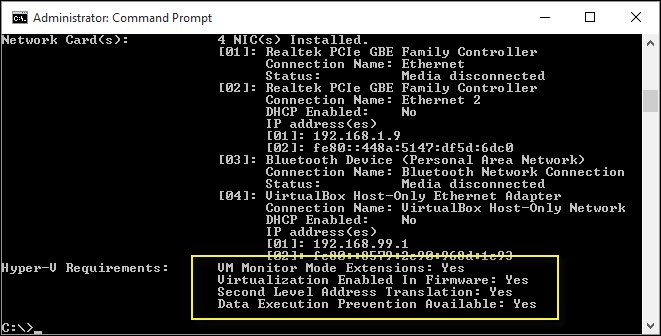
systeminfoRun it in Command Prompt or PowerShell and scroll to the Hyper-V Requirements section at the end of the report. It lists VM Monitor Mode extensions, virtualization in firmware, Second Level Address Translation and Data Execution Prevention, each with Yes or No. A No next to the firmware line means the BIOS switch is off.
You should see: every Hyper-V requirement reads Yes, or the section says "A hypervisor has been detected. Features required for Hyper-V will not be displayed." Both mean virtualization is enabled.
Enable or disable virtualization from BIOS/UEFI
Each PC maker names and places the setting differently, so match your brand to a row. Change only the virtualization option: Microsoft warns that adjusting other UEFI settings can stop you getting back into Windows.
If your brand is not listed, look under the CPU-related menus first, where the option most often sits.
| PC or board | Open the firmware | Where the setting is | Setting name |
|---|---|---|---|
| Dell | Press F2 when the Dell logo appears | Advanced > Virtualization, or Virtualization Support > Virtualization | Virtualization, plus Virtualization for Direct-IO (VT-d). On 2025 and later models, press Ctrl + Alt + S to unhide a hidden VT-x option. |
| ASUS Intel motherboard | Press Del or F2 after power on, then F7 for Advanced Mode (ROG boards open in Advanced Mode) | Advanced > CPU Configuration | Intel (VMX) Virtualization Technology, Enabled by default |
| ASUS Intel laptop | The UEFI Firmware Settings route above | BIOS setup (layout varies by model) | Intel Virtualization Technology, Enabled by default |
| ASUS AMD laptop | The UEFI Firmware Settings route above | BIOS setup (layout varies by model) | SVM Mode, Enabled by default |
| HP, Lenovo, Acer | The UEFI Firmware Settings route above | Model-specific; the maker's article shows the menu: HP, Lenovo, Acer | Named after the Intel or AMD feature on that model |
| Microsoft Surface | Not needed | None | Virtualization is already enabled on Surface devices |
Enable virtualization inside UEFI (BIOS) from WinRE
Windows Recovery Environment (WinRE) is the blue Advanced startup menu. Use these entry points when Settings will not open, or when you are at the sign-in screen. WinRE also opens on its own after two failed starts in a row.
- On the sign-in screen, select the Power icon, then hold Shift and select Restart.
- From a desktop instead, open Command Prompt and run
shutdown /r /o /t 0to restart into the Advanced boot options menu. - Select Troubleshoot > Advanced options.
- Select UEFI Firmware Settings, then Restart.
- Set Intel Virtualization Technology or SVM Mode to Enabled or Disabled.
- Save and exit the firmware; Windows starts normally afterwards.
Enable virtualization inside UEFI (BIOS) from boot
The setup key works even when Windows will not start, because the firmware loads before Windows does.
- Shut the PC down completely.
- Press the power button and tap the setup key as soon as the maker's logo appears: F2 on Dell, Del or F2 on ASUS motherboards.
- On ASUS boards, press F7 to open Advanced Mode.
- Open the menu that holds the CPU settings and change the virtualization option.
- Save and exit; the PC restarts into Windows with the new setting.
To skip the key timing, run shutdown /r /fw /t 0 from Command Prompt opened as administrator. The /fw switch sends the next restart straight to the firmware interface.
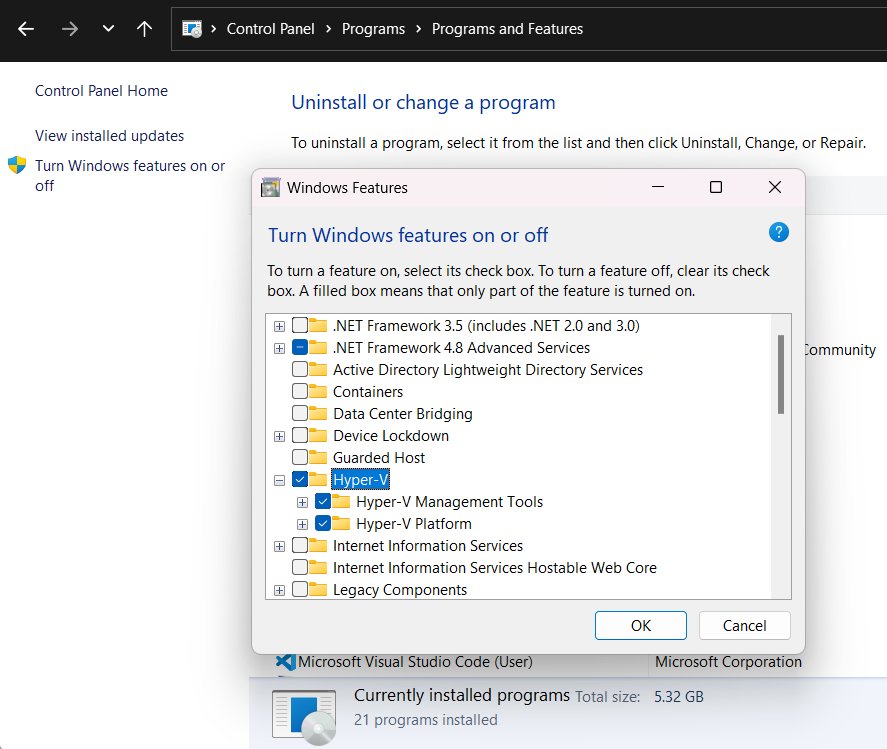
Enable or disable virtualization features in Windows 11
These Windows features sit on top of the firmware switch and do nothing until VT-x or SVM is enabled in UEFI. Hyper-V does not appear on Windows 11 Home, which cannot install the Hyper-V role.
Once the firmware switch is on, you can enable Hyper-V in Windows 11 and build a first virtual machine.
- Select Start, type
Windows features, and select Turn Windows features on or off. - Tick a feature to turn it on, or clear it to turn it off: Virtual Machine Platform, Hyper-V, Windows Hypervisor Platform, Windows Sandbox or Windows Subsystem for Linux.
- To turn off only the Hyper-V hypervisor, expand Hyper-V > Hyper-V Platform and clear Hyper-V Hypervisor.
- Select OK.
- Restart the PC when Windows asks.
If Windows Hypervisor Platform appears but Hyper-V does not on Pro or Enterprise, the PC may not meet the Hyper-V hardware requirements.
Enable Windows virtualization features if needed
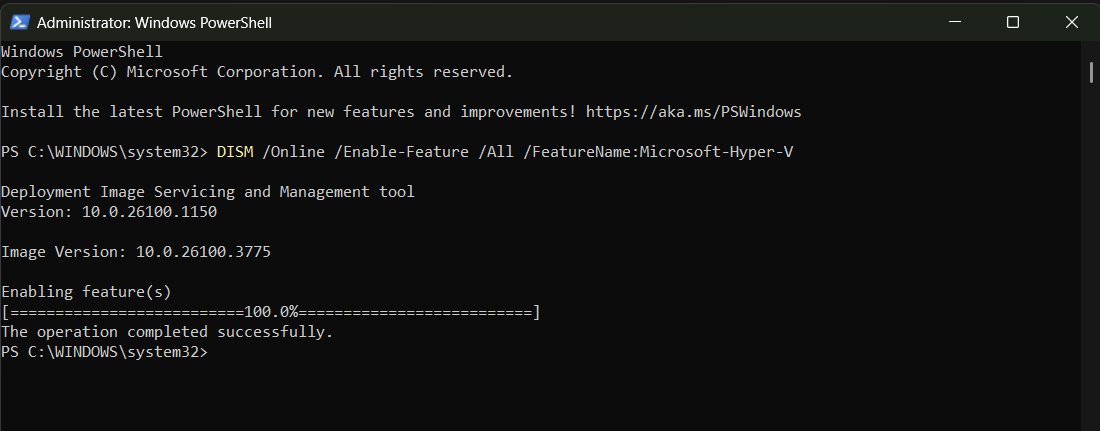
The same features can be switched on from the command line, which is faster on several PCs.
dism.exe /online /enable-feature /featurename:VirtualMachinePlatform /all /norestart
DISM /Online /Enable-Feature /All /FeatureName:Microsoft-Hyper-V
Enable-WindowsOptionalFeature -FeatureName "Containers-DisposableClientVM" -All -Online
Open PowerShell with Run as administrator; the commands fail without it. Line 1 turns on Virtual Machine Platform for WSL 2, line 2 installs Hyper-V on Pro or Enterprise, and line 3 turns on Windows Sandbox. Run only the lines you need, then restart.
You should see: DISM ends with "The operation completed successfully." After the restart, the feature shows as ticked in Turn Windows features on or off.
Disable Hyper-V instead of hardware virtualization
When VMware or VirtualBox refuses to start a VM, the conflict is with Hyper-V, not with the firmware switch. Only one component at a time can use the VT-x or AMD-V extensions.
Update first: VMware 15.5.5 and later and VirtualBox 6 and later can run alongside Hyper-V.
DISM /Online /Disable-Feature /FeatureName:Microsoft-Hyper-V-HypervisorRun it in Command Prompt opened as administrator, then restart. The PowerShell equivalent is Disable-WindowsOptionalFeature -Online -FeatureName Microsoft-Hyper-V-Hypervisor. Memory integrity and Credential Guard depend on the same hypervisor, so a third-party app can still hit the conflict while either one is on.
You should see: "The operation completed successfully." Hardware virtualization stays enabled in UEFI for every other tool.
Advantages of enabling virtualization
Virtualization lets Windows run other operating systems, such as Linux or Android, and gives you a larger library of apps. Before installing one, compare Hyper-V, VirtualBox, VMware and Windows Sandbox for your edition of Windows.
| Feature | What it gives you | What it needs |
|---|---|---|
| WSL 2 | Linux distributions running in a lightweight virtual machine | Virtual Machine Platform, virtualization in BIOS, a CPU with SLAT |
| Hyper-V | Full virtual machines built into Windows | Windows 11 Pro or Enterprise, SLAT, at least 4 GB of RAM |
| Windows Sandbox | A throwaway desktop for testing files and apps | Virtualization in BIOS, 4 GB of RAM (8 GB recommended), two CPU cores, 1 GB of free disk |
| Memory integrity (VBS) | Kernel code-integrity checks inside an isolated environment that malware cannot reach | VT-x or AMD-V, SLAT, and an IOMMU |
| Android Emulator | Hardware-accelerated Android virtual devices through Windows Hypervisor Platform | VT-x or SVM enabled in BIOS |
| VirtualBox, VMware, Docker Desktop | Hardware-assisted virtual machines and containers | Hardware virtualization enabled in BIOS |
Potential drawbacks of enabling virtualization
| Drawback | What happens | How to handle it |
|---|---|---|
| One hypervisor at a time | With Hyper-V running, VMware or VirtualBox may refuse to start VMs or fall back to a slower emulated mode | Update the app, or turn off the Hyper-V hypervisor in Windows Features |
| Driver conflicts with memory integrity | Some drivers are incompatible; devices can malfunction and, rarely, Windows fails to boot with a blue screen | Get an updated driver from the device maker and follow Microsoft's memory integrity troubleshooting steps |
| Slower on older processors | CPUs older than Intel Kaby Lake or AMD Zen 2 emulate the features memory integrity needs, which costs more performance | Newer CPUs with Mode-Based Execution Control or Guest Mode Execute Trap take a smaller hit |
| Firmware mistakes | Changing other UEFI settings by accident can stop Windows from starting | Change only the virtualization option, then save and exit |
When should you disable hardware virtualization?
Turning VT-x or SVM off in firmware disables every feature that depends on it, including memory integrity. App conflicts with Hyper-V are settled in Windows Features without a firmware change.
| Your situation | Turn it off in BIOS? | Better move |
|---|---|---|
| VMware or VirtualBox VMs fail or crawl while Hyper-V is on | No | Update the app or turn off the Hyper-V hypervisor |
| Android Emulator says the virtualization extension is not enabled or Hyper-V is not disabled | No | Switch the emulator to Windows Hypervisor Platform; Google ends the AEHD driver on December 31, 2026 |
| You use WSL 2, Docker Desktop, Windows Sandbox or Hyper-V | No | Each one needs it enabled |
| A work PC with Credential Guard or memory integrity | No | Both run on the Windows hypervisor; ask IT before changing firmware |
| You never run virtual machines and want VT-x off | Your choice | Disabling it also switches off virtualization-based security protections |
Best practices for managing virtualization
| Practice | Why it matters |
|---|---|
| Note your PC maker and model before restarting | The firmware layout and setting name depend on the manufacturer |
| Keep the steps open on a phone or second device | The firmware screen replaces Windows until you exit |
| Change only the virtualization option | Other UEFI changes can prevent Windows from starting |
| On Dell, enable Virtualization for Direct-IO with Virtualization | Dell's own procedure sets both to Enabled |
| Restart after turning on Virtual Machine Platform | WSL 2 needs the restart before the feature works |
| Keep VMware and VirtualBox up to date | VMware 15.5.5+ and VirtualBox 6+ can share the PC with Hyper-V |
| Leave memory integrity on | It hardens the Windows kernel, and Windows Security warns when it is off on Windows 11 22H2 and later |
Troubleshooting virtualization issues
UEFI Firmware Settings is missing from Advanced options
Some PCs hide this tile; you can bring back UEFI Firmware Settings or use the setup key instead.
- Shut the PC down completely.
- Power it on and tap the setup key at the logo (F2 on Dell, Del or F2 on ASUS boards).
- Or run
shutdown /r /fw /t 0from an administrator Command Prompt to restart straight into firmware.
No virtualization option in the BIOS
The processor lacks VT-x or AMD-V, or the firmware hides the option. Not every Dell computer supports virtualization.
- On Dell models from 2025 onward, press Ctrl + Alt + S in BIOS setup to unhide hidden settings such as VT-x.
- Check the CPU: search your processor number on intel.com, open Specifications > Security & Reliability, and read the Intel Virtualization fields.
- Look again under the CPU-related menus, where the option usually sits.
- If the processor supports it and the option is still missing, contact the motherboard or PC maker.
Intel Virtualization Technology is greyed out
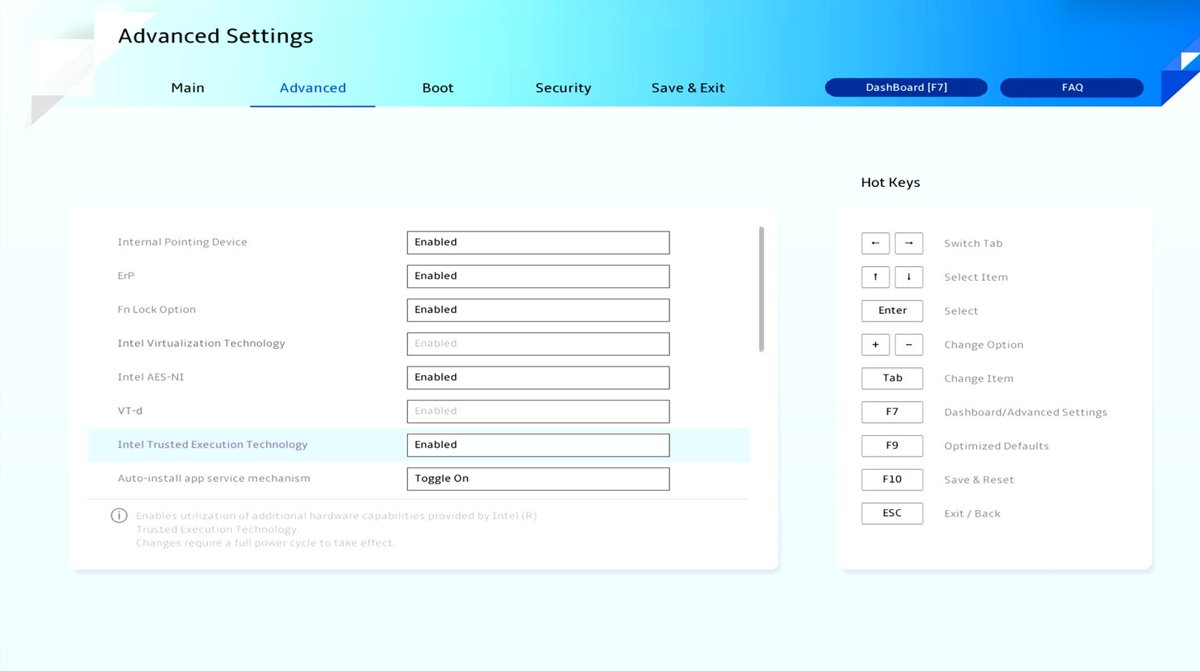
On ASUS laptops, Intel Trusted Execution Technology locks the VT-x setting while it is enabled.
- In the same BIOS menu, find Intel Trusted Execution Technology.
- Set it to Disabled, as ASUS instructs for this case.
- Change Intel Virtualization Technology to the value you want.
- Save and exit.
Task Manager still shows Virtualization: Disabled
The firmware change was not saved, or the processor does not support VT-x or AMD-V.
- Re-enter the firmware and check that the option reads Enabled.
- Leave through Save and Exit rather than holding the power button.
- Run
systeminfoand read the Hyper-V Requirements lines. - If both Task Manager and Intel's Processor Identification Utility report it off, the processor does not support VT-x.
Task Manager shows Enabled, but another tool says VT-x is unavailable
A hypervisor such as Hyper-V already holds VT-x, so other software cannot claim it.
- Type
msinfo32in Start search and open System Information. - Look for "A hypervisor has been detected" in the details pane.
- Update VMware or VirtualBox, or clear Hyper-V Hypervisor in Turn Windows features on or off and restart.
Common problems and their solutions
WSL error 0x80370102 or 0x80070003
"The virtual machine could not be started because a required feature is not installed" means Virtual Machine Platform is off, virtualization is off in BIOS, or the hypervisor is not set to launch.
- Turn on Virtual Machine Platform in Turn Windows features on or off and restart.
- Check that Task Manager shows Virtualization: Enabled.
- In PowerShell as administrator, run
bcdedit /enum | findstr -i hypervisorlaunchtype. - If it shows
hypervisorlaunchtype Off, runbcdedit /set hypervisorlaunchtype Autoand restart. - Older processors without SLAT, such as Intel Core 2 Duo, cannot run WSL 2 at all.
VMware or VirtualBox will not start a VM while Hyper-V is on
Only one component at a time can use the hardware virtualization extensions.
- Update to VMware 15.5.5 or later, or VirtualBox 6 or later.
- If the app still fails, clear Hyper-V Hypervisor under Hyper-V > Hyper-V Platform in Windows Features.
- Restart and start the VM again.
Android Emulator says the virtualization extension is not enabled
The Android Emulator hypervisor driver (AEHD) needs VT-x or SVM and does not run alongside Hyper-V.
- Tick Windows Hypervisor Platform in Turn Windows features on or off.
- Restart the PC.
- Remove AEHD 2.1 or later with
sc stop aehdand thensc delete aehdin an administrator Command Prompt.
Windows Sandbox is missing from Windows Features
The PC does not meet the Sandbox requirements.
- Check that virtualization is enabled in firmware.
- Confirm at least 4 GB of RAM, 1 GB of free disk space and two CPU cores on an AMD64 or Arm64 processor.
- Reopen Turn Windows features on or off after a restart.
Hyper-V is missing from Turn Windows features on or off
Windows 11 Home cannot install the Hyper-V role, or the hardware lacks SLAT or VM Monitor Mode extensions.
- Check your Windows edition; Hyper-V needs Pro or Enterprise.
- Run
systeminfoand look for any No under Hyper-V Requirements. - Enable virtualization in firmware if that line reads No, then restart and check again.
Hardware virtualization in BIOS FAQ
Should I enable virtualization in BIOS?
Yes, if you use WSL 2, Hyper-V, Windows Sandbox, Docker Desktop, an Android emulator or memory integrity, because all of them need it. Many PCs ship with it already on. Turning it off also removes virtualization-based security such as memory integrity.
How to enable virtualization in Windows BIOS?
Open Settings > System > Recovery, select Restart now next to Advanced startup, then choose Troubleshoot > Advanced options > UEFI Firmware Settings > Restart. Set Intel Virtualization Technology or SVM Mode to Enabled, then save and exit the firmware.
Is virtualization enabled by default?
On many PCs, yes. ASUS ships Intel VT-x and AMD SVM Mode enabled by default, and Microsoft Surface devices always have virtualization on. On other PCs the extensions are turned off by default, which is why WSL 2 and Android emulators sometimes ask you to enable them in BIOS.
What is SVM mode in BIOS?
SVM Mode, short for Secure Virtual Machine, is the name AMD-based firmware uses for AMD Virtualization (AMD-V). Setting it to Enabled turns on hardware virtualization on AMD Ryzen and other AMD processors, the same way Intel Virtualization Technology does on Intel PCs.
Does disabling virtualization turn off memory integrity?
Yes. Memory integrity is a virtualization-based security feature that runs on the Windows hypervisor, and the hypervisor needs VT-x or AMD-V with SLAT. With virtualization disabled in firmware, memory integrity and Credential Guard cannot run.
Can VMware and Hyper-V run at the same time?
Yes, on current versions. VMware 15.5.5 and later and VirtualBox 6 and later can run on a PC with Hyper-V enabled. Older versions cannot share the virtualization extensions and either fail to start VMs or fall back to slower emulation.
How do I know if my CPU supports virtualization?
Open Task Manager, select Performance and read the Virtualization line. For Intel chips, look up the processor number on intel.com and open Specifications > Security & Reliability, which lists Intel Virtualization Technology support.
Why is virtualization greyed out in BIOS?
On ASUS laptops, Intel Trusted Execution Technology locks the Intel Virtualization Technology switch. ASUS says to set Intel Trusted Execution Technology to Disabled first, after which the virtualization option can be changed to Enabled or Disabled.
Can I enable virtualization on Windows 11 Home?
Yes. The VT-x or SVM switch lives in firmware, so you set it the same way on any Windows edition. Windows 11 Home cannot install the Hyper-V role, so Hyper-V does not appear in Turn Windows features on or off on that edition.