To create a ZIP file on a Mac, select the file or folder in Finder, Control-click it, and choose Compress. macOS creates the ZIP file in the same location using its built-in compression tools, so you do not need to download WinZip, 7-Zip, or another app.
You can use the same method to ZIP a single file, an entire folder, or several files at once. If you need a password-protected ZIP, macOS can also create one through Terminal.
This guide covers the fastest Finder method, ZIP files containing multiple items, password protection, Terminal commands, renaming ZIP archives, and fixes for common compression problems.
How to Create a ZIP File on Mac
Finder provides the quickest way to create a standard ZIP archive.
- Open Finder.
- Locate the file you want to compress.
- Control-click or right-click the file.
- Select Compress “[filename]”.
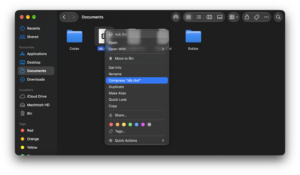
- Wait for macOS to create the ZIP file.
The new archive appears in the same folder as the original file and uses the same name followed by .zip.
For example:
Report.pdf
Report.pdf.zip
The original file remains untouched. Creating a ZIP makes a compressed copy rather than moving or deleting the source file.
How to ZIP a Folder on Mac
You can compress an entire folder without opening it or selecting the files inside individually.
- Open Finder.
- Locate the folder.
- Right-click or Control-click the folder.
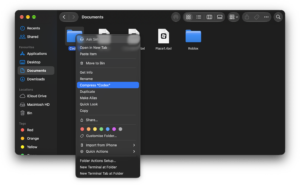
- Select Compress “[folder name]”.
macOS creates a ZIP file beside the original folder.
For example, compressing a folder called:
Project Filescreates:
Project Files.zipWhen another person extracts the archive, the files remain grouped inside the original folder structure.
How to ZIP Multiple Files on Mac
You do not need to place several files into a folder before creating a ZIP. Finder can compress multiple selected items directly.
- Open the folder containing the files.
- Hold Command and click each file you want to include.
- Right-click one of the selected files.
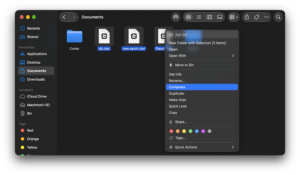
- Select Compress.
macOS creates a file named:
Archive.zipThe original files stay where they are.
How to select several files quickly
Use Command + A if you want to select everything in the current folder.
For a continuous group of files:
- Click the first file.
- Hold Shift.
- Click the last file.
For files that are not next to each other, hold Command while selecting them individually.
How to Rename a ZIP File on Mac
When you compress multiple items, macOS uses the generic name Archive.zip. You can rename it immediately.
- Select the ZIP file.
- Press Return.
- Enter the new name.
- Press Return again.
Keep the .zip extension at the end.
For example:
Archive.zipcan become:
Vacation Photos.zipHow to Create a Password-Protected ZIP File on Mac
Finder does not provide a password option when you click Compress. You can create an encrypted ZIP using the built-in Terminal instead.
Password-protect a single file
Open Terminal from Applications > Utilities, then use:
zip -e Protected.zip filename.pdfTerminal asks you to enter and verify a password. The password is not displayed while you type it.
Afterward, Protected.zip appears in the current Terminal folder.
Password-protect an entire folder
For a folder and everything inside it, add the recursive -r option:
zip -er Protected.zip "Private Files"The quotation marks are useful when the folder name contains spaces.
An easier way to enter long file paths
You do not have to type a complicated path manually. After typing the first part of the command, drag the file or folder from Finder into Terminal. macOS inserts its path automatically.
For example, type:
zip -e Protected.zip Then drag the file into the Terminal window and press Return.
Keep the password somewhere safe. The ZIP file does not contain a password-recovery mechanism. If you forget the password, you may not be able to recover the files from the encrypted archive.
How to Create a ZIP File on Mac Using Terminal
Terminal is useful when you want more control over the archive name, need encryption, or want to automate compression.
ZIP one file
zip documents.zip report.pdfZIP several files
zip documents.zip report.pdf notes.txt photo.jpgZIP an entire folder
zip -r documents.zip DocumentsThe -r option tells the ZIP command to include the folder and everything stored inside its subfolders.
Create a password-protected ZIP
zip -er documents.zip DocumentsYou normally do not need Terminal for ordinary compression. Finder is faster when all you need is a standard ZIP file.
Where Does a ZIP File Save on Mac?
When you use Finder, macOS saves the ZIP archive in the same location as the file or folder you compressed.
If you ZIP something on the Desktop, the ZIP appears on the Desktop. If you compress a folder in Downloads, the resulting ZIP appears in Downloads.
When using Terminal, the ZIP is saved in Terminal’s current working directory unless you specify another path.
You can check the current Terminal directory with:
pwdHow to Open a ZIP File on Mac
macOS can also extract ZIP files without additional software.
- Locate the ZIP file in Finder.
- Double-click it.
- Wait for macOS to extract the contents.
The extracted file or folder appears in the same location as the ZIP archive.
You can keep or delete the original ZIP afterward. Deleting the ZIP does not delete the extracted files.
Can You Create ZIP Files on Mac Without WinZip or 7-Zip?
Yes. macOS includes ZIP compression and extraction by default. Finder handles normal ZIP files, while Terminal provides additional options such as password protection and command-line compression.
You only need a third-party archive app when you require features that Apple’s built-in tools do not provide, such as working with certain uncommon archive formats or advanced encryption options.
Why Can’t I Create a ZIP File on Mac?
The Compress option is missing
Make sure you have selected an actual file or folder in Finder. Control-click the item and look for Compress in the shortcut menu.
You can also select the item and use the Finder menu at the top of the screen.
Mac says you do not have permission
You may not have permission to read or modify the selected file or its folder.
- Select the file or folder.
- Press Command + I.
- Expand Sharing & Permissions.
- Check the permission shown beside your account.
You generally need sufficient access to read the files and create the new ZIP archive in that location.
There is not enough storage space
A ZIP file still needs free disk space while macOS creates it. Large video folders, photo libraries, virtual machines, and other already-compressed files may also shrink very little.
Check available storage under System Settings > General > Storage, then free space or create the ZIP on another drive.
The ZIP file is barely smaller than the original
Some formats are already compressed. JPEG photos, HEIC images, MP4 videos, MP3 audio, DMG files, and many modern document formats may become only slightly smaller when added to a ZIP.
ZIP is still useful for these files when you want to combine several items into a single archive for uploading, emailing, or sharing.
The ZIP file will not open
Double-click the archive first. If macOS reports an error, make sure there is enough free storage to extract its contents.
If a ZIP received from another person still fails to open, the file may be incomplete or damaged. Download it again or ask the sender to create and send a new archive.
Frequently Asked Questions
What is the fastest way to create a ZIP file on Mac?
Right-click or Control-click the file or folder in Finder and select Compress. macOS creates the ZIP in the same location.
Does Mac have a built-in ZIP program?
Yes. ZIP compression and extraction are built into macOS, so you do not need to install another application for normal ZIP files.
How do I ZIP multiple files together on a Mac?
Select the files while holding Command, right-click one of the selected items, and choose Compress. macOS creates an Archive.zip containing all of them.
How do I ZIP an entire folder on Mac?
Right-click the folder and choose Compress “[folder name]”. The resulting ZIP contains the folder and its contents.
How do I create a password-protected ZIP on Mac?
Open Terminal and use the zip -e command for a file or zip -er for an entire folder. Terminal will ask you to create a password.
Can Finder create a password-protected ZIP?
No. Finder’s built-in Compress command does not provide a password field. Use Terminal or a suitable third-party archive utility when encryption is required.
Why does my Mac call the ZIP file Archive.zip?
macOS uses Archive.zip when you compress several selected items at once. You can rename the file afterward without affecting its contents.
Does creating a ZIP delete the original files?
No. macOS creates a separate ZIP archive and leaves the original files or folders unchanged.
Can Windows open a ZIP created on Mac?
Yes. Standard ZIP archives created by macOS can be opened using Windows File Explorer and most other operating systems.
Can I email a ZIP file from a Mac?
Yes. Create the ZIP and attach it to an email like any other file. Your email provider’s attachment-size limit still applies.
How do I unzip a file on Mac?
Double-click the ZIP file. macOS extracts its contents into the same folder automatically.
Can I make a ZIP file smaller on Mac?
The amount of compression depends on the files inside it. Text documents, spreadsheets, and some raw data can shrink considerably, while JPEG, HEIC, MP4, MP3, and other compressed formats usually shrink very little.




How to password protect a zip file – step by step guide - Techdows
[…] and it prompts for the password so nothing is saved in your command history. The same command can create a ZIP file on Mac without a password if you leave out […]