To enable Hyper-V in Windows 11 26H2, open Turn Windows features on or off, select Hyper-V, select OK and restart, or run Enable-WindowsOptionalFeature -Online -FeatureName Microsoft-Hyper-V -All in an administrator PowerShell window.
This guide covers every route on Windows 11 Pro and Enterprise, the hardware checks to run first, how to confirm Hyper-V is running, and how to turn it off again for VMware or VirtualBox.
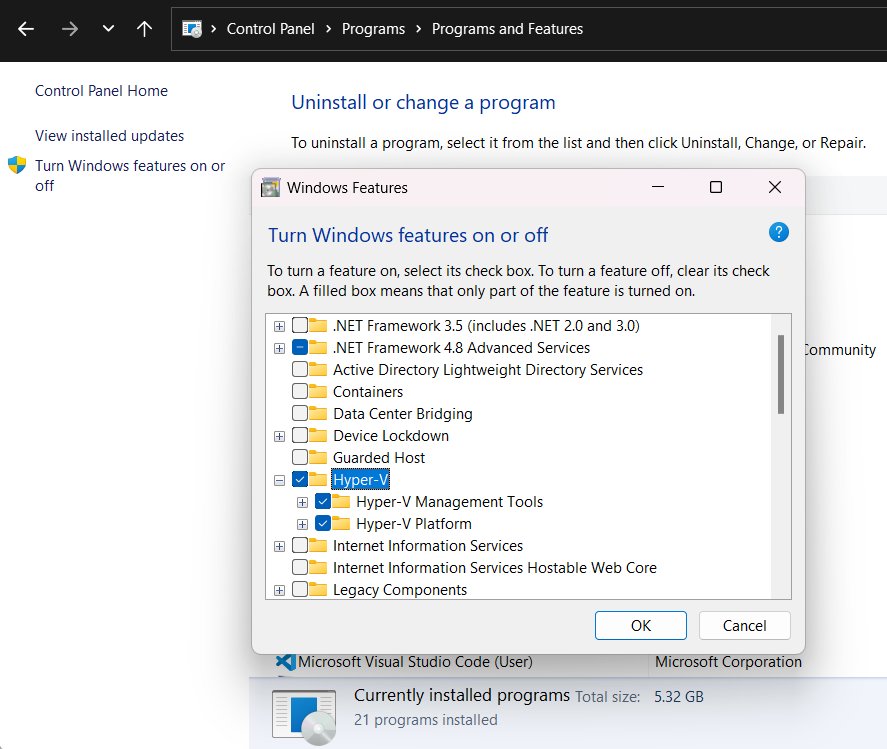
Enable or Disable Hyper-V in Windows Features
Hyper-V is built into Windows as an optional feature, so there is nothing to download. Microsoft's 26H2 feature list includes no Hyper-V change, so these steps match 24H2 and 25H2, and a PC still waiting to upgrade to 26H2 can enable Hyper-V now.
- Select Start, search for Control Panel and open it.
- Select Programs, then Programs and Features.
- Select Turn Windows features on or off.
- Select the Hyper-V checkbox, which includes Hyper-V Platform and Hyper-V Management Tools, then select OK.
- Restart the PC when prompted.
To disable it later, return to the same dialog, expand Hyper-V, expand Hyper-V Platform and clear Hyper-V Hypervisor, or clear Hyper-V entirely, then restart.
Which method should you use?
| Your situation | Use this | Why |
|---|---|---|
| You prefer clicking through menus | Windows Features dialog | Shows exactly which Hyper-V parts are on |
| You started in the Settings app | Taskbar search for Turn Windows features on or off | Microsoft's Windows 11 steps do not route Hyper-V through Settings |
| You script PC setup or manage several PCs | PowerShell Enable-WindowsOptionalFeature |
One command, prompts for the restart |
| You work in Command Prompt | DISM /Enable-Feature |
Built-in tool that works in Command Prompt or PowerShell |
| You run Windows 11 Home | Upgrade the edition first | Hyper-V cannot be installed on Windows 11 Home |
What you need before you start
| Requirement | Details |
|---|---|
| Windows edition | Windows 11 Pro or Enterprise; Hyper-V is not available on Windows 11 Home |
| Processor | 64-bit with second-level address translation (SLAT) and VM Monitor Mode extensions |
| Firmware | Hardware-assisted virtualization (Intel VT or AMD-V) turned on in BIOS or UEFI |
| Data Execution Prevention | Hardware-enforced DEP available and enabled (XD bit on Intel, NX bit on AMD) |
| Memory | At least 4 GB of RAM, plus enough for every VM you run at once |
| Account | Administrator rights; PowerShell and DISM commands fail without them |
Not sure of your edition? The 26H2 Home vs Pro comparison shows what Home lacks beyond Hyper-V.
Check whether your PC can run Hyper-V
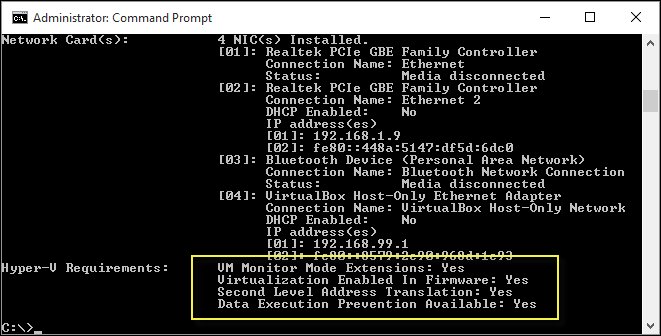
Run this before enabling anything. It reports each hardware requirement as Yes or No.
systeminfo.exeCollects system details, including a Hyper-V requirements section that lists SLAT, VM Monitor Mode extensions, firmware virtualization and Data Execution Prevention.
You should see: Every item under Hyper-V requirements reads Yes. If Hyper-V is already running, the section reads: A hypervisor has been detected. Features required for Hyper-V will not be displayed.
If any item reads No, turn on virtualization in your PC's firmware settings or check the processor against the requirements above.
Enable or Disable Hyper-V in Settings
The Settings app has no Hyper-V switch. Settings > System > Optional features manages Features on Demand such as language resources, and Microsoft's Windows 11 instructions enable Hyper-V through the Windows Features dialog instead. The quickest way there is a search from the taskbar.
- Select the search box on the taskbar.
- Type Turn Windows features on or off and open the result.
- Select Hyper-V to enable it, or clear it to disable it.
- Select OK.
- Restart the PC when prompted.
Enable or Disable Hyper-V in PowerShell
Select Start, type Windows PowerShell, right-click it and select Run as Administrator. The commands fail in a normal window.
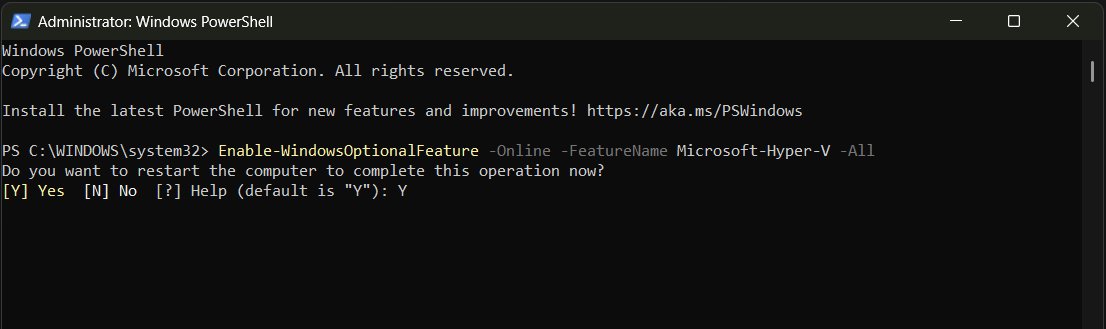
Enable-WindowsOptionalFeature -Online -FeatureName Microsoft-Hyper-V -All-Online targets the running copy of Windows, -FeatureName Microsoft-Hyper-V selects Hyper-V, and -All also enables the parent features it depends on.
You should see: PowerShell asks to restart; enter Y. After the restart, Hyper-V Manager appears in the Start menu.
To disable the hypervisor, run Disable-WindowsOptionalFeature -Online -FeatureName Microsoft-Hyper-V-Hypervisor in the same administrator window and restart.
Enable or Disable Hyper-V in Command Prompt
DISM, the Deployment Image Servicing and Management tool, enables Windows features while Windows is running. Open Command Prompt or Windows PowerShell with Run as Administrator first.
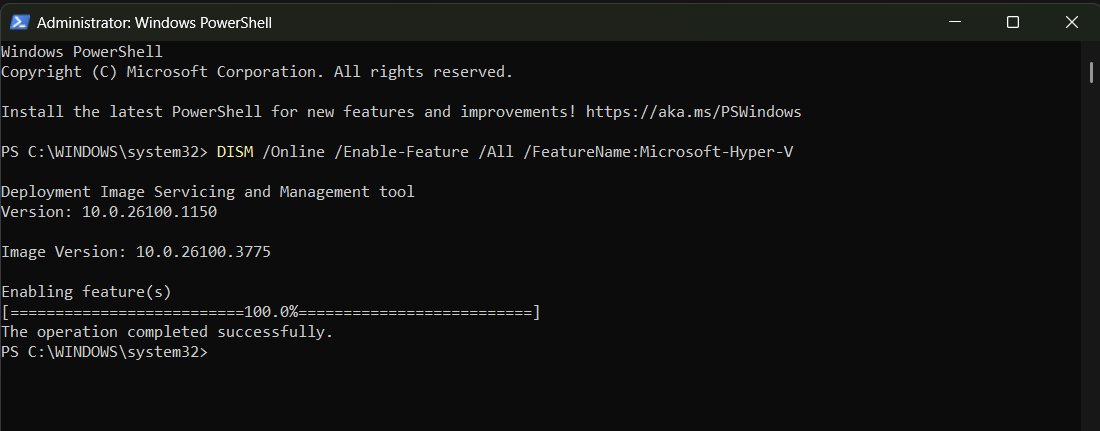
DISM /Online /Enable-Feature /All /FeatureName:Microsoft-Hyper-V/Online targets the running system, /Enable-Feature turns the feature on, /All enables its parent features, and /FeatureName names Hyper-V.
You should see: DISM reports that the feature is enabled and The operation completed successfully. Restart to finish.
To disable the hypervisor from Command Prompt, run DISM /Online /Disable-Feature /FeatureName:Microsoft-Hyper-V-Hypervisor and restart.
How to check Hyper-V is running
- Select Start, type Hyper-V Manager and confirm it opens.
- In the search box, type msinfo32.exe and select System Information.
- In the Details pane, look for A hypervisor has been detected. Features required for Hyper-V will not be displayed.
- In an administrator PowerShell window, run
Get-WindowsOptionalFeature -Online -FeatureName Microsoft-Hyper-Vand check that the state reads Enabled.
Checking the Windows version itself is covered in how to confirm 26H2 is installed.
Create your first virtual machine
You need membership in the local Administrators or Hyper-V Administrators group, enough free memory and disk space, and an .iso file if you want to install an operating system.
- Select Start, type Hyper-V Manager and open it.
- In the left pane, under Hyper-V Manager, select your PC.
- In the Actions pane, select New, then Virtual Machine, and select Next.
- Enter a name on Specify Name and Location, then choose Generation 2 on Specify Generation unless you need Generation 1.
- Set the startup memory on Assign Memory, and pick a virtual switch on Configure Networking or skip it for now.
- On Connect Virtual Hard Disk, select Create a virtual hard disk and set its size.
- On Installation Options, select Install an operating system from a bootable image file, browse to your .iso and select Finish.
A Windows 11 guest must be Generation 2 with Secure Boot and a virtual TPM enabled. The 26H2 ISO download gives you official install media for it, and the 26H2 system requirements cover the rest.
Fix Hyper-V when it will not enable or run
Hyper-V is missing from Turn Windows features on or off
The PC runs Windows 11 Home, where Hyper-V cannot be installed.
- Check the edition in Settings > System > About.
- Upgrade to Windows 11 Pro if you need Hyper-V.
Only Windows Hypervisor Platform is listed, not Hyper-V
Microsoft says the PC might not be compatible with Hyper-V.
- Run
systeminfo.exeand read the Hyper-V requirements section. - Turn on hardware virtualization in the firmware if it reads No.
- Confirm the processor supports SLAT and that DEP is enabled.
PowerShell or DISM returns an error
The window is not elevated.
- Close the window.
- Right-click Windows PowerShell or Command Prompt and select Run as Administrator.
- Run the command again and restart when asked.
VMware or VirtualBox VMs will not start, or run slowly, after enabling Hyper-V
Only one component at a time can use the processor's virtualization extensions; this is by design.
- Decide which virtualization app you need on this PC.
- To use the third-party app, clear Hyper-V Hypervisor under Hyper-V > Hyper-V Platform in Windows Features, or run the disable command above.
- Restart the PC.
- Note that Microsoft lists Memory Integrity and Credential Guard as features that depend on Hyper-V.
Problems that started with the 26H2 update itself
A version-wide issue rather than Hyper-V.
- Check the 26H2 known issues list for your symptom.
- Install the latest cumulative update from Settings > Windows Update.
Frequently asked questions
How do I enable Hyper-V in Windows 11 26H2?
Open Turn Windows features on or off, select Hyper-V and select OK, then restart. Alternatively run Enable-WindowsOptionalFeature -Online -FeatureName Microsoft-Hyper-V -All in an administrator PowerShell window. The steps are the same as on 25H2.
Can I enable Hyper-V on Windows 11 Home?
No. Microsoft states the Hyper-V role cannot be installed on Windows 11 Home. You need Windows 11 Pro or Enterprise, so upgrade the edition first if you want Hyper-V virtual machines.
Do I need to download Hyper-V?
No. Hyper-V is built into Windows 11 Pro and Enterprise as an optional feature, and there is no separate Hyper-V download. Turning the feature on installs everything, including Hyper-V Manager.
Did Windows 11 26H2 change Hyper-V?
Microsoft's What's new page lists no Hyper-V change among the 26H2 new features. The enable and disable steps, requirements and feature names are the same as on Windows 11 24H2 and 25H2.
How do I check if my CPU supports Hyper-V?
Run systeminfo.exe in Command Prompt or PowerShell and scroll to the Hyper-V requirements section. If every item reads Yes, the PC can run Hyper-V. Any No points to a missing processor feature or a firmware setting.
Can VMware or VirtualBox run with Hyper-V turned on?
Not reliably. Microsoft says third-party virtualization apps cannot run alongside Hyper-V because only one component can use the processor's virtualization extensions. VMs might not start or might fall back to a slower emulated mode.
Does enabling Hyper-V need a restart?
Yes. Windows Features prompts you to restart when installation completes, and PowerShell asks you to enter Y to restart. Hyper-V is not active until the PC restarts.
Bottom line
On Windows 11 26H2 Pro or Enterprise, run systeminfo.exe to confirm the hardware checks pass, then enable Hyper-V from Windows Features or with one PowerShell command and restart. Hyper-V ships inside Windows, 26H2 changed nothing about it, and the only real blockers are the Home edition, disabled firmware virtualization, and conflicts with third-party virtualization apps.