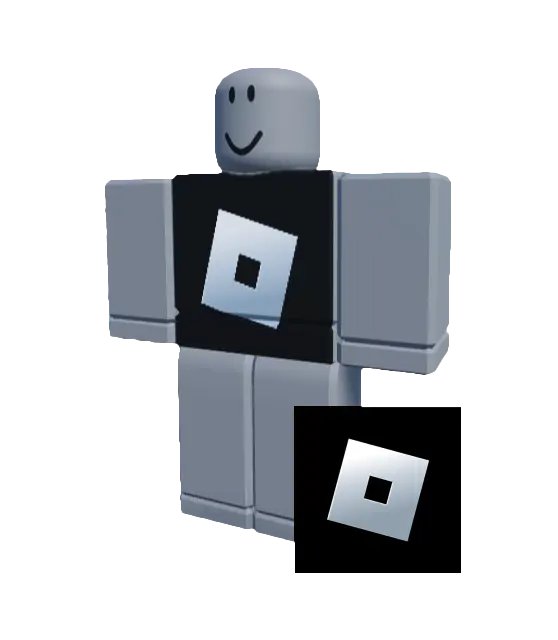
To make a classic T-shirt on Roblox, design a square image such as 512 x 512 pixels, then upload it from the Creator Dashboard under Avatar Items > Classics with the asset type set to T-Shirt.
This guide covers the image, a free test in Roblox Studio, the 80 Robux upload fee, the ID and membership rules for selling, moderation, and fixes for designs that look wrong.
Make a Roblox classic T-shirt in six steps
This is the whole process for a verified account. Each step has its own section below with the detail.
- Create a square image of your design, for example 512 x 512 pixels, and export it as a .png or .jpg file.
- Optionally test it on a blocky rig in Roblox Studio, which costs nothing.
- Open the Creator Dashboard and go to Avatar Items, then the Classics tab.
- Drag your image into the upload box, or click Upload Asset.
- Set Asset Type to T-Shirt, fill in Name and Description, and click Upload to pay the 80 Robux fee.
- After moderation approves it, open the item, turn on On Sale and set a price.
What you need to make a classic T-shirt
| Requirement | Why you need it |
|---|---|
| An image editor | Any editor that exports .png or .jpg works, even the classic MS Paint app; a classic T-shirt is a single flat image |
| A web browser | Uploads and sale settings happen on the Creator Dashboard |
| Roblox Studio (optional) | Lets you preview the design on a test character before paying anything |
| Government ID verification, or a linked parental account with ID verification | Required before Roblox accepts any avatar item upload |
| 80 Robux | The upload fee charged for each submission |
| 2-step verification and Roblox Plus or Premium 1000/2200 | Only needed to publish the T-shirt for sale and keep it on sale |
If Studio or the Roblox app behaves oddly while you test, update Roblox on Windows or Mac before you continue.
Classic T-shirt versus classic Shirt
Roblox has three classic clothing types: T-shirts, Shirts and Pants. Pick the type before you draw, because each uses a different image format.
| Your goal | Choose | Image format |
|---|---|---|
| A logo or picture on the chest | Classic T-shirt | Any square image, such as 512 x 512 pixels; no template |
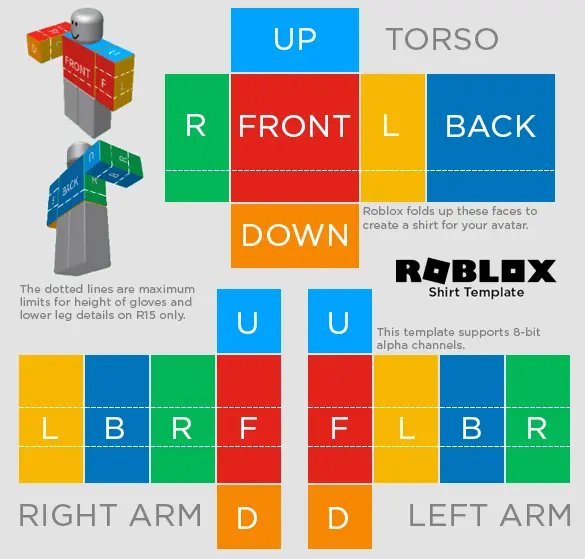
| Full sleeves, back and sides of the torso | Classic Shirt | Roblox's Shirt template, with fixed regions for front, back, sides and arms |
| Trousers, shorts or shoes | Classic Pants | Roblox's Pants template, covering the torso and legs |
In the Shirt and Pants templates, the front and back are 128 x 128 pixel squares, the torso sides are 64 x 128, and the top and bottom panels are 128 x 64. A classic T-shirt ignores all of that and shows only on the front torso of a blocky character.
Step 1: Create the T-shirt image
- Open a new square canvas in your image editor, for example 512 x 512 pixels.
- Draw or place your design in the canvas; this image is what appears on the chest.
- Keep important detail away from the very edges, so nothing reads as cut off on the torso.
- Keep text short; the Marketplace policy rejects items with excessive text.
- Use only artwork you made or have permission to sell; Roblox branding and other creators' work are not allowed.
- Export the finished file as .png or .jpg.
Step 2: Test the design in Roblox Studio
Testing in Roblox Studio is free and is the only way to preview the design on a character before you pay the upload fee.
- Open Roblox Studio and a place to work in.
- On the Avatar tab of the toolbar, click Character.
- Choose a Block Avatar rig type; a mannequin named Rig appears in the 3D workspace.
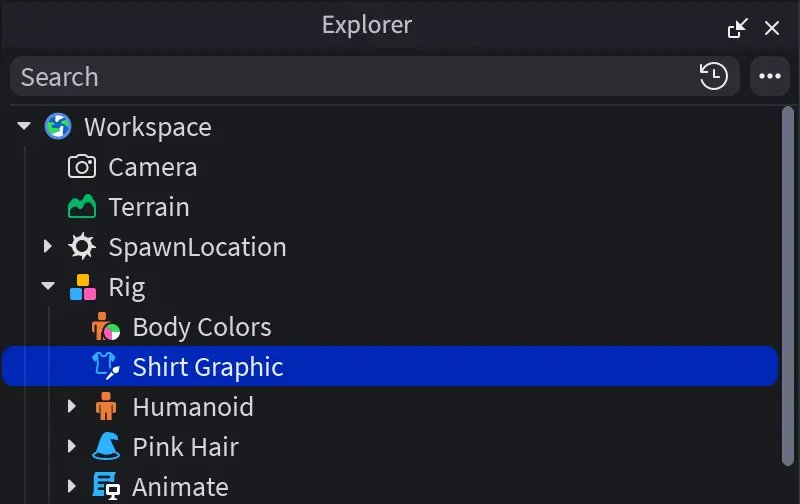
- In the Explorer window, hover over Rig, click the ⊕ button and insert a ShirtGraphic object.
- Select the new ShirtGraphic under Rig.
- In the Properties window, click inside the Graphic row and select your image; the design appears on the rig's chest.
The Graphic property takes an image that is already on your Roblox account. Check the edges and the centring on the rig now, because Roblox does not let you replace the image of an uploaded item.
Step 3: Upload the classic T-shirt
- Sign in to the Roblox Creator Dashboard in your browser.
- Go to Avatar Items, then select the Classics tab.
- Drag and drop your image into the upload box, or click Upload Asset and choose the file on the next page.
- On the Upload Asset page, set the Asset Type dropdown to T-Shirt.
- Fill in Name and Description with words a buyer would search for.
- Click Upload at the bottom of the page and confirm the 80 Robux fee.
The item then enters the moderation queue. Upload fees are generally not refunded if moderation rejects the item.
Current Roblox upload and publishing requirements
Uploading and selling are separate stages with separate rules. You can upload with ID verification alone, but listing the T-shirt for sale needs more.
| Stage | Account requirement | Cost in Robux |
|---|---|---|
| Upload from Studio or the Creator Dashboard | Government ID verification or a linked parental account | 80 per submission, generally not refunded on rejection |
| Publish to the Marketplace | ID verification or parental link, 2-step verification, and Roblox Plus or Premium 1000/2200 | 10 publishing advance for a classic T-shirt, paid back as rebates from sales |
| Keep the item on sale | Roblox Plus or Premium 1000/2200 on the creator or group owner | None |
| Take it off sale and back on | Same as publishing | No second publishing advance |
On a Marketplace sale the creator earns 30% at the price floor, rising with a higher price up to 70% at six times the floor. On an in-game sale the creator gets 30% and the game owner 40%, and every sale is held in escrow for 30 days. You can follow your Roblox transaction history in the My Transactions report on the Creator Dashboard.
Step 4: Wait for moderation and configure the item
- Open the Creator Dashboard and go to Avatar Items > Classics.
- Use the Classic Type dropdown to filter the list to T-shirts.
- Click your T-shirt to open its Configure page and check its moderation status.
- Edit Item Name and Item Description if needed; these are public.
- Once the item is approved, turn on On Sale so users can buy it on the Marketplace.
- Set a price in Robux and save.
How to check your Roblox T-shirt is live
- Confirm the item shows as approved on its Configure page.
- Check that On Sale is on and the price is the one you set.
- Open the Marketplace and search for the item name you gave it.
- Put the T-shirt on a blocky avatar and confirm the design sits on the front of the torso.
Fixes for common Roblox classic T-shirt problems
A template or image-size error on upload
The asset type is set to Shirt or Pants, which expect Roblox's clothing template, or the image is not the right format.
- Check that Asset Type is set to T-Shirt on the Upload Asset page.
- Crop the image to a square, such as 512 x 512 pixels.
- Export it again as .png or .jpg and upload that file.
The design only appears on the front
This is how classic T-shirts work: they display on the front torso only.
- Decide whether the back and sleeves matter for this design.
- If they do, make a classic Shirt from Roblox's Shirt template instead.
- Test the Shirt in Studio by inserting a Shirt object and setting its ShirtTemplate property.
The T-shirt is missing on some avatars
Many user-generated avatar bodies on the Marketplace do not support 2D classic clothing.
- Try the T-shirt on a blocky avatar to confirm the item itself works.
- Tell buyers in the description that it is a classic 2D item.
- For full support on modern bodies, create a 3D layered clothing item instead.
The upload succeeded, but the item is not for sale
Uploading only places the item in moderation; publishing is a separate step with extra account requirements.
- Open the item's Configure page and confirm moderation has approved it.
- Turn on 2-step verification on your Roblox account.
- Make sure the account has Roblox Plus or Premium 1000/2200.
- Turn on On Sale, set a price and save.
The item was rejected by moderation
The image, name or description broke the Marketplace policy or Community Standards, for example with excessive text, Roblox branding or someone else's artwork.
- Check the design, name and description against the Marketplace policy.
- If you believe the decision is wrong, file an appeal with Roblox moderation.
- Otherwise, fix the design and upload it again; the new upload costs another 80 Robux.
Roblox classic T-shirt FAQ
How do I make a classic T-shirt in Roblox in 2026?
Design a square image, such as 512 x 512 pixels, and export it as .png or .jpg. In the Creator Dashboard go to Avatar Items, then Classics, upload the image, set Asset Type to T-Shirt and pay the 80 Robux fee.
Do I need the Roblox Shirt template for a classic T-shirt?
No. A classic T-shirt is any square image and needs no template. The template is only for classic Shirts and Pants, which wrap around the torso, arms and legs and have fixed regions for each side.
What size should a Roblox classic T-shirt be?
Use a square image. Roblox gives 512 x 512 pixels as an example size. Export it as a .png or .jpg file, and test it on a blocky rig in Roblox Studio to check the fit before you upload.
How much does it cost to upload a classic T-shirt?
Uploading costs 80 Robux per submission, and the fee is generally not refunded if moderation rejects the item. Putting it on sale adds a 10 Robux publishing advance, which Roblox pays back as rebates from your sales.
Can I sell a classic T-shirt without Premium?
No. You can upload with ID verification or a linked parental account, but publishing to the Marketplace and keeping an item on sale needs Roblox Plus or Premium 1000/2200, plus 2-step verification on the account.
Why does my T-shirt not show on every Roblox avatar?
Classic T-shirts are 2D items that display on the front torso of a blocky character. Many user-generated avatar bodies on the Marketplace do not support 2D classic clothing, so the design does not appear on them.
Where do I upload a classic T-shirt?
Upload it on the Roblox Creator Dashboard. Open Avatar Items, select the Classics tab, and drag your image into the upload box or click Upload Asset. Set the Asset Type to T-Shirt before you click Upload.
How do I make classic shirts on Roblox?
Download Roblox's Shirt template, paint your design into its front, back, side and arm regions, and export it as .png or .jpg. Upload it the same way as a T-shirt, but set Asset Type to Shirt instead.
Is it free to test a Roblox T-shirt?
Yes. Testing in Roblox Studio costs nothing. Add a Block Avatar rig from the Avatar tab, insert a ShirtGraphic object under it, and set the Graphic property to your image to see the design on the chest.
The bottom line on Roblox classic T-shirts
Test every design on a blocky rig in Roblox Studio before you pay the 80 Robux upload fee, and set up ID verification, 2-step verification and Roblox Plus or Premium first if you plan to sell. The fee is generally lost if moderation rejects the item, an uploaded image cannot be replaced, and selling needs account requirements that uploading does not.