To make a worksheet in Word, open a blank document, set the margins on the Layout tab, type a title with name and date lines, build the questions inside a table, and add answer lines or check boxes before you save and print.
This guide walks through each stage on Word for Windows, from planning the page to sharing a PDF or a reusable template, with notes for Mac and Word for the web where they differ.
How to make a worksheet in Word in ten steps
These steps produce a printable worksheet in Word for Microsoft 365 on Windows. Each step is expanded in the numbered sections below.
- Open Word and select Blank document.
- Select Layout > Margins and pick a margin preset, or Custom Margins to type your own values.
- Type the worksheet title on the first line, then add a line such as
Name: ________ Date: ________underneath. - Type one line of instructions that tells students what to do and how to answer.
- Select Insert > Table and drag across the grid to create a two-column table for questions and answers.
- Type each question in the left column and leave the right column empty for answers.
- Select Insert > Pictures > This Device to add a diagram or picture where a question needs one.
- Select Review > Spelling & Grammar and fix every flagged issue.
- Select File > Print and page through the preview to check the layout.
- Select Print, or save the file as a PDF to share it digitally.
Make a worksheet in Word, Excel, Google Docs, Canva or PowerPoint
Word is the simplest choice for a printed handout with questions and written answers. The other apps suit different kinds of worksheet.
| Your worksheet | Best app | Why |
|---|---|---|
| Printed questions with answer lines, fill-in-the-blanks or multiple choice | Word | Tables, borders and answer lines are quick to build, and the page prints exactly as it looks |
| Calculations, number drills or data that students sort | Excel | In Excel a worksheet is a grid of cells that can hold numbers and formulas |
| A worksheet several teachers edit together online | Google Docs or Word for the web | Both edit in the browser and share by link |
| A picture-heavy design for young learners | Canva or PowerPoint | Free placement of shapes and images suits layouts that are mostly graphics |
| A worksheet students fill in on a computer | Word with content controls | Check boxes, text fields and drop-down lists can be clicked and typed into |
1. Understanding the purpose and planning your worksheet
Decide what the worksheet must prove before you open Word. The goal decides which question types, answer spaces and layout you need.
Write the learning goal in one sentence, then pick the matching layout from the table.
| Worksheet purpose | Question type | Layout to build in Word |
|---|---|---|
| Practice a skill, such as 4-digit addition | Short numeric problems | A table with one problem per cell, several columns across the page |
| Check reading or vocabulary | Fill-in-the-blank or matching | Sentences with underscore blanks, or a two-column matching table |
| Quick quiz or exit ticket | Multiple choice | A table with the question in one row and options A to D below it |
| Reflection, such as a "find your why" worksheet | Open questions | Each prompt followed by several ruled answer lines |
| Science or geography labelling | Diagram labels | A picture with numbered callouts and a numbered answer table |
Sketch the order of sections on paper: header, instructions, questions, then any extension task. Keep one skill or topic per worksheet so it fits on one or two pages.
2. Setting up your document
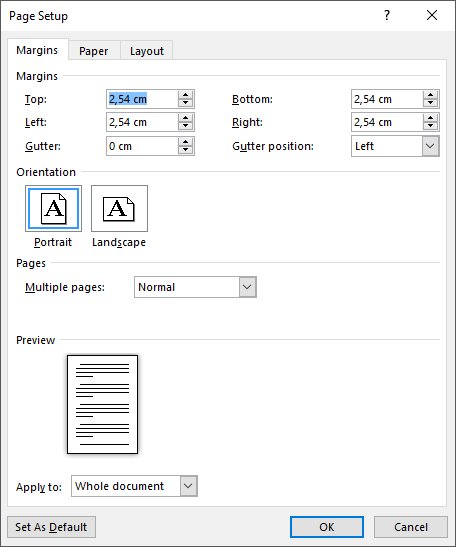
Set the page before you add content, because changing margins or orientation later moves tables and pictures. Check that the page size matches the paper loaded in your printer, such as Letter or A4.
- Open Word and select Blank document on the start screen.
- Select Layout > Margins and choose a preset from the list.
- For your own values, select Layout > Margins > Custom Margins, enter the margins and select OK.
- Select Layout > Orientation and choose Portrait or Landscape.
- Select File > Save As, pick a folder and give the worksheet a clear name before you start typing.
Narrow margins leave more room for answer lines. Landscape suits wide tables, such as a matching exercise with long text on both sides. On a Mac the same Layout > Margins > Custom Margins route applies, and Word for the web uses Page Layout > Margins.
3. Designing your worksheet header
The header tells students what the worksheet is and gives them a place for their name. Put the title and name line in the page body, and put repeating details such as the class or page number in the Word header or footer.
- Type the worksheet title on the first line and apply the Title or Heading 1 style from the Home tab.
- Press Enter and type
Name:followed by a row of underscores, thenDate:andClass:with their own blanks. - Add a one-line subtitle with the subject, unit or week if students keep many worksheets.
- Select Insert > Header or Footer and choose a style.
- Type the school, teacher name or page number text in the header or footer area.
- Select Close Header and Footer, or press Esc, to return to the page body.
Header and footer text repeats on every page, so a two-page worksheet keeps its class name and page number without retyping. To add a school logo to the header, click inside the header area and insert the picture there.
4. Using tables to structure your worksheet
Tables keep questions, options and answer boxes lined up on the printed page. They are the most reliable way to stop text from shifting when someone opens the file on another PC.
- Click where the questions should start.
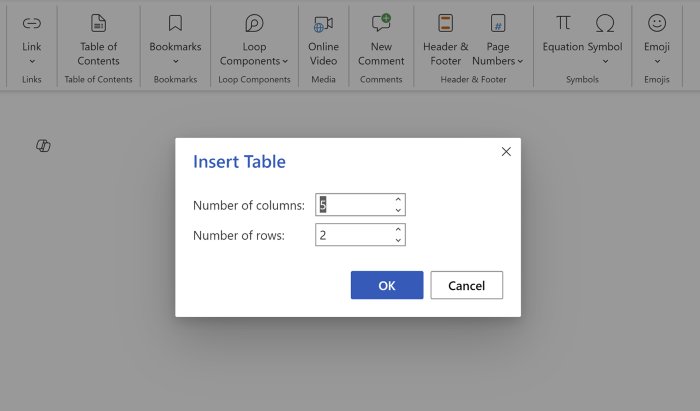
- Select Insert > Table and move the pointer across the grid to highlight the columns and rows you need, then click.
- For a larger table, select Insert > Table > Insert Table, enter the number of columns and rows and select OK.
- To build a multiple-choice question, create a table with one row for the question and one row per option, labelled A, B, C and D.
- Click inside the table and use the Table Design tab to pick a style or shading, and the Table Layout tab to add or remove rows and columns.
- To turn questions you already typed into a table, separate the parts with tabs, select the text and choose Insert > Table > Convert Text to Table, then OK.
In the single-line ribbon, these tools sit together on one Table tab instead of Table Design and Table Layout. A table with borders turned off still keeps everything aligned, so you can hide the grid on a clean-looking worksheet.
5. Adding content: questions, instructions, and multimedia
Write the instructions first, then the questions, then add pictures or charts only where a question needs them.
- Type a short instruction above each section, such as "Circle the correct answer" or "Write your answer in a full sentence".
- Select the questions and choose Home > Numbering so Word numbers them and renumbers them when you add or remove one.
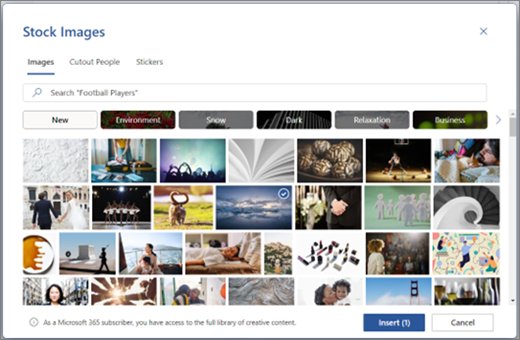
- To add a picture, select Insert > Pictures and choose This Device, Stock Images or Online Pictures, then select the image and Insert.
- Select the picture and pick a text wrapping option other than In Line with Text if you want to drag it freely on the page.
- To add a graph for a data question, select Insert > Chart, choose a chart type and double-click the chart you want.
- Replace the sample values in the spreadsheet that opens with your own data, then close the spreadsheet.
- Use the Chart Elements, Chart Styles and Chart Filters buttons beside the chart to add axis titles, change colors or hide data.
Only use pictures you have the right to reuse in class. In Word for the web, the picture options are This device, OneDrive, Stock Images and Search on Web under Insert > Picture.
6. Formatting for readability and visual appeal
Formatting should help a student find the next question, not decorate the page. Use one font family, two or three sizes, and color only where it marks a section.
| What to change | Where in Word | Good setting for a worksheet |
|---|---|---|
| Font styles and sizes | Home tab, Font group | A plain font, larger for the title and slightly larger body text for young readers |
| Line spacing and paragraph spacing | Home > Line and Paragraph Spacing > Line Spacing Options | Extra space after each question so answers have room |
| Colors and shading behind text | Home > Paragraph group > arrow next to Shading | A light theme color behind section titles; dark shading wastes printer ink |
| Borders and lines around text | Home > Paragraph group > Borders > Borders and Shading | A thin box around an instruction or a word bank |
| Page border | Design > Page Borders | A simple border for younger classes; select Options to change its distance from the edge |
| Creating sections | Layout > Breaks | A Next Page break to start part two on a fresh page, or Continuous to change layout on the same page |
Theme colors change when the document theme changes, while Standard Colors stay fixed. Pick standard colors if the worksheet must look the same everywhere. A page border applies to a whole section, so a single bordered page needs its own section break.
7. Creating answer spaces and response areas
Every question needs a visible place for the answer, sized to the answer you expect. Pick the response area by question type.
| Answer type | How to build it in Word | Tip |
|---|---|---|
| Short word or number | Type underscores with Shift + – after the question | Keep blanks the same length so the length does not hint at the answer |
| Several lines of writing | Insert a one-column table with one row per line, then use Borders and Shading to keep only horizontal lines | Rows stay evenly spaced when you edit the questions above |
| Boxed answer area | A one-cell table, with its row height increased by dragging the bottom border | Good for drawings, working out or math steps |
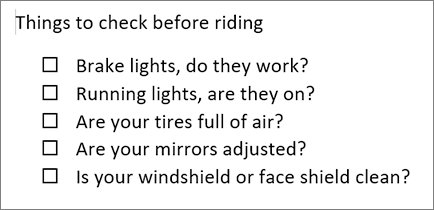
| Tick boxes on a printed sheet | Home > arrow next to Bullets > Define New Bullet > Symbol, then pick a box character from Wingdings or Segoe UI Symbol | Each new line in the list starts with an empty box |
| Clickable tick boxes on screen | Developer > Check Box Content Control, then copy and paste it to each line | Clicking the box marks it with an X |
| Matching exercise | A three-column table: items, an empty answer column, then the options | Shuffle the options so rows do not line up with the answers |
The Developer tab is hidden by default. Show it with File > Options > Customize Ribbon, tick Developer and select OK.
8. Finalizing and saving your worksheet
Check spelling and wording before you save, because a typo on a class set of 30 copies costs paper and time.
- Select Review > Spelling & Grammar, or press F7 to open the Editor pane.
- Correct, ignore or skip each issue Word lists, then select OK when the check finishes.
- Read every question once as a student would and confirm each one has an answer space.
- Select File > Save to keep the editable .docx version.
- To reuse the layout, select File > Save As and save a copy as a template (.dotx) in the Custom Office Templates folder.
- To start the next worksheet from it, select File > New and choose your template category.
A template keeps the header, margins, styles and table layout, so each new worksheet only needs new questions. To change the template itself, open it from the Custom Office Templates folder in Documents with File > Open.
9. Printing or distributing your worksheet
Print a single test copy first, then the class set. For digital distribution, a PDF keeps the layout identical on every device.
- Select File > Print and use the arrows under the preview to check every page.
- Choose the printer and enter the number of copies in the print pane.
- To print only part of the worksheet, open Print All Pages under Settings and choose Print Current Page or Custom Print with a range such as
1-2. - Select Print.
- To share a PDF, select File > Save a Copy (or Save As), select Browse, choose PDF in the file type list and select Save.
- To share an editable copy, send the .docx file or upload it to OneDrive or your class platform.
Under More Options > Options in the PDF save dialog you can set a page range or encrypt the PDF with a password. In Word for the web, use File > Export > Download as PDF instead.
Check a Word worksheet in print preview before printing
Print preview shows the worksheet exactly as the printer will produce it, including anything pushed past the margins.
- Select File > Print and page through the preview with the arrows at the bottom.
- Use the zoom slider at the bottom to read small text and blank lines.
- Confirm no table row or question is split across two pages; if one is, place a page break before it with Insert > Page Break.
- Confirm the header, name line and page numbers appear on every page they should.
- Check that pictures and charts sit next to the questions that refer to them.
- Print one copy and write an answer in every space to confirm each one is large enough.
10. Tips and best practices for making effective worksheets
| Practice | Why it helps |
|---|---|
| One clear instruction per section | Students start working without asking what to do |
| Questions ordered from easy to hard | Early success keeps weaker readers going |
| Plenty of white space | Crowded pages are harder to read and harder to mark |
| Consistent numbering and answer positions | Marking is faster when every answer sits in the same column |
| An answer key saved as a separate copy | Fill in the answers in a copy with File > Save As so the student version stays blank |
| Readable text at arm's length | Test-print one page and read it at desk distance |
| Turning a worksheet into a game | Number the questions to match a bingo card, a board-game track or a scavenger-hunt clue |
11. Advanced features and tips
These Word features save time once the basic worksheet works.
| Feature | Where to find it | Use on a worksheet |
|---|---|---|
| Fill-in fields students type into | Developer > Plain Text Content Control | Answer boxes for a worksheet completed on screen |
| Drop-down answers | Developer > Drop-Down List Content Control, then Properties > Add | Multiple choice that can be answered on a computer |
| Lock everything except the answers | Review > Restrict Editing, then Yes, Start Enforcing Protection | Stops students from editing the questions |
| Different layout for one part | Layout > Breaks > Continuous or Next Page | A landscape page for a wide table inside a portrait worksheet |
| Landscape for selected content only | Layout > Page Setup dialog > Landscape, Apply to > Selected text | One wide chart page without changing the rest |
| Draw a table by hand | Insert > Table > Draw Table | Uneven grids such as a crossword or a labelled diagram |
| Reusable starting point | Save a copy as a template (.dotx) | The same header and layout for a whole unit |
Content controls work in the Word desktop app; Word for the web cannot create them. You can make the Word document fillable with text fields, check boxes and drop-down lists, then lock it so only the answer fields can change. If a shared worksheet arrives locked, you can make a Word document editable again before you reuse it.
Making worksheets in Word FAQ
How do I make a worksheet in Word?
Open a blank document, set the margins on the Layout tab, and type a title with name and date lines. Build the questions in a table from Insert > Table, add answer lines or check boxes, check spelling with F7, then save and print or export a PDF.
How do I make a fillable worksheet in Word?
Show the Developer tab from File > Options > Customize Ribbon, then insert Plain Text, Check Box or Drop-Down List content controls where answers go. Lock the questions with Review > Restrict Editing so students can only fill in the fields.
How do I make a worksheet for students?
Start from one learning goal and pick a question type that tests it. Put a name and date line at the top, one clear instruction per section, and questions ordered from easy to hard, with an answer space sized to each expected answer.
How do I make my own worksheet from scratch?
Plan the questions on paper first, then build the page in Word with a header, instructions, a question table and answer spaces. Save it as a template (.dotx) so your next worksheet starts with the same layout.
What is the purpose of a worksheet?
A worksheet gives students structured practice on one skill or topic and gives the teacher evidence of what each student understands. The answer spaces turn the questions into a record that can be marked and reviewed.
Can I make a worksheet in Google Docs instead of Word?
Yes. Google Docs also has tables, images and page settings, so the same plan of header, instructions, question table and answer lines works there. Word gives more layout control, check box content controls and template files for printed worksheets.
How is a worksheet in Excel different from a worksheet in Word?
In Excel, a worksheet is a grid of cells inside a workbook, built for numbers and formulas. In Word, a worksheet is a printed handout of questions and answer spaces. Use Excel for calculation drills and Word for written questions.
Can I make a worksheet in PowerPoint or Canva?
Yes. Both suit picture-heavy worksheets because you can place shapes and images anywhere on the slide or page. For text questions with neat answer lines and tables, Word is quicker and prints more predictably.
Can you make an addition worksheet for 4-digit numbers in Word?
Yes. Insert a table with several columns, type one problem per cell with the numbers right-aligned and a bottom border under the second number. Leave a blank row beneath each problem for the answer, then print.
How do I turn a worksheet into a game?
Number the worksheet questions and link them to a game format, such as a bingo card whose squares hold the answers, a board-game track, or scavenger-hunt clues. Students answer a question to earn a move or mark a square.
Conclusion: is Word the best tool for making worksheets?
Use Word for printed worksheets with written questions: build the questions in tables, add sized answer spaces, check the print preview, and save the finished layout as a template. Tables keep every question and answer box aligned, the print preview matches the printed page, and a .dotx template turns the next worksheet into a few minutes of typing new questions.
Every tool used here sits on the Insert, Layout, Home and Review tabs of the Word ribbon, so a worksheet needs no add-ins.


![How to enable DLNA media server in Windows 11 [solution]](https://techdows.com/wp-content/uploads/2026/10/Windows-11-Network-folder-banner-offering-to-turn-on-network-discovery.jpg)