To add members to a distribution list in classic Outlook, select People, double-click the contact group, select Add Members, pick the people, select OK, then select Save & Close.
This guide covers adding and removing members in every Outlook app, plus company distribution groups and Microsoft 365 Groups that only owners or admins can change.
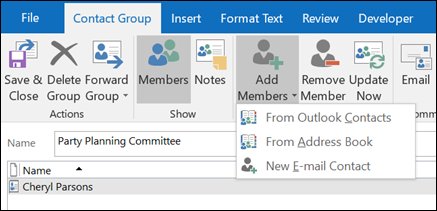
Add members to a personal contact group in classic Outlook
Classic Outlook, the Outlook desktop app for Windows, calls a personal distribution list a contact group. Contact groups were formerly called distribution lists, which is why both names still turn up.
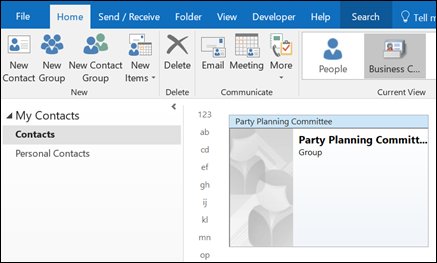
- Select People on the navigation bar.
- Under My Contacts, select Contacts.
- Double-click the contact group you want to change.
- Select Add Members on the ribbon, then select From Outlook Contacts, From Address Book or New E-mail Contact.
- Type a name or email address in the Search box, then double-click the name to move it into the Members box.
- Hold Ctrl while selecting to add several people at once, then select OK.
- Select Save & Close.
These steps apply to Outlook for Microsoft 365, Outlook 2024, 2021, 2019 and 2016 on Windows desktops.
No list yet? You can create a contact group in Outlook first, then come back to fill it.
Identify the type of list first
Check the group type before making changes. A personal list lives in your own Contacts folder, while a company distribution group lives in Exchange Online and only its owners or an admin can edit it.
| What you see | List type | Where you add members | Who can do it |
|---|---|---|---|
| A group you built under People in classic Outlook | Contact group | Double-click it, then Add Members | You |
| A list under All contact lists in new Outlook or on the web | Contact list | Edit on the list, or Add to list on a contact | You |
| A list under People in Outlook for Mac | Contact list (also called a distribution group) | The list's Add members field | You |
| A company address in the global address list, such as [email protected] | Distribution group | Microsoft 365 admin center or Exchange admin center | Group owners and admins |
| A group under Groups with a shared inbox and calendar | Microsoft 365 Group | The member count under the group name, or Group Settings in classic Outlook | Any member can add; only owners remove |
Before you begin: requirements, permissions, and which Outlook version you're using
Match your account and role to the row below before you start. Most failed edits come from trying to change a list you do not own.
| Requirement | Applies to | Detail |
|---|---|---|
| Any Outlook account | Personal contact groups and contact lists | The list sits in your own mailbox, so no extra permission is needed |
| An email address on every new member | Contact lists | A contact list only accepts contacts that have an email address |
| Owner of the group | Distribution groups | Owners edit the groups they own; every distribution list needs at least one owner |
| Exchange or Microsoft 365 admin role | Distribution groups you do not own | Admins edit membership in the Microsoft 365 admin center or the Exchange admin center |
| Work or school account with a qualifying Microsoft 365 subscription | Microsoft 365 Groups | Required for the group membership features in Outlook |
| Microsoft 365 or Outlook.com account | Outlook for Mac | Contact lists sync from the server only for these account types |
Add members to a contact list in new Outlook
New Outlook for Windows has no Add Members button. Contact lists here are what classic Outlook calls contact groups, and members go in from the contact or from the list itself.
- Open new Outlook and select People on the side panel.
- Select the contact you want to add.
- Right-click the contact or use the ribbon, select Add to list, then select the existing list.
- To work from the list instead, select All contact lists, right-click the list and select Edit.
- Add the contacts, or change the name or Description.
- Select Save.
Bringing in a large batch of people? Import them as contacts from a .csv file first, then select them all and use Add to list.
Add members to a contact list in Outlook on the web
Outlook on the web for Microsoft 365 accounts and Outlook.com use the same People page. Company distribution groups are not edited here; see the organization-wide section below.
- Sign in to Outlook on the web and select the People icon.
- Select the contact you want to add, select Lists, then choose the contact list.
- To edit the list directly, select All contact lists, then select Edit from the right-click menu or the ribbon.
- Add names or email addresses to the list.
- To remove someone, select the x next to their name or address.
- Select Save.
If a contact has no Edit button, it comes from Skype for Business or a connected social network account and has to be changed there.
How to add members to a contact group in Outlook for Mac
Outlook for Mac calls a personal distribution list a contact list. The steps differ between new Outlook for Mac and legacy Outlook for Mac.
- Select People on the side navigation bar.
- Select the Contacts folder under the account that holds the list, then open the list.
- In new Outlook for Mac, type an email address in the add members field and select Add. Repeat for each person.
- In legacy Outlook for Mac, select Add, then choose a contact or type an email address.
- To remove someone, select the Remove (trash can) button next to the contact in new Outlook, or select the name and choose Remove in legacy Outlook.
- Select Save in new Outlook, or Save & Close in legacy Outlook.
Lists in an Exchange account's local Contacts folder are not saved to the Exchange server, so they appear only in Outlook for Mac.
Support for legacy Outlook for Mac ends in October 2026.
Adding members from different sources: address book, existing contacts, or new email addresses
Each Outlook app takes members from a slightly different place. Pick the row that matches where the person's address lives now.
| Where the address is | Classic Outlook | New Outlook and the web | Outlook for Mac |
|---|---|---|---|
| Already saved in your contacts | Add Members > From Outlook Contacts | Select the contact > Add to list | Pick the contact after selecting Add (legacy) |
| Company directory (global address list) | Add Members > From Address Book | Type the name or address while editing the list | Type the address in the add members field |
| Not saved anywhere | Add Members > New E-mail Contact | Type the full email address while editing the list | Type the address, then select Add |
| Dozens of people in a spreadsheet | Import the .csv as contacts, then From Outlook Contacts | Import contacts, then Add to list | Add each address in turn |
Add members to an organization-wide distribution group
A distribution group has its own address and appears in everyone's address book. Admins change its membership in the Microsoft 365 admin center.
Group owners who are not admins manage their groups from the Microsoft distribution groups portal under Groups I own. Managing distribution groups is no longer available in Outlook on the web as of August 2023.
- Sign in to the Microsoft 365 admin center.
- Select … Show all in the left navigation bar, then select Teams and groups > Active teams and groups.
- Select the Distribution list tab, then select the name of the group.
- In the details pane, select the Members tab, then select View all and manage members.
- Select + Add members, search with the Search for a member box and select each person.
- Select Add, then close the Members pane.
To remove people, select them in the same Members pane and select Remove members.
In the Exchange admin center, the same change is under Recipients > Groups > Distribution list. Select the group's row, open the Members tab, make the change and select Save.
Add a member with Exchange Online PowerShell
PowerShell is faster for one-off changes on large groups and the reliable route for groups above 5,000 members, where Exchange admin center filtering can return inconsistent results.
- Open PowerShell and run
Import-Module ExchangeOnlineManagement. - Run
Connect-ExchangeOnline -UserPrincipalName [email protected]with your own account, then sign in. - Run
Add-DistributionGroupMember -Identity "Staff" -Member "[email protected]", replacing the group and member values. - If you are not an owner of the group, add
-BypassSecurityGroupManagerCheckto the command. This needs the Organization Management role group or the Security Group Creation and Membership role. - Run
Get-DistributionGroupMember -Identity "Staff" | Format-Table Name,PrimarySMTPAddress,RecipientTypeto confirm the new member is listed. - Run
Disconnect-ExchangeOnlinewhen you finish.
Add-DistributionGroupMember adds one recipient per command. To take someone out, run Remove-DistributionGroupMember -Identity "Staff" -Member "[email protected]". Neither cmdlet works on dynamic distribution groups, whose membership comes from a query.
Add members to a Microsoft 365 Group
A Microsoft 365 Group is a shared inbox and calendar, not a contact list. Any member can invite people, but only an owner can remove them.
- In new Outlook or Outlook on the web, select Groups in the app bar, then select the group in the left pane.
- Select the member count text under the group name.
- Select Add members, type a name or email address, then select Add.
- In classic Outlook, select the group under Groups in the folder list.
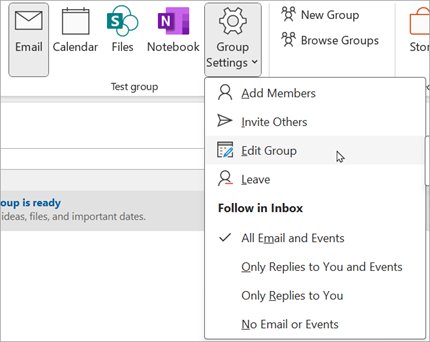
- Select Group Settings > Add Members on the ribbon, pick the people, then select Save.
- To remove someone in new Outlook or on the web, select Remove from group next to the person, then select Yes.
Owners can also add guests from outside the organisation by typing their external email address. Each guest receives a welcome email.
Outlook.com groups allow a maximum of 50 members.
How to save, update, and verify changes to your distribution list
An unsaved list loses every member you just added. Save first, then confirm the change from a second view.
- Select Save & Close in classic Outlook, or Save in new Outlook, on the web and in Outlook for Mac.
- Reopen the list and count the members against the people you meant to add.
- Start a new message, type the list name in To and confirm it resolves to one entry.
- For a distribution group, reopen View all and manage members in the Microsoft 365 admin center and search for the new name.
- For PowerShell changes, run
Get-DistributionGroupMemberon the group and check the new address is in the output. - Send a test message with your own address in To and the list in Bcc, so recipients cannot see each other's addresses.
Why the Add Members button may be missing
You are viewing an organization-wide distribution group
Company distribution groups live in Exchange Online, not in your Contacts folder, so Outlook shows no edit controls.
- Check the group's owner in its address book entry.
- Ask the owner or an admin to add the member, or use the Microsoft 365 admin center if you are an admin.
- If you own the group, manage it from the distribution groups portal under Groups I own.
You are editing a Microsoft 365 Group from the address book
Microsoft 365 Group membership cannot be changed through the Address Book, and trying can produce an error.
- Close the address book.
- Select Groups in Outlook, then select the group.
- Select the member count, then select Add members. In classic Outlook use Group Settings > Add Members.
You are following an old Outlook on the web guide
Distribution group management was removed from Outlook on the web in August 2023.
- Admins use Teams and groups > Active teams and groups in the Microsoft 365 admin center.
- Owners use the distribution groups portal and select Groups I own.
- Personal lists still use People > All contact lists > Edit.
You are in new Outlook for Windows
New Outlook replaced Add Members with Add to list and the list's Edit command.
- Select People, then select the contact.
- Select Add to list and choose the list.
- Or open All contact lists, right-click the list, select Edit, then select Save.
Common mistakes and troubleshooting when members don't appear or emails don't send
Your coworker still sees the old members
A contact group lives in your own Contacts folder, so your edits never reach anyone else's copy unless you use a shared contacts folder.
- Share the updated list again, or move it to a shared contacts folder that everyone uses.
- For a team that needs one list everyone sees, ask an admin for a distribution group.
- For a company distribution group, have the coworker select File > Account Settings > Download Address Book, then select OK. Offline address books are generated every 8 hours.
The person was added but still does not receive messages
The person went into a personal copy of the list, or into a member type a distribution group does not support.
- Confirm you edited the group itself, not a personal contact group with the same name.
- Run
Get-DistributionGroupMemberon the group, or reopen View all and manage members, and check the address. - Add each person individually if you tried to nest a Microsoft 365 Group, which is not a supported member type.
- Add outside people as a mail contact, which distribution groups do support.
Why can't I add members to my Outlook group?
Only owners can change a distribution group, and a closed group automatically denies join requests.
- Check whether you are listed as an owner of the group.
- Ask an owner to add the person, or ask an admin to make you an owner.
- For a Microsoft 365 Group, invite the person with Add members; any member can do this.
A contact will not go into the contact list
Contact lists only accept contacts that have an email address.
- Open the contact and add an email address.
- Save the contact.
- Add the contact to the list again.
The Exchange admin center gives inconsistent search results
Filtering members in distribution groups with more than 5,000 members can return inconsistent results in the Exchange admin center.
- Search the group's members in the Microsoft 365 admin center instead.
- Or run
Get-DistributionGroupMember -Identity "GroupName"in Exchange Online PowerShell.
Best practices for managing distribution lists efficiently over time
Lists drift as people join and leave. These habits keep them accurate without a full rebuild.
| Practice | Reason |
|---|---|
| Assign at least two owners to every shared group | Microsoft recommends two owners for Microsoft 365 Groups, so membership can still change when one owner is away |
| Remove leavers the day they go | Removed members stop receiving list mail; stale members keep getting it |
| Use PowerShell for groups above 5,000 members | Exchange admin center filtering is unreliable at that size |
| Set membership approval to Owner approval for open teams | People can ask to join, and owners stay in control of who gets in |
| Keep one shared list instead of many personal copies | Personal contact groups never update each other |
| Send to large lists with Bcc | A list in To can be expanded by every recipient, showing all addresses |
If several people answer list mail together, a shared mailbox in Outlook may suit the team better than a distribution group.
Frequently asked questions about editing and managing Outlook distribution lists
How do you add members to a DL in Outlook?
In classic Outlook, select People, double-click the contact group, select Add Members, pick the people and select Save & Close. A company DL is changed by its owner or an admin in the Microsoft 365 admin center.
How do you add members to an Outlook group?
Select Groups, select the group, select the member count under its name, then select Add members. In classic Outlook, select Group Settings > Add Members on the ribbon and select Save.
How do you add members to an Outlook email group in new Outlook?
Select People, select the contact, then select Add to list and choose the list. You can also open All contact lists, right-click the list, select Edit, add contacts and select Save.
Why can't I add members to my Outlook group?
You are probably not an owner. Company distribution groups can only be changed by owners and admins, and closed groups deny join requests. Microsoft 365 Groups let any member invite people, but only owners remove them.
Why can I see a distribution list but not edit its members?
Everyone in the organisation can see a distribution list in the global address list, but only its owners and admins can change membership. Ask an owner, or an admin with access to the Microsoft 365 admin center.
Does editing my Outlook contact group update everyone else's list?
No. A contact group is stored in your own Contacts folder. Unless it sits in a shared contacts folder, other people's copies stay unchanged until you share the updated list with them.
What is the difference between a contact list and a distribution group?
A contact list is a personal set of addresses in your mailbox that only you edit. A distribution group is an organisation-wide list with its own email address, held in Exchange Online and managed by owners and admins.
Can I add an email address that is not saved as a contact?
Yes. In classic Outlook, select Add Members > New E-mail Contact. In new Outlook, on the web and in Outlook for Mac, type the full address while editing the list.
How long does it take for a new distribution group member to show up?
The change applies in Exchange Online as soon as it is saved. Classic Outlook may show older details until the offline address book refreshes, which is generated every 8 hours, or until you select Download Address Book.
How do you add members to a shared mailbox?
A shared mailbox is not a distribution list, so it has no Add Members command. An admin gives people permission to the mailbox instead, and each person then opens it in Outlook.
The bottom line on adding distribution list members
Edit a personal contact list yourself from People, and send changes to a company distribution group through its owner or the Microsoft 365 admin center. Personal lists change only your own copy, while distribution groups are shared objects in Exchange Online that Outlook itself no longer lets regular users edit.