Yes, you can dual boot Windows 11 26H2 and 25H2 on one PC by installing each version on its own partition and picking one from the Windows Boot Manager menu at startup.
This guide covers when a dual boot is worth it, how to add 26H2 next to an existing 25H2 install, how to stop the 25H2 side from updating itself, and how to undo the setup.
Yes, you can dual boot 26H2 and 25H2, but check why first
Windows keeps each installation in its own Windows folder on its own partition, and Windows Boot Manager lists every installation it knows about. Microsoft's BCDBoot documentation names this case directly: a PC with more than one copy of Windows installed, using one shared boot menu.
Versions 26H2 and 25H2 share a common core and an identical set of system files. The difference is which features are switched on, which is why most PCs move to 26H2 through a small enablement package and one restart.
Dual boot only if you need both versions on real hardware at the same time, such as testing a driver, an app or a work policy against each. Keep your current 25H2 install, shrink it, and install 26H2 into the freed space. Microsoft's download page now offers only 26H2 media, so the existing 25H2 installation is usually the only 25H2 copy you can get. If you just want to try 26H2 and possibly return, a virtual machine or a plain upgrade with a rollback plan is simpler than two installs.
If you are still deciding whether the new version is worth having at all, compare what actually changes between 26H2 and 25H2.
Dual boot, virtual machine or native VHD boot: which should you use?
| Your situation | Use this | Why |
|---|---|---|
| You need 26H2 and 25H2 on the real hardware, with full GPU and driver access | Dual boot on two partitions | Each version runs natively; you restart to switch |
| You have Windows 11 Pro or Enterprise and only want to look at 26H2 | Hyper-V virtual machine | No partition changes; the VM runs inside your current Windows |
| You have Windows 11 Home and want to test 26H2 | Dual boot, or upgrade after a full backup | Microsoft states the Hyper-V role cannot be installed on Windows 11 Home |
| You are an IT pro deploying images | Native boot from a VHDX | Microsoft documents booting a VHDX side by side with an existing install; it needs the Windows ADK, WinPE and a generalized image |
| You only want to go back if 26H2 misbehaves | Upgrade in place, no dual boot | One install to maintain; follow the uninstall steps if you need to return |
| You are on 26H1 (build 28000) | Dual boot or a VM | 26H1 is on a different core and cannot be updated to 26H2 |
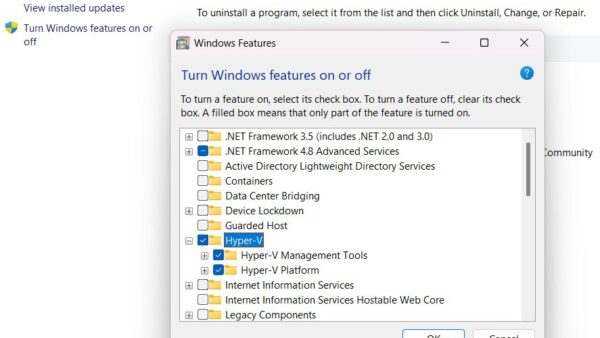
Hyper-V needs Windows 11 Pro or Enterprise, a 64-bit processor with Second Level Address Translation and at least 4 GB of memory. The steps to turn on Hyper-V in 26H2 cover the setup.
What you need before you start
| Requirement | Detail |
|---|---|
| A working 25H2 installation | Check Settings > System > About: Version should read 25H2 and the OS build should start with 26200 |
| 26H2 installation media | A USB drive of at least 8 GB made with Microsoft's Media Creation Tool, which now builds 26H2 media for x64 PCs |
| Free disk space | At least 64 GB for the new partition, which is the Windows 11 storage minimum; more if you plan to install apps |
| A full backup | Partition changes and a wrong click in Setup can erase data; back up to an external drive or OneDrive first |
| Your BitLocker recovery key | Booting from USB changes the boot order, which BitLocker can treat as a reason to ask for the recovery key |
| Administrator rights | Needed for Disk Management, BCDEdit and the Group Policy change |
| A plan for activation | Windows must be activated after install; Microsoft does not state whether one digital license covers two installs on the same PC |
The Media Creation Tool builds x64 media only. On an Arm-based PC, read the notes on 26H2 for ARM64 and Copilot+ PCs before you plan a second install.
Your BitLocker recovery key can be saved to a Microsoft account, a USB drive, a file or a printout. Find it and keep it off the PC before you start.
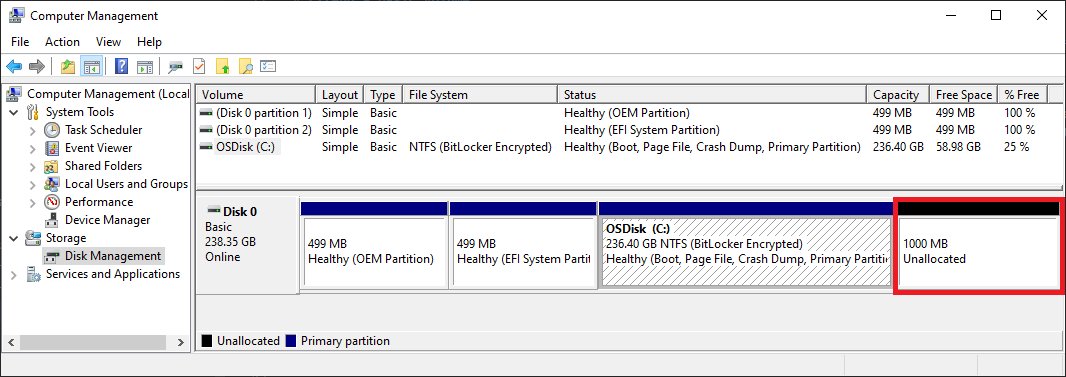
Step 1: Shrink the 25H2 partition to make room
Shrinking moves ordinary files automatically and does not reformat the drive. Files that cannot move, such as the page file, limit how far the partition can shrink.
- Sign in to Windows 11 25H2 with an administrator account.
- Right-click the Start button and select Disk Management.
- Right-click the C: volume and select Shrink Volume.
- Enter the amount of space to shrink in MB; 65,536 MB equals 64 GB, the minimum for Windows 11.
- Select Shrink and wait for a black Unallocated bar to appear on the disk.
- Close Disk Management without creating a volume in that space.
Leave the space unallocated. Windows Setup formats it in the next step, and creating a volume now adds nothing.
Step 2: Install Windows 11 26H2 on the new space
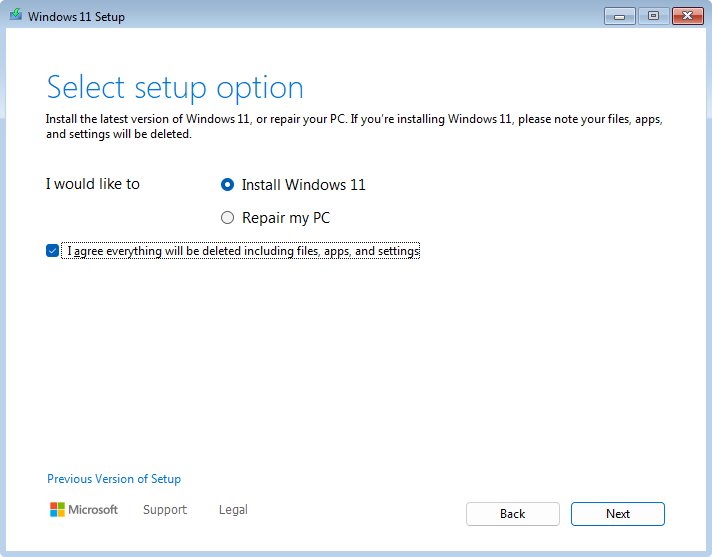
These are the screens of Windows 11 Setup when you boot from the USB drive. The one rule that matters: never delete a partition on this screen, and install only into the unallocated space you just made.
- Create the USB drive with the Media Creation Tool, following the steps to make 26H2 USB install media.
- Restart the PC and boot from the USB drive using your PC maker's boot menu key.
- Choose your language and keyboard, and select Next on each screen.
- In Select setup option, select Install Windows 11, tick the confirmation box, and select Next.
- Select I don't have a product key if asked, choose the edition that matches your license, and select Accept on the license terms.
- In Select location to install Windows 11, select the Unallocated Space entry that matches the size you shrank, and select Next.
- In Ready to install, select Install and let the PC restart several times.
- Finish the setup screens and sign in with your Microsoft account so the digital license can be applied.
The confirmation box warns that files, apps and settings will be deleted. Your 25H2 partition stays intact only if you leave its entry alone and install to the unallocated space, which is why the backup comes first.
Setup is covered in more depth, including the ISO route, in the official ways to install 26H2.
Step 3: Stop the 25H2 install from updating to 26H2
Windows Update offers 26H2 to eligible 25H2 PCs, so the 25H2 side can turn into a second 26H2 install. On Pro, Enterprise and Education, the Select the target Feature Update version policy keeps it on 25H2 until you change the policy or 25H2 reaches end of service.
- Start the PC and choose the 25H2 entry on the boot menu.
- Type
gpedit.mscin the taskbar search box and press Enter. - Go to Computer Configuration > Administrative Templates > Windows Components > Windows Update > Manage updates offered from Windows Update.
- Double-click Select the target Feature Update version and select Enabled.
- In the product version box, type
Windows 11. - In the target version box, type
25H2. - Select OK and restart the 25H2 install.
Windows 11 Home has no such policy and does not support deferring feature updates. The most Home offers is Pause updates in Settings > Windows Update, set up to 35 days ahead and extended again before it ends. The full set of options to block the 26H2 update compares these routes.
Home and Pro support for 25H2 ends on 12 October 2027, so a 25H2 side kept for testing has a fixed shelf life.
Change the default system and the boot menu timer
After the install, the boot menu lists both systems and starts the default one when the timer runs out. BCDEdit changes both settings from an elevated Command Prompt on either install. Microsoft also points to the System Configuration tool (msconfig) as a simpler alternative for basic boot settings.
- Right-click Command Prompt and select Run as administrator.
- Type
bcdeditand press Enter to list every entry with its identifier and description. - Rename the current entry so the menu is readable:
bcdedit /set {current} description "Windows 11 26H2". - Set the default system with
bcdedit /default {identifier}, using the identifier shown for the entry you want. - Set the menu timer in seconds with
bcdedit /timeout 10. - Shut down and start the PC normally so the changes are written to disk.
In PowerShell, wrap identifiers in quotes, for example "{current}". Microsoft warns that changing some other BCDEdit options can leave a PC unbootable, so change only these three values.
How to check each side runs the right version
- Start the PC and pick the 26H2 entry from the boot menu.
- Type
winverin the taskbar search box and press Enter. - Confirm the window shows Version 26H2 with an OS build starting with 26300.
- Restart and pick the 25H2 entry.
- Run
winveragain and confirm Version 25H2 with an OS build starting with 26200.
If the 25H2 side suddenly shows 26H2, Windows Update installed the enablement package; the build-number checks to confirm which version is installed explain the numbers.
How to remove the 26H2 install and go back to one system
Removal runs from the 25H2 side. Windows cannot delete the volume it is running from, so start 25H2 before you begin.
- Start the PC and choose the 25H2 entry.
- Open Command Prompt as administrator and type
bcdeditto find the 26H2 entry's identifier. - Delete that boot entry with
bcdedit /delete {identifier}. - Type
diskpart, thenlist volume, and note the number of the 26H2 volume. - Type
select volumefollowed by that number, thendelete volume, thenexit. - In Disk Management, right-click C:, select Extend Volume, and follow the Extend Volume Wizard to take back the unallocated space.
Extend Volume works only when the unallocated space sits directly after C: on the same disk, which is the case when the space came from shrinking C:. If you want to leave 26H2 on a single-install PC instead, the steps to safely uninstall 26H2 avoid partitions altogether.
Fix dual boot problems
The boot menu does not show the 25H2 install
The boot entry for one installation is missing from the boot configuration.
- Start the installation that does boot and open Command Prompt as administrator.
- Find the drive letter of the other installation's partition in File Explorer.
- Run
bcdboot D:\Windows /d, replacing D: with that drive letter; the /d switch keeps the existing boot order instead of moving that entry to the top. - Restart and check that both entries appear.
The PC asks for a BitLocker recovery key
Booting from the USB drive changed the boot order that BitLocker measures.
- Enter the recovery key you saved before starting.
- Set the internal drive first in the boot order in your PC's firmware settings, so USB devices do not change the measurement.
- Restart and confirm Windows starts without the prompt.
Shrink Volume offers far less space than is free
Unmovable files such as the page file or shadow copies sit near the end of the volume.
- Open Event Viewer and check the Application log for event ID 259, which names the file blocking the shrink.
- Move the page file to another drive or delete stored shadow copies if that file is the blocker.
- Run Shrink Volume again.
- Move the page file back once the shrink succeeds.
Something breaks only on the 26H2 side
A known 26H2 issue, such as USB audio or domain trust problems, rather than the dual boot itself.
- Confirm the same device or feature works on the 25H2 side.
- Compare the symptom with the known 26H2 issues Microsoft lists.
- Apply the listed workaround on the 26H2 side only.
Frequently asked questions
Can you dual boot Windows 11 26H2 and 25H2?
Yes. Install each version on its own partition and choose one from the Windows Boot Manager menu at startup. The simplest setup keeps your existing 25H2 install, shrinks its partition, and installs 26H2 into the freed space from Media Creation Tool USB media.
Can I still download Windows 11 25H2 to dual boot with it?
Not from Microsoft's main Windows 11 download page, which lists Version 26H2 as the current release. An existing 25H2 installation, or 25H2 media you saved earlier, is the practical source.
Do I need two licenses to dual boot 26H2 and 25H2?
Microsoft has not published a statement on dual booting two Windows 11 versions under one digital license. Its reinstall guidance says the installed edition must match your license and that Windows must be activated after installation, so check activation on both sides after setup.
Will the 25H2 install upgrade itself to 26H2?
It can. Windows Update offers 26H2 to eligible 25H2 PCs through a phased rollout. On Pro, Enterprise and Education, set the target Feature Update version policy to Windows 11 and 25H2. On Home, you can only pause updates for up to 35 days at a time.
Is dual booting 26H2 and 25H2 worth it?
Rarely. Both versions share the same system files, and 26H2 mainly switches on features that 25H2 already carries in a dormant state. Dual booting suits testing drivers, apps or policies on real hardware; for a look at the new features, a virtual machine is simpler.
Can I dual boot 26H2 with 26H1?
Yes, as two separate installations, because 26H1 cannot be updated to 26H2. Windows 11 26H1 runs on a different Windows core and is meant for new devices, so a 26H1 PC would need a second partition and 26H2 media for a side-by-side install.
How do I pick which Windows starts by default?
Open Command Prompt as administrator, run bcdedit to see each entry's identifier, then run bcdedit /default with the identifier of the version you want. Use bcdedit /timeout followed by a number of seconds to change how long the boot menu waits.