To change DNS settings on Windows 11, open Settings > Network & internet, pick your Wi-Fi or Ethernet connection, select Edit next to DNS server assignment, switch to Manual and type the new addresses.
This guide covers Windows 11 and Windows 10 through Settings, Control Panel, PowerShell and Command Prompt, plus encrypted DNS, IPv6, checking the change, undoing it and fixing sites that stop loading.
The fastest way to change DNS on Windows 11
Write down the current DNS addresses before you start, so you can put them back. Google gives the same advice for its own resolver.
- Select Start > Settings > Network & internet.
- Select Ethernet, or select Wi-Fi > Manage known networks and choose your network.
- Scroll to DNS server assignment and select Edit.
- Change Automatic (DHCP) to Manual, then turn on the IPv4 toggle.
- Type the primary address in Preferred DNS and the backup in Alternate DNS, for example 1.1.1.1 and 1.0.0.1.
- Select Save.
The change applies to that one connection only. Repeat it for each Wi-Fi network and for Ethernet if you use both.
Which method should you use?
Every method writes the same per-adapter DNS setting. They differ in which Windows versions offer them and whether they can encrypt lookups.
| Your situation | Use this | Why |
|---|---|---|
| Windows 11, one PC, want encrypted DNS | Windows Settings | The only route that also sets DNS over HTTPS |
| Windows 10 | Settings > Change adapter options, or Control Panel | Windows 10 has no DNS over HTTPS option, so both routes end in the same IPv4 dialog |
| Several PCs or a repeatable script | PowerShell Set-DnsClientServerAddress |
One line per adapter, and -ResetServerAddresses undoes it |
| Older scripts or a recovery prompt | Command Prompt netsh interface ipv4 set dnsservers |
Works from any Command Prompt, including batch files |
| Every device in the house should switch | Your router's DNS fields | One change covers phones, consoles and TVs; see the router steps in the OpenDNS guide linked below |
Why Change DNS Settings on Windows?
DNS turns names such as example.com into IP addresses. By default Windows uses whatever resolver your router or internet provider hands out through DHCP.
| Reason | What changes | Pick a resolver that offers it |
|---|---|---|
| Encrypted lookups | DNS over HTTPS hides queries from others on the network | Cloudflare, Google or Quad9 on Windows 11's built-in list |
| Malware and adult-content blocking | Known bad domains fail to resolve | Cloudflare 1.1.1.1 for Families, OpenDNS FamilyShield |
| Privacy commitments | Published log-retention and no-ad-targeting rules | Cloudflare deletes resolver logs within 25 hours |
| Reliability | A large public resolver replaces a slow or failing provider resolver | Google Public DNS answers most queries from shared Google-scale caches |
| Tamper resistance | DNSSEC validation rejects forged answers for signed domains | Cloudflare and Google both validate DNSSEC |
Speed gains are not guaranteed. A resolver only speeds up the lookup step, and pages still download from the same web servers.
Choose a DNS Provider Before You Start
Enter both addresses of one provider. The second one takes over if the first stops answering. The IPv6 pair is only needed if your connection uses IPv6.
| Provider | IPv4 (preferred, alternate) | IPv6 | Filtering |
|---|---|---|---|
| Cloudflare 1.1.1.1 | 1.1.1.1, 1.0.0.1 | 2606:4700:4700::1111, 2606:4700:4700::1001 | None |
| Cloudflare for Families (malware) | 1.1.1.2, 1.0.0.2 | 2606:4700:4700::1112, 2606:4700:4700::1002 | Malware and phishing |
| Cloudflare for Families (malware and adult) | 1.1.1.3, 1.0.0.3 | 2606:4700:4700::1113, 2606:4700:4700::1003 | Malware, phishing and adult content |
| Google Public DNS | 8.8.8.8, 8.8.4.4 | 2001:4860:4860::8888, 2001:4860:4860::8844 | Rarely blocks; not a malware filter |
| Quad9 | 9.9.9.9, 149.112.112.112 | 2620:fe::fe, 2620:fe::fe:9 | Listed by Microsoft as a known DoH server |
| OpenDNS | 208.67.222.222, 208.67.220.220 | Not listed on OpenDNS's setup page | Basic protection; more with a free OpenDNS Home account |
| OpenDNS FamilyShield | 208.67.222.123, 208.67.220.123 | Not listed on OpenDNS's setup page | Adult content blocked, preconfigured |
For provider-specific setup and testing, see how to use Cloudflare's 1.1.1.1 for secure DNS or how to use OpenDNS on your router, PC, tablet or smartphone.
How to Change DNS Settings in Windows Settings
This is the Windows 11 route with IPv6 and encryption included. Only addresses on Microsoft's known list, currently Cloudflare, Google and Quad9, get the automatic DNS over HTTPS template.
- Open Settings > Network & internet and select Ethernet, or Wi-Fi > Manage known networks > your network.
- Select Edit next to DNS server assignment, then choose Manual.
- Turn on IPv4 and enter the Preferred DNS and Alternate DNS addresses.
- Under each address, set DNS over HTTPS to On (automatic template). Use On (manual template) only if your provider gave you a DoH URL.
- Leave Fallback to plaintext off for strict encryption, or turn it on so lookups still work when DoH fails.
- Turn on IPv6 and enter the provider's IPv6 pair the same way, if your connection uses IPv6.
- Select Save.
Microsoft's support page shows the same DNS fields under IP assignment > Edit when you set a manual IP address. Use DNS server assignment when you only want to change DNS and keep the IP address automatic.
On Windows 10, the Settings app has no DNS over HTTPS option. Select Settings > Network & Internet > Change adapter options and continue with step 3 of the Control Panel method below.
How to Change DNS Settings Using Control Panel
The classic adapter dialog works on Windows 10 and Windows 11. It cannot turn on DNS over HTTPS.
- Open Control Panel > Network and Internet > Network and Sharing Center.
- Select Change adapter settings.
- Right-click your Wi-Fi or Ethernet connection and select Properties.
- On the Networking tab, select Internet Protocol Version 4 (TCP/IPv4), then Properties.
- Choose Use the following DNS server addresses and type the preferred and alternate addresses.
- Select OK.
- Repeat with Internet Protocol Version 6 (TCP/IPv6) and the IPv6 pair if you use IPv6, then select OK.
Change only the DNS part of the dialog. DNS can be manual while the IP address itself stays automatic.
How to Change DNS Settings with Command Prompt or PowerShell
Open Windows PowerShell or Command Prompt as administrator: search for it on the taskbar, then select Run as administrator. Replace Wi-Fi in each command with your own adapter name.
Find the name of your network adapter
Every command targets one interface by its friendly name or index number.
- In PowerShell, run
Get-DnsClientServerAddress. - Note the InterfaceAlias of the connection you use, such as
Wi-FiorEthernet, and its current DNS servers. - In Command Prompt,
netsh interface ipv4 show dnsserverslists the same interfaces by name.
Change DNS using PowerShell
Set-DnsClientServerAddress adds static DNS servers that override the DNS your router assigns through DHCP.
- Run
Set-DnsClientServerAddress -InterfaceAlias "Wi-Fi" -ServerAddresses ("1.1.1.1","1.0.0.1"). - Add
-Validatebefore running it if you want Windows to check that the servers respond first. - Run
Get-DnsClientServerAddress -InterfaceAlias "Wi-Fi"to confirm the new list. The set command itself prints nothing on success.
Change DNS using Command Prompt
netsh sets the first server and then appends the backup at a numbered position.
- Run
netsh interface ipv4 set dnsservers name="Wi-Fi" source=static address=1.1.1.1 register=primary. - Run
netsh interface ipv4 add dnsservers name="Wi-Fi" address=1.0.0.1 index=2. - Run
netsh interface ipv4 show dnsservers name="Wi-Fi"to check the list.
Set IPv6 DNS servers
IPv6 keeps its own DNS list, so an IPv4-only change leaves IPv6 lookups on the old resolver.
- Run
netsh interface ipv6 set dnsservers name="Wi-Fi" source=static address=2606:4700:4700::1111 register=primary. - Run
netsh interface ipv6 add dnsservers name="Wi-Fi" address=2606:4700:4700::1001 index=2. - Check with
Get-DnsClientServerAddress -InterfaceAlias "Wi-Fi" -AddressFamily IPv6.
Run ipconfig /flushdns afterwards so Windows forgets answers cached from the old server. The ipconfig /flushdns guide explains what that cache holds.
How to Verify Your New DNS Settings
Check both what Windows has stored and which resolver actually answers.
- In PowerShell, run
Get-DnsClientServerAddress. Your adapter should list the new IPv4 and IPv6 addresses. - In Command Prompt, run
ipconfig /alland read the DNS Servers lines under your adapter. - Run
nslookup example.com. With no server named, nslookup uses your default DNS server, so an answer here proves the new resolver responds. - Open your provider's test page: one.one.one.one/help for Cloudflare, or welcome.opendns.com for OpenDNS.
- For Google Public DNS, load a site, then close and reopen the browser and refresh several times so a cached page does not fool you.
If the cmdlet shows the new servers but a test page says you are not using them, a browser's own secure DNS setting may be sending lookups elsewhere.
How to switch back to automatic DNS
- Windows 11 Settings: select Edit next to DNS server assignment, choose Automatic (DHCP) and select Save.
- Control Panel: reopen the IPv4 and IPv6 properties, switch from Use the following DNS server addresses back to automatic DNS, and select OK.
- PowerShell: run
Set-DnsClientServerAddress -InterfaceAlias "Wi-Fi" -ResetServerAddressesto return to the DHCP-assigned servers. - Command Prompt: run
netsh interface ipv4 set dnsservers name="Wi-Fi" source=dhcp, and the same withipv6if you changed IPv6.
Troubleshooting Common DNS Problems
Websites stop loading after you change DNS
A mistyped address, or a resolver your network cannot reach.
- Check the DNS server addresses with
Get-DnsClientServerAddressand compare them with the provider table above. - Test DNS resolution directly: run
nslookup example.com 1.1.1.1, thennslookup example.com 8.8.8.8. If one server answers and the other times out, switch to the working provider. - If
nslookupreports timed out or No response from server, the resolver is unreachable from your network. - Switch back to automatic DNS to confirm the connection itself works.
Windows still uses the old DNS server
Cached answers, the wrong adapter, or a browser with its own secure DNS provider.
- Flush cached DNS records with
ipconfig /flushdns, then retest. - Run
Get-DnsClientServerAddressand confirm you changed the adapter that is actually connected. - Check your browser's secure DNS setting, which can use its own provider instead of Windows' servers.
You can't change the DNS settings, or they will not stick
The PC is managed by an organization, or the command ran without administrator rights.
- Rerun PowerShell or Command Prompt with Run as administrator.
- On a work or school PC, ask the IT administrator, because network settings may be set centrally.
- Make sure you are editing DNS server assignment, not a different network profile under Manage known networks.
The DNS over HTTPS option is missing or cannot be turned on
Windows 10 has no DoH setting, and Windows 11 only enables the automatic template for servers on its known list.
- On Windows 10, use your browser's secure DNS setting instead.
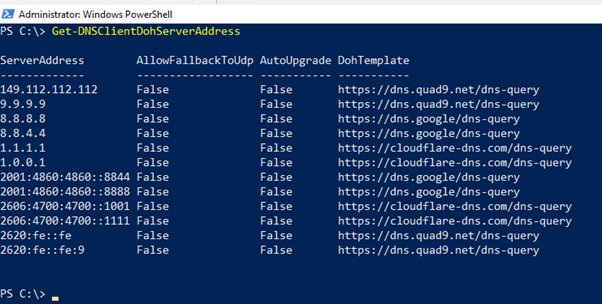
- On Windows 11, run
Get-DnsClientDohServerAddressto list the servers Windows knows. - Pick a Cloudflare, Google or Quad9 address, or choose On (manual template) with your provider's DoH URL.
Public Wi-Fi or hotel sign-in pages do not appear
Manual DNS can block the captive portal that the network uses for sign-in.
- Switch the connection back to Automatic (DHCP).
- Connect and finish the sign-in page.
- Re-enter your DNS addresses once you are online.
Nothing connects even with automatic DNS
The network stack itself needs a reset, not the DNS setting.
- Open Command Prompt as administrator.
- Run
netsh winsock reset, thennetsh int ip reset. - Run
ipconfig /release, thenipconfig /renew, thenipconfig /flushdns. - Restart the PC and test again.
Bottom Line
On Windows 11, set DNS through Settings > DNS server assignment with a Cloudflare, Google or Quad9 pair and turn on DNS over HTTPS; on Windows 10, use the IPv4 and IPv6 properties dialog. The Settings route is the only one that encrypts lookups without extra software, and those three providers get Microsoft's automatic DoH template. Script with PowerShell only when you manage several PCs, and confirm the result with Get-DnsClientServerAddress either way.
Frequently Asked Questions
How do I change DNS settings on Windows 11?
Open Settings > Network & internet, select Ethernet or your Wi-Fi network, and select Edit next to DNS server assignment. Choose Manual, turn on IPv4, enter the Preferred DNS and Alternate DNS addresses, optionally turn on DNS over HTTPS, and select Save.
How do I change DNS settings on Windows 10?
Open Settings > Network & Internet > Change adapter options, right-click your connection and select Properties. Select Internet Protocol Version 4 (TCP/IPv4) > Properties, choose Use the following DNS server addresses, enter both addresses and select OK.
How do I change DNS settings on a PC or laptop?
A Windows laptop uses the same steps as a desktop PC. Change DNS for the connection you use, usually Wi-Fi on a laptop, and repeat for each Wi-Fi network you join, because Windows stores DNS per network.
Why change DNS settings?
People change DNS to encrypt lookups with DNS over HTTPS, to block malware or adult sites through a filtering resolver, to use a provider with published privacy rules, or to replace a slow or failing resolver from their internet provider.
Which DNS server should I use on Windows?
Cloudflare (1.1.1.1), Google (8.8.8.8) and Quad9 (9.9.9.9) work with Windows 11's automatic DNS over HTTPS. Choose Cloudflare for Families or OpenDNS FamilyShield if you want adult content blocked on the PC.
Do I need to change DNS for both IPv4 and IPv6?
Yes, if your connection uses IPv6. Windows keeps a separate DNS list for each protocol, so changing only IPv4 can leave IPv6 lookups on your provider's resolver. Enter the provider's IPv6 pair in the IPv6 section as well.
Will changing DNS make my internet faster?
Only the name lookup step can get faster, and only if your current resolver is slow. Download speed does not change, because pages still come from the same web servers over the same connection.
How do I change DNS settings with PowerShell?
Open PowerShell as administrator and run Set-DnsClientServerAddress -InterfaceAlias "Wi-Fi" -ServerAddresses ("1.1.1.1","1.0.0.1"), using your own adapter name. Run Get-DnsClientServerAddress to confirm, and add -ResetServerAddresses to go back to automatic DNS.
How can I check that Windows is using my new DNS server?
Run Get-DnsClientServerAddress in PowerShell or ipconfig /all in Command Prompt to see the configured servers. Then open your provider's test page, such as one.one.one.one/help for Cloudflare or welcome.opendns.com for OpenDNS.
Why can't I change the host DNS settings?
The most common causes are a PC managed by a work or school organization, or a command run without administrator rights. Rerun the command as administrator, and ask your IT administrator if the network settings are controlled centrally.
What should I do if websites stop loading after I change DNS?
Recheck the addresses for typos, then run nslookup example.com against your new server. If it times out, switch to another provider or back to Automatic (DHCP), and run ipconfig /flushdns before testing again.
How do I change DNS settings for all Wi-Fi networks?
Windows stores DNS per network, so each Wi-Fi profile needs its own change. To cover every device on your home network at once, change the DNS servers on your router instead of on each PC.