Open the meeting chat in Microsoft Teams, select Shared, then pick More options > Download on the recording to save the .mp4 file.
This guide covers where recordings land, who can download them, every sharing link type, the transcript, and the fixes when the Download command is missing.
The fastest way to download or share a Teams recording
A recorded meeting is an .mp4 file in OneDrive or SharePoint, so it behaves like any other file.
- Select Chat in Teams and open the meeting conversation.
- Select the Shared tab and find the file with the recording icon.
- Hover over the recording and select More options.
- Select Download to save the .mp4 file to your computer.
- To send it instead, select Copy link and paste the link into a chat message or an email.
If Teams is not installed on the machine you are working from, get it from Download Microsoft Teams for PC, Windows 11/10 & Mac (Free).
Where Microsoft Teams Recordings Are Saved
The storage location depends on the meeting type, not on who pressed the button in most cases.
| Meeting type | Where the file lands | Folder |
|---|---|---|
| Scheduled or Meet now meeting | The organizer's OneDrive, even if the organizer did not attend | Recordings |
| Meeting created by a delegate | The organizer's OneDrive | Recordings |
| 1:1 call or group call | The OneDrive of the person who selected Record | Recordings |
| Channel meeting | The channel's SharePoint site | *Team name – Channel name*/Documents/Recordings |
| Webinar or town hall published with VOD | SharePoint Embedded file storage containers | Managed from the organizer's calendar |
| Organizer has no OneDrive | The first co-organizer's OneDrive, then the recording initiator's | Recordings |
A one-hour recording is about 400 MB, and it counts against the OneDrive or SharePoint quota of whoever owns it.
Who Can Download or Share a Teams Recording?
Editing rights decide this. Read access lets someone watch the video but not save or forward it.
| Role | What they get | Can they download or share? |
|---|---|---|
| Meeting organizer | Full permissions on the file | Yes, both |
| Co-organizer | Edit permissions | Yes, both |
| Attendee in the same organization | Read access | No sharing or download permissions |
| Guest or external attendee | No access by default | Only after the organizer shares the file with them |
| Callee on a 1:1 call recorded by the caller | Read-only access | No sharing or download permissions |
| Channel member | Whatever the channel SharePoint permissions grant | Yes, if the channel grants edit rights |
| Attendee in a meeting with more than 250 people | Sometimes no file permission at all | Ask the recording owner to add you |
Ask the organizer to grant edit access, or to send you the file, when the commands below are greyed out.
How to Find a Teams Recording
Teams links the recording in five places. Pick the row that matches where you already are.
| Where you are | Do this | What you get |
|---|---|---|
| Teams meeting chat | Select Chat, open the meeting conversation, select Shared | The .mp4 with the recording icon |
| A Teams channel | Select Teams, open the channel, select Shared | The channel meeting recording |
| Teams calendar | Select Calendar, open the past meeting, select Recap | The recording and the Recordings and Transcripts tab |
| OneDrive in a browser | Open My files and then the Recordings folder | Every recording you own |
| SharePoint in a browser | Open the team site, then Documents > Recordings | Every channel meeting recording for that channel |
Channel recordings never appear in the organizer's OneDrive, so search the SharePoint site instead of the chat.
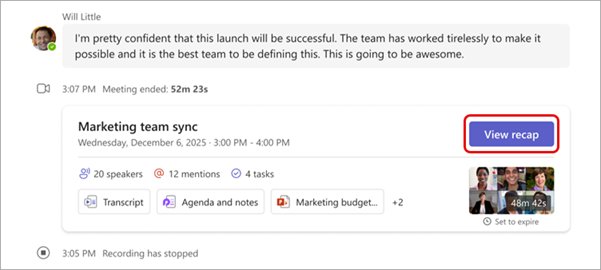
How to Download a Microsoft Teams Recording
The same Download command appears wherever the file lives, because the file is stored in OneDrive or SharePoint.
- From the Teams chat or channel: open the Shared tab, hover over the recording, select More options > Download.
- From OneDrive: sign in at onedrive.com, open the Recordings folder, select the file, then select Download on the command bar.
- From SharePoint: open the team site, go to Documents > Recordings, select the file, then select Download.
- From the video player: open the recording, then use Download in the player toolbar.
- Wait for the transfer to finish before closing the tab, because an hour of video is roughly 400 MB.
The downloaded copy is a plain .mp4 file and plays in any video player.
How to Share a Microsoft Teams Recording
Sharing the link beats sending the file. The recipient streams it and the permissions stay under your control.
- Select Chat, open the meeting conversation and select the Shared tab.
- Hover over the recording and select More options > Copy link.
- Select Settings in the link dialog to choose who the link works for.
- Pick People in (Your Organization) so the recipient has to sign in.
- Select Copy and paste the link into a Teams message, a channel post or an Outlook email.
- For someone outside the company, choose Specific people and type their email address instead.
Guests and external attendees see the recording only when the link is sent to them directly.
Choose the right sharing link
OneDrive and SharePoint offer three primary link types, and they differ in who can redeem the link.
| Who needs the recording | Link type | Why |
|---|---|---|
| Colleagues inside the company | People in (Your Organization) | Works only for members of your Microsoft 365 organization, and they must sign in |
| One named client or contractor | Specific people | Non-transferable; the recipient authenticates as the person you named |
| A public audience with no sign-in | Anyone | No authentication and no audit trail, so avoid it for meeting recordings |
| People who already opened the file | People with existing access | Grants nothing new; it just regenerates a link |
| Anyone in a Teams shared channel site | Specific people | *Anyone* links cannot be used in shared channel sites |
Microsoft recommends the organization link for recordings, and warns that external sharing is not designed for distributing large files.
How to Manage Recording Permissions
Every link you create stays listed against the file until you delete it.
- Open the Recordings folder in OneDrive, or the channel's Documents > Recordings folder in SharePoint.
- Select the recording, then select the Information icon in the upper right.
- Select Manage access in the details pane.
- Select the X next to a link to revoke it for everyone who used it.
- Use the drop-down next to a person's name to switch them between Can edit and Can view.
- Select Grant access and add the people who need edit rights, such as a co-organizer.
Channel meeting recordings follow the channel's SharePoint owners and members list, so edit the channel membership rather than the file.
How to Share a Teams Recording Without Letting Everyone Edit It
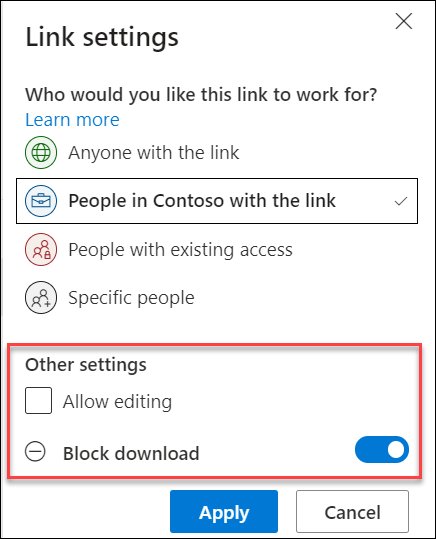
Two switches in the link settings do this: turn editing off, and block the download.
- Select the recording in OneDrive or SharePoint and select Share.
- Select Settings in the share dialog.
- Choose People in (Your Organization) or Specific people as the link type.
- Turn Allow editing off so the link grants view rights only.
- Turn Block download on to stop recipients saving a local copy.
- Set an expiry date and a password if your subscription offers them, then select Apply and Copy link.
Block download applies to that link. Someone who already holds edit rights on the file can still save a copy.
How to Rename, Move, or Copy a Teams Recording
Recordings arrive with a generated name. Renaming is safe; moving and copying are not free of side effects.
- Open the Recordings folder in OneDrive or SharePoint.
- Hover over the file, select the ellipses (…) next to its name, then select Rename.
- Type the new name and select Save.
- To relocate it, select the file and select Move to on the command bar, browse to the destination and select Move here.
- To duplicate it, select Copy to, browse to the destination and select Copy here.
- Check the captions play after a move or a copy, because they are not fully supported once the file leaves its original location.
In SharePoint Online a sharing link keeps working after a rename. A direct link to the old file name does not.
How to Download or Share the Transcript
A transcript exists only when transcription was running during the meeting. It is stored next to the video and inherits its permissions.
- Open the recording in the Microsoft 365 video player.
- Select Transcript in the upper right of the video to read it alongside playback.
- Select Video settings, then expand Transcripts and captions.
- Select the menu next to the transcript you want and select Download to save the WebVTT (.vtt) file.
- To share it instead, share the recording itself; the transcript travels with the video and follows the same permissions.
- Open the .vtt file in any text editor if you need to read it without the player.
Live captions are never saved. Only a transcript produces a file you can download.
How to check the download and the shared link actually work
Two checks catch the usual failures: a truncated file, and a link that only works for you.
- Open the downloaded .mp4 in a local player and skip to the last minute of the meeting.
- Compare the file size against roughly 400 MB per hour of recording; a few kilobytes means the transfer failed.
- Open the shared file in OneDrive or SharePoint, select the Information icon, then Manage access.
- Confirm the link you sent is listed and shows the people or scope you intended.
- Ask one recipient to open the link and report whether they are asked to sign in.
- For an external recipient, confirm their name appears under Manage access rather than relying on the meeting invite.
Why You Might Not See the Download Button
The Download command is missing for an attendee
Attendees other than the organizer and co-organizers get read access with no sharing or download permissions.
- Ask the organizer to open the file in OneDrive and select Manage access.
- Ask them to change your entry from Can view to Can edit.
- Reload the recording in Teams and check the More options menu again.
Why can't I download files from SharePoint in a channel recording
The org-wide -ChannelRecordingDownload policy is set to Block, which stores channel recordings in a Recordings\View only folder.
- Check the folder path in SharePoint; Recordings\View only confirms the policy.
- Ask a channel owner to download the file, since owners keep full access to that folder.
- Ask your Teams administrator whether the policy can be set back to Allow for your team.
Download is blocked everywhere, including OneDrive
A SharePoint administrator turned on the org-wide block download policy for Teams meeting recordings and transcripts.
- Confirm playback still works in the browser while download, sync and app access do not.
- Ask your SharePoint administrator whether
BlockDownloadFileTypeIds TeamsMeetingRecordingis set. - Ask to be added to a security group listed in
-ExcludedBlockDownloadGroupIdsif your role requires downloads.
The recording never appeared in the chat
The organizer, co-organizers and recording initiator had no OneDrive, so the file went to temporary async media storage.
- Ask the organizer to check for the upload error message shown after the meeting.
- Ask them to download the recording within 21 days, after which it is deleted.
- Free space in the OneDrive quota, or assign a OneDrive licence, then retry the upload.
What to Do If a Teams Recording Expired or Disappeared
"The recording is currently unavailable" on the meeting recap page
Meeting recordings and transcripts expire after 120 days by default and are moved to the recycle bin.
- Identify the owner: the organizer for a normal meeting, the channel for a channel meeting.
- Open onedrive.com as that owner and select Recycle bin in the navigation pane.
- Point at the recording, tick the circle check box, then select Restore.
- Act quickly; items in a work or school recycle bin are deleted after 93 days unless an admin changed the setting.
A channel meeting recording vanished from SharePoint
Expired or deleted files go to the site recycle bin, not to OneDrive.
- In Teams, open the channel's Files tab and select More > Open in SharePoint.
- Select Recycle bin in the Quick Launch navigation, or open Settings > Site contents if it is not shown.
- Tick the box beside the recording and select Restore.
- Ask a site collection administrator to check the second-stage recycle bin if it is not listed.
The recording was deleted from a synced folder on the PC
Deleting a synced file removes it from OneDrive as well, but the local copy is still in the bin.
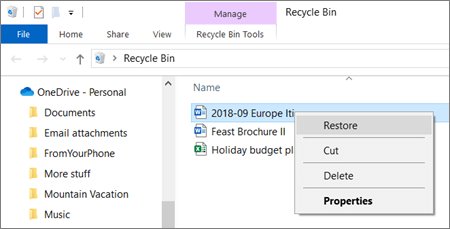
- Open the Recycle Bin on Windows, or the Trash on a Mac.
- Right-click the file and select Restore, or Put back on a Mac.
- Confirm the file reappears in the Recordings folder online before sharing the link again.
A published webinar or town hall recording is gone
Published recordings for Teams events expire after 30 days, extendable to 90 days.
- Ask the event organizer to open the past event in their Teams calendar.
- Only the organizer can manage recordings of events optimised for large audiences.
- Ask an administrator to check the Teams events usage report if the organizer cannot find it.
Best Practices for Sharing Teams Recordings
A meeting recording carries faces, voices and screen shares, so the link type matters more than the file format.
Share recordings with a People in (Your Organization) link, keep Allow editing off, and add named external guests with a Specific people link. An *Anyone* link needs no sign-in and its use cannot be audited, and Microsoft states external sharing is not designed to distribute large files. A signed-in recipient can be traced, revoked and removed from Manage access at any time.
Rename the file before sharing so recipients see the meeting subject, and set an expiry date on links that cover a one-off session.
Quick Troubleshooting Checklist
| Check | How to confirm | If it fails |
|---|---|---|
| Signed in with the right account | The account name in the top right of Teams or OneDrive | Sign out and sign in with the work or school account that attended |
| Looking in the right store | Channel meeting in SharePoint, everything else in the organizer's OneDrive | Search the other location before assuming the file is gone |
| Still inside the expiry window | The expiry date column on the file in OneDrive | Restore from the recycle bin of the owner's storage |
| Holding edit rights | Manage access lists you as Can edit | Ask the organizer or a channel owner to raise your permission |
| Not covered by a block policy | Playback works but Download is absent | Ask the SharePoint administrator about the block download policy |
| Transcript exists | A Transcript button appears beside the video | Nothing to download; transcription was off during the meeting |
Frequently Asked Questions
Why can't I download files from SharePoint?
Channel recordings stored in a Recordings\View only folder are view-only for channel members, and an org-wide block download policy can remove the command for everyone. Channel owners keep full access, so ask an owner or your SharePoint administrator.
Why can't I download a Teams recording when I can play it?
Playback needs read access; downloading needs edit rights. Attendees other than the organizer and co-organizers get read access with no sharing or download permissions, so the organizer has to raise your permission under Manage access.
How do I share a downloaded Teams recording?
Upload the .mp4 back to OneDrive or a SharePoint library, select Share, then choose a People in (Your Organization) or Specific people link. Emailing the raw file is slower and leaves you no way to revoke access afterwards.
How do I share downloads with someone outside my organization?
Use a Specific people link addressed to their email address. Guests and external attendees can view a recording only when it is explicitly shared with them, because they get no access from the meeting invite alone.
Can you download a Teams recording on mobile?
Microsoft documents the Download command in the Teams Shared tab and in the OneDrive or SharePoint library. Open the recording's OneDrive or SharePoint location in a phone browser to reach that same command.
Where are Teams meeting recordings saved?
Meetings, events and calls save to the organizer's OneDrive in a Recordings folder. Channel meetings save to the channel's SharePoint site under *Team name – Channel name*/Documents/Recordings.
How long is a Teams recording available?
Recordings and transcripts expire after 120 days by default, then move to the recycle bin. Administrators can change that default, and published recordings for Teams events expire after 30 days, extendable to 90.
What happened to Microsoft Stream?
Stream (Classic) is deprecated. Teams recordings are now ordinary video files in OneDrive and SharePoint, played by the Microsoft 365 video player, so they are shared and managed like any other file.
Can I download the transcript separately from the video?
Yes, if you hold edit rights. Open the recording, select Video settings, expand Transcripts and captions, then select Download next to the transcript to save a WebVTT (.vtt) file.
Does moving or copying a recording break the captions?
It can. Closed captions are not fully supported once a recording is moved or copied away from its original OneDrive or SharePoint location, and copying inside the same site can break the transcript link.
How large is a Teams meeting recording?
About 400 MB for one hour of video. The file counts against the OneDrive or SharePoint quota of whoever owns it, which is usually the meeting organizer.