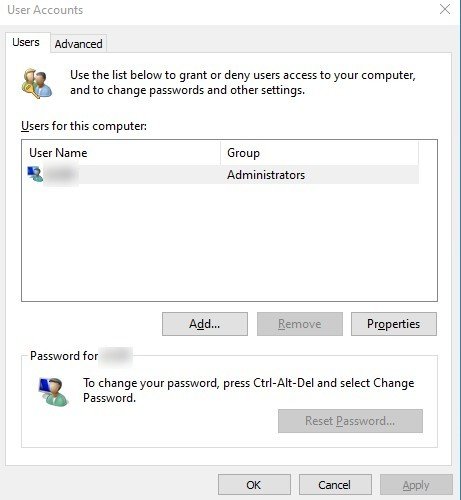
Press Win + R, type control userpasswords2 and press Enter to open the classic User Accounts dialog, the same window that netplwiz opens, where you add, remove and reset local accounts.
This guide covers every job the dialog handles in Windows 11, the matching Settings and command-line routes, automatic sign-in, and the fixes for a missing password checkbox.
How to open Control Userpasswords2 in Windows 11
The command works from the Run box, Command Prompt, PowerShell and the taskbar search box. You need an administrator account to change anything in the dialog.
- Press Win + R to open the Run box.
- Type
control userpasswords2(or the shorternetplwiz). - Press Enter or select OK.
- Select Yes if a User Account Control prompt appears.
- Work in the Users tab to manage accounts, or the Advanced tab for passwords and secure sign-in.
If you prefer typing commands, run the same string in Command Prompt or Windows Terminal. The dialog that opens is identical.
Control Userpasswords2 vs netplwiz vs Settings: which tool to use
| What you want to do | Best tool | Why |
|---|---|---|
| Add a person with a Microsoft account | Settings > Accounts > Other users | The modern wizard handles Microsoft accounts, family members and local accounts |
| Change an account between Standard and Administrator | Settings or the dialog's Group Membership tab | Both write the same group change; the dialog also offers other groups |
| Rename the display name of a local account | control userpasswords2 > Properties |
Settings has no rename field for other users |
| Reset a forgotten password for another local account | control userpasswords2 > Reset Password |
No need to know the old password when you are an administrator |
| Sign in automatically at startup | control userpasswords2 or netplwiz |
The dialog stores the credentials for you after one checkbox change |
| Script or remote account changes | net user in Command Prompt |
Works without a window and supports batch files |
| Disable an account, set group rights | Local Users and Groups in Computer Management | Full account properties, including disabling an account |
control userpasswords2 and netplwiz are two names for one dialog, so pick whichever is easier to remember.
For managing user accounts via Control Panel, this command is the route: control launches Control Panel and userpasswords2 tells it to open the User Accounts dialog. Using netplwiz gives the same advanced control over groups, passwords and automatic sign-in.
What the Control Userpasswords2 dialog controls
Control Userpasswords2 is a Control Panel command, not a separate program: it opens the classic User Accounts dialog that netplwiz.exe also opens. Here is what the user accounts dialog can do, control by control.
| Tab or control | What it does |
|---|---|
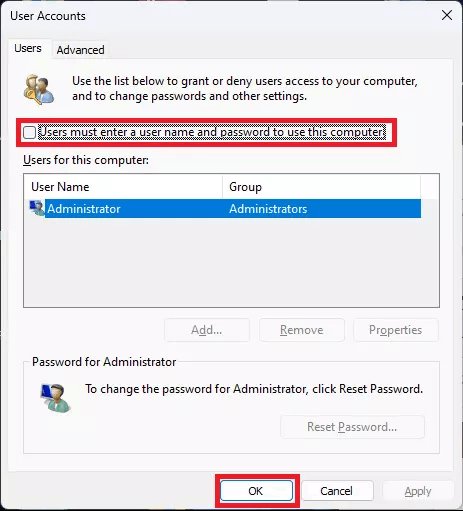
| Users must enter a user name and password to use this computer | Turns the sign-in prompt on or off; clearing it sets up automatic sign-in |
| Users for this computer list | Shows every account and the group it belongs to (Administrators, Users) |
| Add | Starts the wizard that adds a Microsoft account or a local account |
| Remove | Deletes the selected account from this PC after a confirmation |
| Properties | Opens the General tab (user name, full name, description) and the Group Membership tab |
| Reset Password | Sets a new password for a local account other than the one you are signed in with |
| Advanced tab > Manage Passwords | Opens Credential Manager with saved network and app sign-ins |
| Advanced tab > Advanced | Opens Local Users and Groups for full account and group control |
| Advanced tab > Require users to press Ctrl+Alt+Delete | Turns secure sign-in on or off |
Benefits of Control Userpasswords2: one window handles adding, removing, renaming, group changes, password resets for other local accounts and automatic sign-in, and it opens with one short command.
Limitations: it cannot reset a Microsoft account password or the password of the account you are signed in with, it has no fields for family settings, sign-in options or work and school accounts, and the automatic sign-in checkbox disappears when Windows Hello-only sign-in is on. Those jobs live in Settings > Accounts.
Types of user accounts in Windows 11
A user account in Windows 11 is a separate sign-in with its own settings, documents and apps on a shared device. Managing user accounts matters because it keeps each person's files private and controls who can change the system.
| Account type | What it is | When to use it |
|---|---|---|
| Microsoft account | Signs in with an email address linked to Microsoft services | Microsoft's recommended choice; adds service integration and sync across devices |
| Local account | Exists only on this PC, with a password stored on the device | A PC that should not connect to Microsoft services |
| Administrator | Full control: change settings, install software, access all files | Keep as few as possible |
| Standard user | Everyday rights; admin tasks need an administrator's approval through User Account Control | Day-to-day use, including for administrators |
| Family member (child) | Standard account in a Microsoft family group with parental controls | Children whose use parents monitor and limit |
| Work or school account | An organization's account connected to the PC for its files, email and apps | Personal devices your organization allows to connect |
| Guest (built-in) | Limited account for occasional users, disabled by default with a blank password | Leave it disabled; Microsoft treats it as a security risk |
Settings has no option for creating guest accounts in Windows 11. For a visitor, add a standard local account with a name such as Visitor and remove it afterwards.
How to manage user accounts in Windows 11 using Control Userpasswords2: A step-by-step guide
Start with adding an account, since most other jobs in the dialog act on an existing one. You can also add a user account in Settings if you prefer the modern pages.
- Run
control userpasswords2and stay on the Users tab. - Select Add below the Users for this computer list.
- Enter the person's Microsoft account email address, or choose the option to sign in without a Microsoft account to create a local account.
- For a local account, enter a user name, a password and a password hint, then select Next.
- Select Finish, and the new account appears in the list as a member of Users.
- Select Apply, then OK to close the dialog.
Check the Group column before you close the dialog. Microsoft recommends standard accounts for everyday use and as few administrators as possible.
To add a new user account in Settings instead, open Settings > Accounts > Other users and select Add account under Add other user. Enter the person's Microsoft account email, or to create a local account select I don't have this person's sign-in information > Add a user without a Microsoft account, then follow the prompts.
Change account type or rename a user with Control Userpasswords2
- Run
control userpasswords2. - Select the account in Users for this computer, then select Properties.
- On the General tab, edit Full name or Description to change how the account is labelled.
- Open the Group Membership tab.
- Choose Standard user or Administrator, or pick Other and select a group from the list.
- Select OK, then sign out of that account and back in so the new rights apply.
To configure a user as an administrator in Settings, open Accounts > Other users, expand the account, select Change account type next to Account options, pick Administrator or Standard User and select OK.
Reset a local account password with Control Userpasswords2
This works only for local accounts. A Microsoft account password is changed online, and the dialog cannot reset the account you are currently signed in with.
- Sign in with an administrator account and run
control userpasswords2. - Select the local account that needs a new password.
- Select Reset Password in the password section under the list.
- Type the new password twice in New password and Confirm new password.
- Select OK and give the person the new password.
To change your own local account password, open Settings > Accounts > Sign-in options, select Password > Change and enter the old password first. Computer Management offers the same reset as the dialog: right-click the user under Local Users and Groups > Users and choose Set Password.
Step-by-step guide to remove an administrator account in Windows 11
Make sure another account keeps administrator rights before you start. Removing an account deletes its sign-in information and data from this PC, but it does not delete the person's Microsoft account.
- Sign in with a different administrator account and back up any files you want from the account you are removing.
- Run
control userpasswords2, select the account, then select Properties > Group Membership and choose Standard user if you only want to take away its rights. - To delete it completely, select the account in the Users tab and select Remove.
- Select Yes to confirm.
- Alternatively, open Settings > Accounts > Other users, expand the account and select Remove next to Account and data.
The built-in account named Administrator cannot be deleted. Windows setup already disables it, and you can rename or disable it, but never remove it from the Administrators group.
How to switch between user accounts in Windows 11
Switching keeps the current account's apps open and its session running, so another person can sign in without closing your work.
- Select Start.
- Select your user picture or the Accounts icon.
- Select the user account you want to switch to from the list.
- Sign in with that account's password, PIN or Windows Hello.
On a device managed by an organization, the same menu also shows a Switch user option. To end your session instead, select Sign out from that menu; open apps close and unsaved work may be lost.
How to add a family account and enable parental controls
Managing accounts for family members works through a Microsoft family group. Give children standard accounts so parental controls can monitor and limit their use, and keep administrator rights for the parents.
- Open Settings > Accounts > Family.
- Select the option to add someone to your family group.
- Enter the family member's Microsoft account email, or create one for them, and follow the prompts.
- Set up parental controls for a child in Microsoft Family Safety, which manages the family group's limits and monitoring.
- Leave the child's account as a standard account in
control userpasswords2or Other users, so changes still need a parent's approval.
Each family member gets their own sign-in, so their files and settings stay separate and private from yours.
Connect or disconnect a work or school account in Windows 11
Connecting a work or school account gives your personal PC access to your organization's files, email, apps and resources. Your organization must support bring your own device (BYOD) for this to work.
Connect a work or school account
Use this to reach your organization's resources from a personal PC.
- Open Settings > Accounts > Access work or school.
- Select Connect next to Add a work or school account.
- Enter the account information, select the account type, then select Add.
Disconnect a work or school account
Use this when you leave the organization or no longer need its resources on this PC.
- Open Settings > Accounts > Access work or school.
- Select the dropdown next to the work or school account and select Disconnect.
- Select Yes to confirm.
Disconnecting does not delete the account itself; it removes its sign-in information and data from this device.
Add accounts used by apps in Windows 11
Accounts used by apps make signing in to email, calendar, contacts and other apps easier and faster. They do not create a new sign-in on the PC.
- Open Settings > Accounts > Email & accounts.
- For email, calendar or contacts, select Add an account under Accounts used by email, calendar, and contacts.
- For other apps, select Add a Microsoft account or Add a work or school account.
- Follow the prompts to finish adding the account.
How to manage sign-in options in Windows 11
Windows Hello replaces the password with a PIN, fingerprint or face. The PIN works only on the one device and is backed up for recovery with your Microsoft account.
- Open Settings > Accounts > Sign-in options.
- Under Ways to sign in, select Facial recognition (Windows Hello), Fingerprint recognition (Windows Hello) or PIN (Windows Hello).
- Select Set up and follow the instructions.
- To remove a PIN or biometric sign-in later, return to the same option and choose its remove button.
- Sign out and back in to try the new method.
Facial recognition needs a Hello-compatible infrared camera, and fingerprint sign-in needs a fingerprint reader; a USB reader adds one to a PC without it.
Syncing settings across devices with Windows backup
Windows backup syncs the settings you choose across every Windows device you sign in to with the same Microsoft account.
- Open Settings > Accounts > Windows backup.
- Turn on Remember my preferences.
- Expand it and tick the groups to sync: Accessibility, Accounts and passwords, Personalization, Language preferences and Other Windows settings.
- Sign in with the same Microsoft account on your other PC to bring those settings across.
Turn on automatic sign-in with Control Userpasswords2
Automatic sign-in skips the password at startup, so use it only on a PC that stays in a secure place.
- Run
control userpasswords2ornetplwiz. - Select the account that should sign in automatically.
- Clear Users must enter a user name and password to use this computer.
- Select Apply.
- Enter the account's user name and password twice in the Automatically sign in box, then select OK.
- Restart the PC to confirm it reaches the desktop without a prompt.
For a Microsoft account, enter the account's password, not the PIN. To skip automatic sign-in once and use another account, hold Shift after you sign out or while Windows restarts.
Set up automatic sign-in with the Winlogon registry key
Use this route when the dialog's checkbox is missing or you are scripting a kiosk or test PC. Manual registry configuration is discouraged because the password sits in the registry in plain text, and Authenticated Users can read that key remotely.
- Press Win + R, type
regeditand press Enter. - Go to
HKEY_LOCAL_MACHINE\SOFTWARE\Microsoft\Windows NT\CurrentVersion\Winlogon. - Select Edit > New > String Value, name it
AutoAdminLogon, and set its data to1. - Double-click
DefaultUserNameand type the account's user name. - Double-click
DefaultPasswordand type the password; create it as a String Value first if it does not exist. - On a domain-joined PC, add a
DefaultDomainNamestring with the domain's full name, such as contoso.com. - Close Registry Editor and restart.
Without a DefaultPassword value, Windows sets AutoAdminLogon back to 0. Microsoft's Sysinternals Autologon tool writes the same settings but stores the password as an encrypted LSA secret instead of plain text.
Require Ctrl+Alt+Delete at sign-in with Control Userpasswords2
Secure sign-in makes every user press Ctrl + Alt + Delete before the password box appears. Only Windows can answer that key combination, so a fake sign-in screen cannot capture the password.
- Run
control userpasswords2. - Open the Advanced tab.
- Under Secure sign-in, tick Require users to press Ctrl+Alt+Delete.
- Select Apply, then OK.
- Lock the PC with Win + L to see the new prompt.
Clear the same checkbox to remove the prompt. On a work PC the setting can be locked by the policy Interactive logon: Do not require CTRL+ALT+DEL, and the checkbox then has no effect.
Using Computer Management to manage users and groups
Computer Management holds every local account, including the built-in ones, in Local Users and Groups. It is the advanced route for disabling accounts and managing user groups, and the dialog's Advanced button opens the same tool.
- Press Win + R, type
compmgmt.mscand press Enter. - Expand Local Users and Groups and select Users to see every local account.
- Right-click an account and choose Set Password to reset it, or Properties for its full settings.
- In Properties, tick Account is disabled to block an account without deleting it.
- Open the Groups folder and double-click a group, such as Administrators or Users, to add or remove members.
- Select OK, then have the affected user sign out and back in.
Manage user accounts with net user in Command Prompt
net user covers the same jobs from an elevated Command Prompt, which suits scripts and remote sessions. Right-click Command Prompt or Terminal and choose Run as administrator first.
net user Alex * /addCreates a local account named Alex and prompts for its password without showing it. Use net user alone to list accounts, net user Alex /delete to remove one, and net user Alex /active:no to disable one without deleting it.
You should see: Command Prompt prints "The command completed successfully." and the account appears when you run net user again or reopen control userpasswords2.
To view all user accounts in Windows 11, run net user on its own, or open Settings > Accounts > Other users, which lists every other person with an account on the PC.
How to check Control Userpasswords2 changes worked
- Reopen
control userpasswords2and check that each account shows the expected group in the Group column. - Run
net user <name>in Command Prompt and read the Local Group Memberships line for the account you changed. - Restart the PC after enabling automatic sign-in; it should reach the desktop without the password box.
- Lock the PC with Win + L after turning on secure sign-in; the screen should ask for Ctrl + Alt + Delete.
- Sign in to an account you reset with its new password to confirm the change.
Turn the Windows 11 sign-in password prompt back on
- Run
control userpasswords2. - Tick Users must enter a user name and password to use this computer.
- Select Apply, then OK.
- If you used the registry route, set
AutoAdminLogonto0and delete theDefaultPasswordvalue in the Winlogon key. - Restart and confirm the sign-in screen asks for a password or PIN again.
Fix Control Userpasswords2 missing checkbox and sign-in problems
The "Users must enter a user name and password" checkbox is missing
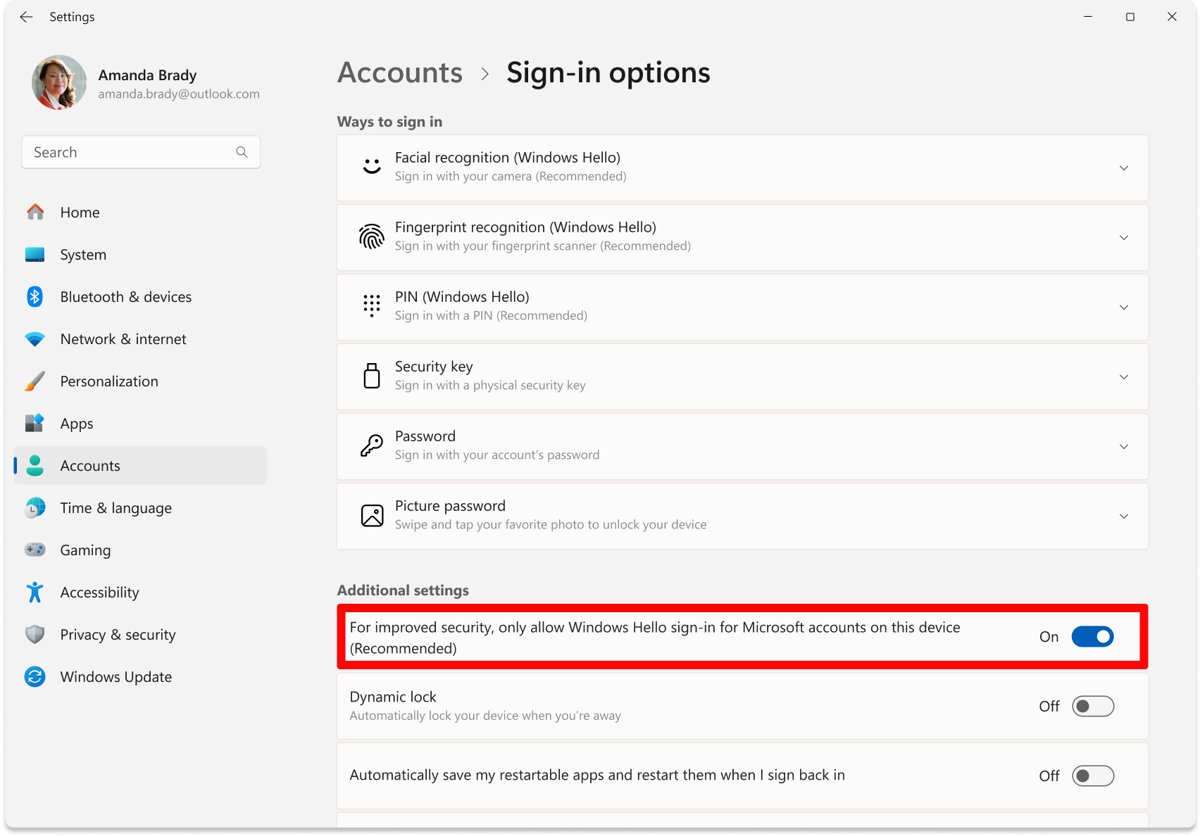
Windows Hello-only sign-in is turned on for your Microsoft account, which removes password sign-in from this PC.
- Open Settings > Accounts > Sign-in options.
- Under Additional settings, turn off For improved security, only allow Windows Hello sign-in for Microsoft accounts on this device.
- Close and reopen
control userpasswords2; restart first if the checkbox is still hidden. - On a work or school PC, ask the administrator: the Windows passwordless experience policy for Microsoft Entra accounts also hides password sign-in.
Windows still asks for a password after you clear the checkbox
A logon banner policy, Exchange ActiveSync password rules, or a wrong stored password blocks automatic sign-in.
- Run
control userpasswords2, tick the checkbox, select Apply, then clear it again and re-enter the password carefully. - Use the account password, not the PIN, for a Microsoft account.
- Check whether a logon banner (a legal notice before sign-in) is set by policy; automatic sign-in does not run while one is defined.
- Remove Exchange ActiveSync password policies from a mail account in Control Panel if your PC has one; they block automatic sign-in by design.
You forgot a local account password and cannot sign in
Local account passwords are stored only on the PC, so they are reset there, not online.
- On the sign-in screen, enter any password, select OK, then Reset password, and answer the security questions set up with the account.
- If you made a password reset disk, choose Use a password reset disk instead.
- Otherwise sign in with another administrator account and reset the password with
control userpasswords2or Computer Management. - With no other administrator account, the only remaining option is to reset the PC.
An account disappeared from the list after a rename or group change
The account was disabled or removed from the groups the dialog lists.
- Sign in with another administrator account.
- Press Win + R, type
compmgmt.mscand press Enter. - Open Local Users and Groups > Users and check that the account exists and is not disabled.
- If it shows as disabled, run
net user <name> /active:yesfrom an elevated Command Prompt to turn it back on.
Is automatic sign-in with Control Userpasswords2 safe?
Use automatic sign-in only on a desktop that never leaves a locked room, and keep the password prompt on laptops. Anyone who powers on the PC reaches every file and connected network, and the registry method stores the password in plain text that other accounts can read. Turning on User Account Control and using a standard account for the auto sign-in limits the damage if the PC is taken.
Safer alternatives to removing the password: a Windows Hello PIN, fingerprint or face sign-in is almost as fast and keeps the PC locked. When automatic sign-in is truly needed, Sysinternals Autologon stores the password encrypted instead of in plain text.
Best practices for managing user accounts
| Practice | Why it matters |
|---|---|
| Give each person their own account | Keeps files, settings and apps private and separate |
| Keep as few administrators as possible | Administrators can change settings, install software and access all files |
| Use a standard account day to day, even as an administrator | User Account Control asks for approval before admin tasks, which limits malware damage |
| Leave the built-in Administrator and Guest accounts disabled | Both are disabled by default, and Guest can give anonymous access |
| Set up Windows Hello instead of automatic sign-in | Fast sign-in without leaving the PC open to anyone |
| Remove or disable accounts nobody uses | Fewer sign-ins means fewer ways into the PC |
| Separate work or school use from personal use | Keeps sensitive organization data compartmentalized |
Control Userpasswords2 FAQ
How do I run control userpasswords2 from CMD?
Open Command Prompt, type control userpasswords2 and press Enter. The classic User Accounts dialog opens on top of the console. Run Command Prompt as administrator if you plan to change other accounts, so you can approve changes without a second prompt.
Is control userpasswords2 the same as netplwiz?
Yes. Both commands open the same User Accounts dialog with the Users and Advanced tabs. netplwiz is shorter to type, while control userpasswords2 is the Control Panel form of the command. Settings and checkboxes you change in one appear in the other.
Does control userpasswords2 work in Windows 10?
Yes. The command opens the same dialog in Windows 10 and Windows 11. On Windows 10 the setting that hides the password checkbox is called Require Windows Hello sign-in for Microsoft accounts, under Settings > Accounts > Sign-in options.
Is there a control userpasswords2.exe file?
No separate file has that name. control is Control Panel's launcher and userpasswords2 is the argument that opens the User Accounts dialog. The dialog itself is netplwiz.exe, which you can also run directly from the Run box.
Why is the checkbox missing in control userpasswords2?
The checkbox usually disappears when Windows Hello-only sign-in is on for a Microsoft account. Turn off For improved security, only allow Windows Hello sign-in for Microsoft accounts on this device in Settings > Accounts > Sign-in options, then reopen the dialog.
Can I set up automatic sign-in in the registry instead of control userpasswords2?
Yes. Set AutoAdminLogon to 1 and fill in DefaultUserName and DefaultPassword under HKEY_LOCAL_MACHINE\SOFTWARE\Microsoft\Windows NT\CurrentVersion\Winlogon. The password is stored in plain text there, so Sysinternals Autologon is the safer way to write the same settings.
Can control userpasswords2 reset a Microsoft account password?
No. Reset Password in the dialog works only for local accounts other than the one you are signed in with. A Microsoft account password is changed or reset online through the Microsoft account sign-in pages.
Do I need administrator rights to use control userpasswords2?
Yes, to make changes. Adding, removing, resetting passwords and changing group membership all need an administrator account. On a standard account, Windows asks for an administrator's credentials through a User Account Control prompt before it applies the change.

![6 best free virtual webcam software for Windows [2026 update]](https://techdows.com/wp-content/uploads/2026/10/6-best-free-virtual-webcam-software-for-Windows-2026-update-600x338.jpg)