Press Windows key + R, type printmanagement.msc and press Enter to open the Print Management tool on Windows 11 and Windows 10.
This guide covers every way to open it, how to install the console when Windows says it cannot be found, and how to use it to add, deploy, filter and script printers.
Open Print Management with the Run command
Print Management is a Microsoft Management Console (MMC) snap-in saved as printmanagement.msc. The Run dialog box is the fastest route on both Windows 11 and Windows 10.
- Press Windows key + R to open the Run box.
- Type
printmanagement.mscin the Open field. - Press Enter or select OK.
- Select Yes if User Account Control asks for permission.
- Wait for the Print Management window to open with Print Servers listed in the left pane.
If Windows replies that it cannot find printmanagement.msc, the console is not installed on this PC. Jump to the install section below, then run the command again.
How to open Print Management Tool in Windows 11
Every route below opens the same console. Pick the one that matches where you already are.
| Your situation | Use this | Why |
|---|---|---|
| Keyboard works and you know the file name | Windows key + R, then printmanagement.msc |
Same two keystrokes on Windows 11 and Windows 10 |
| You do not remember the command | Select Start, type Print Management and select the result | Search matches the plain name once the console is installed |
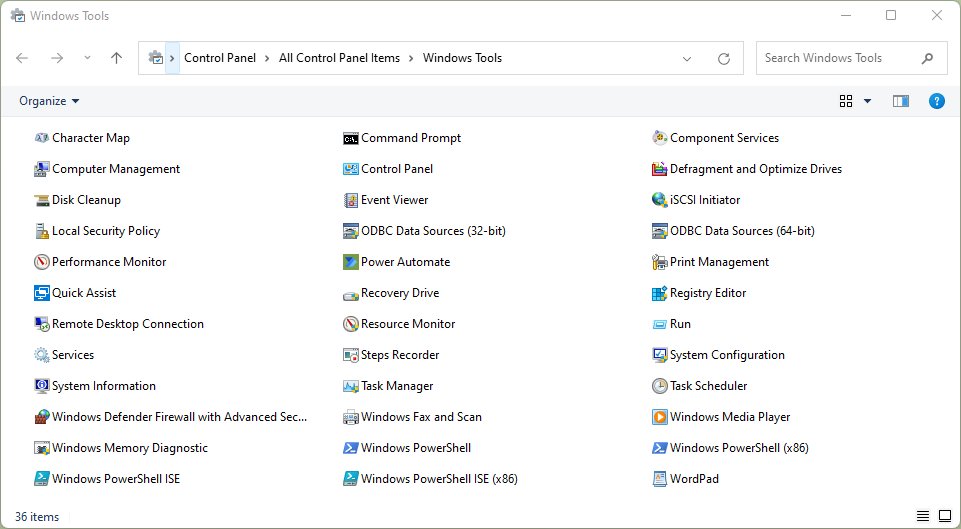
| You prefer Control Panel | Control Panel > Windows Tools (Windows 11) or Administrative Tools (Windows 10), then double-click Print Management | Lists every admin console in one folder |
| You are already in a terminal | Type printmanagement.msc in Command Prompt, PowerShell or Windows Terminal |
No need to return to the desktop |
| You want Print Management next to other snap-ins | Run mmc, then File > Add/Remove Snap-in > Print Management |
Builds one custom console you can save and reuse |
Microsoft notes that the contents of Windows Tools vary by Windows edition, so a missing entry there points to the same install fix as a Run error.
Open Print Management through Microsoft Management Console
Adding the snap-in to an empty MMC window lets you point it at a remote print server from the start. Microsoft documents this route for backing up printers on another server.
- Press Windows key + R, type
mmcand press Enter, then select Yes at the User Account Control prompt. - Select File > Add/Remove Snap-in.
- In Available snap-ins, select Print Management, then select Add.
- In the Configure Print Management window, type a print server name and select Add to List, or select Add the Local Server.
- Select Finish, then OK.
- Select File > Save As to keep the console as an
.mscfile you can double-click later.
This MMC route works alongside other administrative consoles, the same way you can open Computer Management with compmgmt.msc and add more snap-ins to one window.
Check whether your Windows edition supports Print Management
Microsoft lists Print Management Console as a Feature on Demand for Windows 10, version 2004 and later, and for Windows 11. Its capability name is Print.Management.Console~~~~0.0.1.0, and it enables management of printers, printer drivers and print servers.
Microsoft's list does not name an edition restriction, and it adds that tools in Windows Tools vary by edition. Check both your version and whether the capability is present before you troubleshoot anything else.
| What to check | How to check it | What the result means |
|---|---|---|
| Windows version | Press Windows key + R, type winver and press Enter |
Windows 10, version 2004 or later, or any Windows 11 release, can install the console as an optional feature |
| Windows edition | Open Settings > System > About and read Edition under Windows specifications | Note the edition before you ask an IT team or search for edition-specific help |
| Whether the console is installed | In an administrator terminal, run DISM /Online /Get-CapabilityInfo /CapabilityName:Print.Management.Console~~~~0.0.1.0 |
The State line shows whether the console is installed; if it is not, use the install steps below |
| Whether the file opens | Run printmanagement.msc from the Run box |
An error saying Windows cannot find the file confirms the feature is missing or damaged |
Install or restore Print Management Console
Windows downloads Features on Demand from Windows Update, so the PC needs an internet connection. On Windows 11 the optional features list sits under System in Settings.
| Route | Steps |
|---|---|
| Settings on Windows 11 | Open Settings > System > Optional features, select View features next to Add an optional feature, search for Print Management, tick it, select Next, then Install |
| Settings on Windows 10 | Open Settings, search for Optional features, select Add a feature, search for Print Management, tick it and select Install |
| PowerShell (administrator) | Run Add-WindowsCapability -Online -Name "Print.Management.Console~~~~0.0.1.0" |
| Command Prompt (administrator) | Run DISM.exe /Online /Add-Capability /CapabilityName:Print.Management.Console~~~~0.0.1.0 |
When the install finishes, run printmanagement.msc again. If the console was installed but broken, remove it with DISM.exe /Online /Remove-Capability /CapabilityName:Print.Management.Console~~~~0.0.1.0, restart, and add it back with the same command.
On a work PC that gets updates from WSUS, Microsoft notes that Features on Demand can only be installed from Windows Update since Windows 10, version 1809, so the IT team may need to allow that download.
How to use Print Management Tool in Windows 11
Print Management gives one window for many printers and print servers. Microsoft describes it as the tool for monitoring print queues, getting notified when queues stop processing jobs, migrating print servers and deploying printer connections with Group Policy.
| Job you want to do | Where to do it in Print Management |
|---|---|
| Watch printers on several servers at once | Right-click Print Management > Add/Remove Servers, then add each server |
| Pause, resume or cancel jobs on many printers together | Select several printers under a server or filter, then right-click for the bulk action |
| Find printers with errors or a status other than Ready | Create a filter in the custom filters folder |
| Get an email or run a script when a printer goes offline | Set notifications on a filter or a print server |
| Install printers found on the network | Right-click a server > Add Printer |
| Push printer connections to users or PCs in a domain | Right-click a printer > Deploy with Group Policy |
| Back up or move all queues and drivers | Right-click Print Management > Migrate Printers |
| Export a list of drivers, forms, ports or printers | Select the node, then More Actions > Export List in the Actions pane |
For a single home printer, the Settings app or the Devices and Printers folder is quicker. Print Management earns its place once you handle drivers, ports or more than one machine.
Navigate the Print Management console
The left pane is a tree. By default it manages the local computer, and every server you add gets its own branch.
| Node in the tree | What it holds | Typical use |
|---|---|---|
| Custom filters folder (Custom Printer Filters in Microsoft's documentation) | Saved, dynamic views of printers that match conditions you set | See every printer that is not Ready, across all servers |
| Print Servers | The local computer and every server added with Add/Remove Servers | Expand a server to reach its drivers, forms, ports and printers |
| Server > Drivers | Printer drivers installed on that server | Check driver versions or export the driver list |
| Server > Forms | Paper forms defined on the server | Review paper sizes available to queues |
| Server > Ports | Ports the printers use, such as TCP/IP ports | Confirm which port a printer prints to |
| Server > Printers | Every print queue on the server | Open properties, share, deploy or delete a printer |
The Actions pane on the right changes with the node you select. Use More Actions there when a right-click menu does not show the command you need.
Add a printer from Print Management
Print Management can search the subnet, install a matching driver, create the queue and share it. Run the console as an administrator for this job.
- Open Print Management with
printmanagement.msc. - Expand Print Servers and right-click the server that should host the printer.
- Select Add Printer to start the Network Printer Installation Wizard.
- Select Search the network for printers, then select Next.
- Pick the printer from the results and, if prompted, choose the driver to install.
- Finish the wizard, then expand the server's Printers node to see the new queue.
The search only finds printers on the same subnet as the computer running the console. For a printer on a remote server's subnet, sign in to that server with Remote Desktop and add it there.
Add print servers and deploy printers with Group Policy
These two jobs turn Print Management into a central console for a network. Deploying needs an Active Directory domain and write access to the Group Policy object you choose.
- Right-click Print Management in the tree and select Add/Remove Servers.
- Under Specify print server, type server names separated by commas, or select Browse, then select Add to List and OK.
- Under the server, select Printers, right-click the printer to share out and select Deploy with Group Policy.
- Select Browse and choose or create the Group Policy object, then select OK.
- Tick The users that this GPO applies to (per user), The computers that this GPO applies to (per machine), or both.
- Select Add, then OK.
Per-machine connections appear for every user of the targeted computers; per-user connections follow the user to any PC. Removing the setting from the GPO removes the printer from clients at the next Group Policy refresh or sign-in.
Create a Print Management printer filter with email alerts
Filters are saved views that update live. Each one can send an email or run a script when its conditions are met, for example a printer that leaves the Ready status.
- Right-click the custom filters folder at the top of the tree and select Add New Printer Filter.
- Type a name and optional description, tick Display the total number of printers next to the name of the printer filter, and select Next.
- On Define a printer filter, choose a Field, a Condition and a Value, such as queue status not equal to Ready, then select Next.
- On Set Notifications (Optional), tick Send e-mail notification and enter the recipient, sender and SMTP server, or tick Run script and enter the script path.
- Select Finish.
- To add alerts to an existing filter later, right-click it and select Set Notifications.
Scripts run with your credentials on the PC that runs Print Management, so a script that restarts a spooler needs the rights to do that.
Manage printers with PowerShell
The PrintManagement module in Windows PowerShell does most console jobs from a prompt and scales to scripts. Microsoft notes that Get-Printer and Get-PrintJob do not need administrator credentials, while Add-Printer may.
Other cmdlets in the module include Remove-Printer, Rename-Printer, Set-Printer, Add-PrinterDriver, Add-PrinterPort, Get-PrinterDriver, Get-PrinterPort, Remove-PrintJob, Suspend-PrintJob and Resume-PrintJob.
Get-Printer -ComputerName PrintServerLists every printer on the computer named PrintServer; drop -ComputerName to list local printers. Related one-liners: Add-Printer -ConnectionName \\printServer\printerName connects to a shared printer, Get-PrintJob -PrinterName "PrinterName" lists the jobs in one queue, and Remove-Printer -Name "PrinterName" deletes a printer.
You should see: PowerShell lists one entry per printer and connection, and the names match the server's Printers node in the console.
Add | Format-List after Get-Printer -Name "PrinterName" to see the detailed properties of one printer.
Use the legacy prnmngr command
prnmngr is a Visual Basic script that adds, deletes and lists printers or printer connections, and sets the default printer. It lives in %WINdir%\System32\printing_Admin_Scripts\<language>, so you run it through cscript with the full path or from that folder.
cscript %WINdir%\System32\printing_Admin_Scripts\en-US\prnmngr -l-l lists every printer on the local computer, or on a remote one when you add -s <Servername>. Other switches: -a adds a local printer, -d deletes one (-p names it), -g shows the default printer, -t -p <Printername> sets the default, and -x deletes all printers on the target.
You should see: The script lists the printers installed on the target computer and returns to the prompt without an error.
Replace en-US with your Windows display language folder if the path is not found. For new scripts, prefer the PowerShell cmdlets above, which Microsoft lists as the supported module.
Why not use net print?
Use Print Management or the PrintManagement PowerShell cmdlets instead of net print for any new task. Microsoft marks net print as deprecated and says it is not guaranteed to be supported in future Windows releases. It only shows a shared queue or holds, releases and deletes single jobs; Get-PrintJob, Suspend-PrintJob, Resume-PrintJob and Remove-PrintJob cover the same jobs with a supported tool.
How to check Print Management is installed and working
- Run
printmanagement.msc: a window titled Print Management opens instead of a file-not-found error. - Expand Print Servers: your own computer is listed, plus any server you added.
- Expand your computer and select Printers: the list matches the printers shown in Settings.
- Select Drivers and Ports: each shows entries, which confirms the console can read the print spooler.
- In PowerShell, run
Get-Printerand check that the same printer names appear.
Fix common Print Management problems
Windows cannot find printmanagement.msc
The Print Management Console feature is not installed on this PC.
- Check the spelling:
printmanagement.msc, one word, with the.mscextension. - Open Settings > System > Optional features and look for Print Management under installed features.
- If it is missing, add it from View features, or run
DISM.exe /Online /Add-Capability /CapabilityName:Print.Management.Console~~~~0.0.1.0in an administrator Command Prompt. - Restart the PC if Settings asks, then run
printmanagement.mscagain.
The optional feature will not install
Features on Demand come from Windows Update, which the PC cannot reach or is told not to use.
- Confirm the PC is online and that Windows Update is not paused.
- On a managed PC, ask IT whether WSUS blocks Feature on Demand downloads; Microsoft states they can only be installed from Windows Update since Windows 10, version 1809.
- Run the
Add-WindowsCapabilitycommand from an administrator PowerShell window to see any error text that Settings hides.
Printers, drivers or ports do not show, or printing is stuck
The Print Spooler service has stopped or is hung.
- Press Windows key + R, type
services.mscand press Enter. - Right-click Print Spooler and select Restart.
- Or, in an administrator PowerShell window, run
Restart-Service -Name spooler. - On a domain PC, check with IT that no Group Policy disables the Print Spooler service as a security measure.
A remote print server shows a blank printer list
The print server cannot resolve your PC's full DNS name to call it back, even though drivers and ports may display.
- From the print server, ping your PC's fully qualified domain name, such as
client.domain.com. - If the name does not resolve, ask the DNS administrator to add or correct the A record for your PC.
- Run
ipconfig /flushdnson the print server, then refresh the server in Print Management.
Add Printer finds no network printers
The wizard only searches the subnet of the computer running Print Management.
- Sign in to a computer on the printer's subnet, or to the print server with Remote Desktop.
- Open Print Management there and run Add Printer again.
- Or add the queue directly with
Add-Printer, naming the driver with-DriverNameand the port with-PortName.
Print Management tool FAQ
Why can't I find Print Management in Windows 11?
Print Management is a Feature on Demand, so it may not be installed. Open Settings > System > Optional features, select View features, search for Print Management and install it. Then press Windows key + R, type printmanagement.msc and press Enter.
How do I open print jobs for a printer?
Run Get-PrintJob -PrinterName "PrinterName" in PowerShell to list every job in that printer's queue; no administrator rights are needed. In Print Management, select several printers to pause, resume or cancel all of their jobs in one action.
How do I open print services on Windows?
Press Windows key + R, type services.msc and press Enter, then find Print Spooler in the list. Right-click it and select Restart to clear stuck jobs. In an administrator PowerShell window, Restart-Service -Name spooler does the same thing.
What is the purpose of Print Management?
Print Management gives one console for many printers and print servers. Use it to monitor queues, get alerts when a queue stops, manage drivers and ports, migrate print servers, and deploy printer connections to users or computers with Group Policy.
What is the command to open Print Management?
The command is printmanagement.msc. Type it in the Run box, Command Prompt, PowerShell or Windows Terminal and press Enter. If Windows says it cannot find the file, install the Print Management Console optional feature first.
Can Print Management manage printers on another computer?
Yes. Right-click Print Management, select Add/Remove Servers, type the server name and select Add to List. Each server then appears under Print Servers. In PowerShell, Get-Printer -ComputerName ServerName lists the printers on a remote computer.
How do I add a printer with a command instead of the console?
Run Add-Printer -ConnectionName \\printServer\printerName in PowerShell to connect to a shared printer. To create a local queue, use Add-Printer with -Name, -DriverName and -PortName. The older prnmngr -a script also works but is a legacy tool.
Is net print still supported in Windows?
No. Microsoft lists net print as deprecated and not guaranteed in future releases. Use the PrintManagement cmdlets, such as Get-PrintJob, Suspend-PrintJob and Remove-PrintJob, or the Print Management console for the same queue and job tasks.
The bottom line on Print Management in Windows 11/10
Run printmanagement.msc from the Run box, and if it is missing, install Print Management from Settings > System > Optional features before trying anything else. The console is a Feature on Demand on Windows 10, version 2004 and later, and on Windows 11, so a missing install explains most open errors. Once present, it covers servers, drivers, ports, filters and Group Policy deployment, and the PrintManagement cmdlets script the same jobs.