To add launch options in Steam, right-click the game in your Library, select Properties, and type your options into the Launch Options box on the General tab.
This guide covers the exact steps, how to add several options at once, the common options Valve documents, how to confirm they work, and how to remove them when a game misbehaves.
How to add launch options to Steam games
Launch options live in the Steam desktop client, so open it on your PC first. If it is not installed yet, download Steam for Windows and sign in.
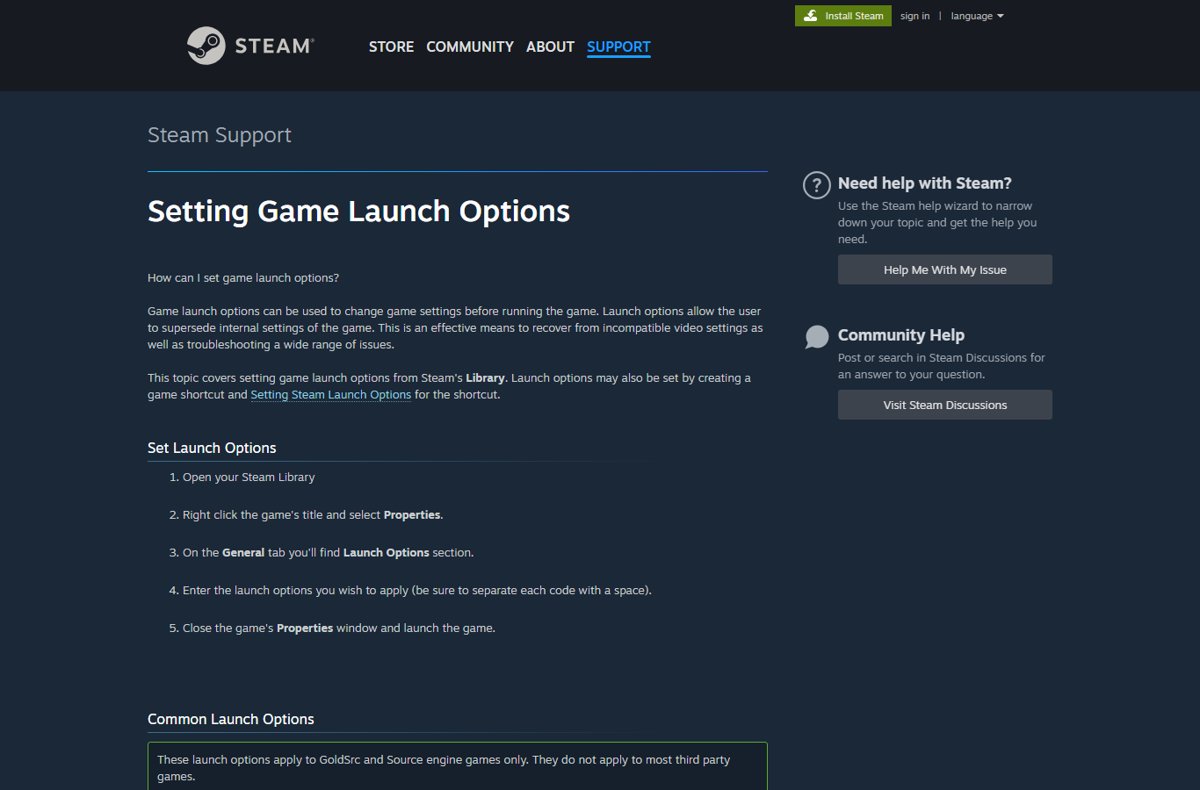
- Open Steam and select Library at the top of the window.
- Right-click the game's title in the list and select Properties.
- Stay on the General tab and find the Launch Options section.
- Type the options you want, separating each one with a space, for example
-novid -fullscreen. - Close the Properties window and launch the game.
There is no Save button. Steam keeps whatever is in the box when you close the window, and applies it every time the game starts from Steam.
Understanding launch options in Steam
Launch options are parameters Steam passes to a game when it starts. Valve describes them as a way to change game settings before the game runs and to override the game's internal settings.
| Question | Answer |
|---|---|
| What they are | Short text codes, usually starting with a hyphen (-novid) or a plus sign (+mat_hdr_level 0) |
| Where you set them | Game Properties > General tab > Launch Options box |
| What reads them | The game itself, not Steam, so each game decides which options it accepts |
| Which games accept Valve's list | GoldSrc and Source engine games; Valve says its list does not apply to most third-party games |
| The plus-sign form | Many Source console commands work as launch options when you add + in front of them, though some do not |
| How long they last | Until you edit or clear the box; they apply on every launch from Steam |
Benefits of using launch options in Steam games
| Benefit | Example option | What it does |
|---|---|---|
| Recover from broken video settings | -autoconfig |
Restores video and performance settings to defaults for the detected hardware |
| Start in the display mode you want | -windowed or -fullscreen |
Forces windowed or fullscreen mode before the game draws a frame |
| Fix a wrong resolution or refresh rate | -w 1920 and -refresh 144 |
Forces the width (height follows) and a specific refresh rate |
| Skip intro videos | -novid |
Stops the Valve intro video from playing |
| Get to the console faster | -console |
Starts the game with the developer console enabled |
| Collect evidence for a bug report | -condebug |
Writes all console output to console.log |
Valve's own summary is that launch options are an effective way to recover from incompatible video settings and to troubleshoot a wide range of issues.
How to access launch options in Steam
Two routes reach the same Properties window. Pick the one that matches where you are in the client.
| Where you are | Do this | Why |
|---|---|---|
| Scrolling the game list on the left of Library | Right-click the game's title > Properties | Fastest; no need to open the game page |
| Already on the game's Library page | Click the gear icon on the far right > Properties… | Same window, reached from the game page |
| Want options for a desktop shortcut instead | Set them on the game shortcut | Steam's support page notes options can also be set by creating a game shortcut |
Whichever route you take, the Launch Options section sits on the General tab, which opens first.
Step-by-step guide to adding launch options in Steam
Use this longer version the first time, or when a game has several options you need to get right.
- Open Steam and access your library: launch the Steam client, sign in, and click Library.
- Open game properties: right-click the game's title and select Properties, or click the gear icon on its Library page and select Properties….
- Navigate to the launch options: on the General tab, find the Launch Options text box.
- Enter your launch commands: type each option exactly as documented, including the leading
-or+, with a space between options. - Apply and close: close the Properties window; Steam keeps the text you typed without a separate save step.
- Launch the game: click Play and check that the option took effect, for example that the intro video is skipped with
-novid.
How to add multiple launch options in Steam
Steam accepts any number of options in the one box. The rule from Valve is to separate each code with a space.
- Open the game's Properties and stay on the General tab.
- Click at the end of any text already in Launch Options.
- Type a space, then the next option, for example
-novid -console -w 1920. - Keep a value directly after the option it belongs to, such as
-dxlevel 95or+mat_hdr_level 0. - Close the window and start the game to test the full set.
Never separate options with commas or semicolons. A value that drifts away from its option, such as -w -novid 1920, is read wrongly or ignored.
Common Steam launch options and their uses
These basic launch options come from Valve's support page. They apply to GoldSrc and Source engine games only, so a third-party game may ignore them or use its own names.
| Option | What it does |
|---|---|
-novid or -novideo |
Skips the Valve intro video at launch |
-console |
Starts the game with the developer console enabled |
-toconsole |
Starts the engine directly in the console, unless a map is set with +map |
-dev |
Enables developer mode, stops menu background maps loading and removes the quit dialog |
-condebug |
Logs all console output to the console.log text file |
-fullscreen |
Forces the engine to start in fullscreen mode |
-windowed or -sw |
Forces the engine to start in windowed mode |
-w [width] |
Sets the starting resolution width; the height follows automatically |
-h [height] |
Sets the starting resolution height; not needed when -w is set |
-refresh [rate] |
Forces a specific refresh rate |
-lv |
Enables some low violence options in Left 4 Dead |
-sillygibs |
Enables low violence in Team Fortress 2 |
Performance and compatibility launch options for Source games
Use these when a Source game runs badly, crashes on start, or looks wrong on older graphics hardware.
| Option | What it does | When to use it |
|---|---|---|
-autoconfig |
Restores video and performance settings to defaults for the detected hardware and ignores .cfg files | After a settings change breaks the game; remove it afterwards |
-dxlevel [level] |
Forces a DirectX level: 80, 81, 90, 95 or 98 | Older graphics hardware that runs better on an earlier DirectX level |
-16bpp or -32bpp |
Forces the colour depth | GoldSrc games only |
-heapsize [kilobytes] |
Sets the memory heap size the game uses | Only when a game's own documentation calls for it |
-nocrashdialog |
Suppresses some "memory could not be read" error dialogs | Hides the dialog, not the cause |
+r_rootlod # |
Model detail: 0 high, 1 medium, 2 low | Lower detail on weak hardware |
+mat_picmip # |
Texture detail: 0 high, 1 medium, 2 low | Low video memory |
+mat_reducefillrate # |
Shader detail: 0 high, 1 low | Fill-rate limited GPUs |
+mat_trilinear 0 |
Bilinear filtering, the least demanding mode | Lowest-end hardware |
+mat_forceaniso # |
Anisotropic filtering at 2, 4, 8 or 16 | Higher values cost more resources |
+mat_hdr_level # |
HDR lighting: 0 off, 2 full | 0 needs the least resources |
Valve warns that its games no longer support -dxlevel 70, and using it can cause crashes. Remove it if it is still in an old launch options string.
Network and connectivity launch options (GTA V example)
Valve's list has no network options, so these come from each game's own documentation. Grand Theft Auto V on PC is a common example: NVIDIA's GTA V performance guide lists options that go in a commandline.txt file in the game's install folder, separated by spaces.
| GTA V option | What it does |
|---|---|
-scOfflineOnly |
Sets Rockstar Social Club to offline mode, which speeds up single-player loading and hides friend-progress pop-ups |
-StraightIntoFreemode |
Loads the game directly into multiplayer freemode |
-goStraightToMP |
Loads the game directly into a multiplayer match |
-benchmark |
Loads the in-game benchmark instead of single or multiplayer |
-ignoreDifferentVideoCard |
Stops the game resetting graphics options after a GPU swap |
Other games use different names for similar switches. Check the publisher's support pages before you add a network option to any game that is not on Valve's list.
Best practices for setting launch options in Steam
| Practice | Why it matters |
|---|---|
| Copy option names from the game's own documentation | Each game reads its own options; a typo or an option from another engine is ignored |
| Add one option at a time | If the game breaks, you know which option caused it |
| Keep a copy of the full string in a text file | You can restore a working set after clearing the box |
| Remove one-off options after use | -autoconfig ignores your .cfg files until you remove it |
| Prefer in-game settings when they exist | Launch options override internal settings, which can hide later changes you make in the menu |
| Avoid options you cannot explain | Old forum strings often carry outdated values such as -dxlevel 70 |
How to check Steam launch options are working
- Reopen the game's Properties and confirm the text is still in Launch Options exactly as typed.
- For a Source game, add
-consoletemporarily and launch the game. - Confirm the developer console is open when the game starts.
- Check the visible effect of each other option: no intro video with
-novid, a window with-windowed, the forced resolution with-w. - Remove
-consoleagain if you only added it as a test.
If nothing changes, the game is not reading that option. Jump to the troubleshooting section below.
Resetting or removing launch options in Steam
Steps to reset or remove launch options are the same for one option or all of them: edit the box.
- Right-click the game in your Library and select Properties.
- On the General tab, click inside Launch Options.
- Delete the single option you want to remove, or select all the text and delete it to reset.
- Close the Properties window.
- Launch the game; it now starts with its own settings.
Clearing the box does not undo changes an option already made inside the game. If -autoconfig reset your video settings, set them again in the game's options menu.
Troubleshooting issues with launch options in Steam
The game ignores the launch option
A typing error, a missing hyphen, or an option this game does not support.
- Check for typing errors: compare each option letter by letter with the game's documentation, including the leading
-or+. - Verify compatibility: Valve's common options work only in GoldSrc and Source engine games, so look up the game's own option names.
- Make sure options are separated by single spaces and values sit right after their option.
The game crashes or shows a black screen after adding options
One option in the string conflicts with the hardware or the game version.
- Reset launch options by clearing the Launch Options box, then launch the game.
- If it starts, test incrementally: add back one option, launch, and repeat until the crash returns.
- Remove
-dxlevel 70if it is present; Valve says it can cause crashes. - For a Source game with broken video settings, try
-autoconfigonce, then remove it.
Launch options stopped working after an update
The game or the Steam client changed, or game files are damaged.
- Update your game and Steam: open Downloads in Steam and let any pending update finish, then restart Steam.
- Restart your computer and launch Steam.
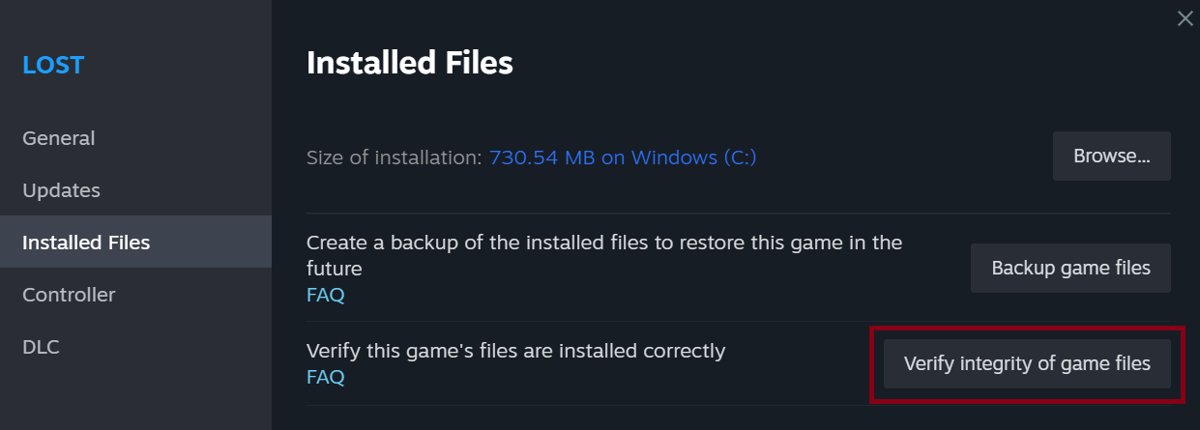
- Right-click the game, select Properties, open the Installed Files tab and click Verify integrity of game files.
- Launch the game again with the same options.
Options work, but the game still stutters or overlays break
Another program that hooks into games is running at the same time.
- Turn off conflicting software that hooks into games, such as other game launchers, screen recorders and FPS overlay tools, before you start the game.
- Launch the game from Steam with your options and compare the result.
- Leave your antivirus running; it is not a launch options conflict and should stay on.
Nothing above fixes it
The problem is specific to the game or your account.
- Consult support: open Steam Support and select Help Me With My Issue to reach the right help topic.
- Search the game's community forums in Steam Discussions for the exact option and error.
- Treat forum option strings as suggestions, and test them one at a time.
Additional tips for optimizing Steam games
Additional tips that pair well with launch options:
| Tip | How |
|---|---|
| Change an option string later | Edit the text in Launch Options; the new string applies on the next launch |
| Repair missing textures or crashes | Properties > Installed Files > Verify integrity of game files; one or more files failing to verify is normal |
| Do not verify several games at once | Valve advises against running verification for multiple games or during a virus scan |
| Keep big games on your fastest drive | Add a new Steam library folder on an SSD and install there |
| Lower Source detail without menus | Use +r_rootlod 2 and +mat_picmip 2 for low model and texture detail |
Steam launch options FAQ
What is launch options in Steam?
Launch options are text parameters Steam passes to a game when it starts. They change game settings before the game runs and override its internal settings, which helps recover from incompatible video settings. Each game decides which options it accepts.
Where is launch options in Steam?
Right-click the game in your Steam Library and select Properties. The Launch Options box is on the General tab, which opens first. You can also click the gear icon on the game's Library page and choose Properties.
How do I add multiple launch options in Steam?
Type all of them in the same Launch Options box with a single space between each one, for example -novid -console -w 1920. Keep any value directly after its option, and never use commas or semicolons between options.
How do I use launch options in Steam?
Enter the options in the game's Properties under Launch Options, close the window, and start the game from Steam. The options apply on every launch from Steam until you edit or clear the box.
How do I change launch options in Steam?
Open the game's Properties, click inside the Launch Options box on the General tab, and edit or replace the text. Close the window and the new string applies the next time you start the game.
Do Steam launch options work for every game?
No. Steam passes the text to the game, and the game decides what to do with it. Valve's common options such as -novid and -console apply to GoldSrc and Source engine games, not to most third-party games.
How do I add launch options to an exe or shortcut?
Steam's support page says launch options can also be set by creating a game shortcut and setting the options on that shortcut. For games inside Steam, the Launch Options box in Properties is the simpler and supported route.
How do I remove launch options in Steam?
Open the game's Properties, select all the text in Launch Options and delete it, then close the window. The game then starts with its own settings. Settings an option already changed inside the game stay as they are.
Bottom line: when to use Steam launch options
Use Steam launch options for fixes the in-game menu cannot reach, such as a broken resolution, a crash on start or a forced display mode, and keep the string short. The game reads every option itself, so a short, documented string is easy to test, and clearing the box always returns the game to its own settings.

![How to find word count in Microsoft Word [updated 2026]](https://techdows.com/wp-content/uploads/2026/10/Word-Review-tab-with-the-Word-Count-menu-and-Show-Word-Count-ticked-600x252.jpg)