To manage file and folder permissions on a Mac, select the item in Finder, press Command-I to open Get Info, unlock Sharing & Permissions, and set each user or group to Read & Write, Read only, Write only (Drop Box) or No Access.
This guide covers what each setting means, how to read permissions in Terminal, changing owners and groups, applying settings to a whole folder, app access in Privacy & Security, and fixes for "You don't have permission" and "Permission denied" errors.
The fastest way to change permissions on a Mac
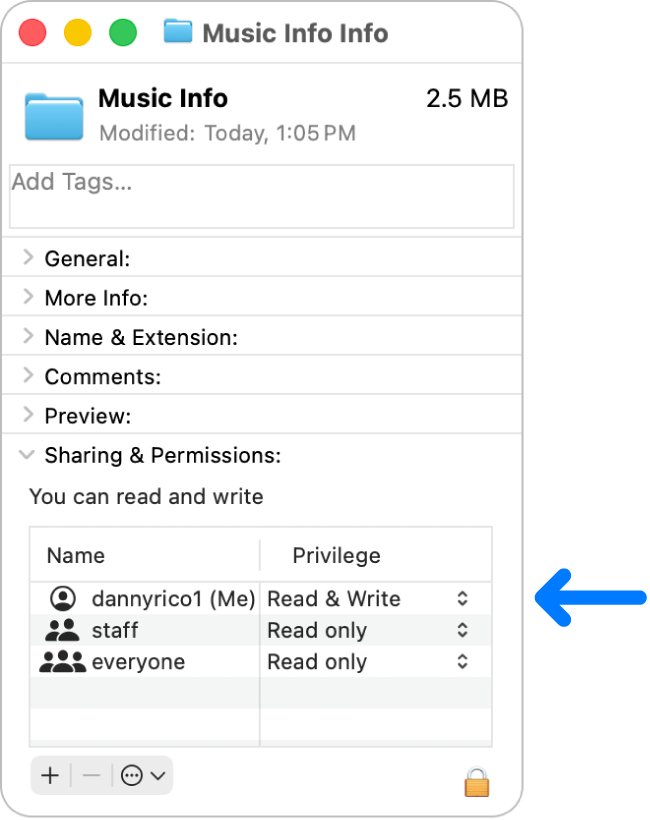
The Info window in Finder is the route Apple documents for every file, folder and disk. It works the same on macOS Tahoe, Sequoia, Sonoma and earlier versions.
- Select the file, folder or disk in Finder, then choose File > Get Info (or press Command-I).
- If Sharing & Permissions is collapsed, click the arrow next to it. You may need to scroll down.
- Click the lock icon at the bottom right and enter an administrator name and password.
- Select a user or group in the Name column.
- Click the pop-up menu next to that name and choose Read & Write, Read only, Write only (Drop Box) or No Access.
- Close the Info window to keep the change.
Changed the wrong entry? Before you close the window, click the Action pop-up menu at the bottom and choose Revert changes.
Which method should you use?
Most people only ever need the Info window. Pick the row that matches the job in front of you.
| Your situation | Use this | Why |
|---|---|---|
| Let another user read, edit or stay out of one item | Get Info > Sharing & Permissions privilege menu | Four plain choices, no commands |
| A whole folder of files needs the same access | Action pop-up menu > Apply to enclosed items | Copies the folder's settings to everything inside it |
| A file belongs to another account | Action pop-up menu > Make [user name] the owner | Only the owner and administrators control the item |
| A script will not run or you work in Terminal anyway | chmod with a three-digit number |
Sets owner, group and other access in one command |
| An app cannot open your Desktop, Documents or Downloads files | System Settings > Privacy & Security > Files & Folders | App access is a separate privacy control, not a file permission |
| Files on an external drive show as locked to you | Ignore ownership on this volume in the drive's Info window | The Mac treats every file on the drive as yours |
| Errors keep coming back across many files | Disk Utility First Aid | Repairs formatting and directory errors on the disk |
Understanding Permissions
Every file, folder and app on a Mac has permission settings that decide which accounts can read it, change it or run it. Under the hood, macOS uses BSD permissions for three user categories: the owner, a group, and everyone else (other).
The owner is usually the account that created the item. Administrators belong to the admin group, and standard accounts belong to the staff group. Finder shows these same categories in the Name column of Sharing & Permissions.
| Finder privilege level | What that user or group can do | Typical use |
|---|---|---|
| Read & Write | Open the item and change it | Your own files, or a shared project folder |
| Read only | Open the item, but not change its contents | Reference files other accounts should see but not edit |
| Write only (Drop Box) | Copy items into the folder, but not open it; only the owner can open it | A hand-in folder for other users on the Mac |
| No Access | Nothing; all access is blocked | Private folders on a shared Mac |
Privacy controls sit on top of this. Since macOS 10.15, apps also need your consent before they reach Documents, Downloads, Desktop, iCloud Drive and network volumes, even when file permissions allow it.
Numeric Representation of Permissions
Terminal writes permissions as three digits: one for the owner, one for the group and one for other. Each digit from 0 to 7 is a sum of read (4), write (2) and execute (1).
| Digit | Letters in ls -l | Meaning |
|---|---|---|
| 0 | --- |
No permissions |
| 1 | --x |
Execute only |
| 2 | -w- |
Write only |
| 3 | -wx |
Write and execute |
| 4 | r-- |
Read only |
| 5 | r-x |
Read and execute |
| 6 | rw- |
Read and write |
| 7 | rwx |
Read, write and execute |
Common combinations: 755 (owner full access, everyone else read and run) suits scripts and folders, 644 (owner read and write, others read) suits documents, and 711 lets others pass through a folder without listing it. With the default umask of 022, new files get 644 and new folders get 755.
On a folder, read lets a user list its contents, write lets them add, rename or delete items inside, and execute lets them open or search through it.
Viewing Permissions
Finder shows the friendly privilege names. Terminal shows the raw letters, the owner and the group, which is faster when you check several items. New to Terminal? See how to open Terminal on Mac.
- In Finder: select the item and press Command-I. Expand Sharing & Permissions to see each name and its privilege.
- In Terminal: open Terminal, type
cdfollowed by the folder path, and press Return. - Type
ls -land press Return to list every item in that folder with its permissions. - To check one folder itself rather than its contents, type
ls -ld foldernameand press Return. - Read the first column. The first character is the type:
-for a file,dfor a folder,lfor a symbolic link. - Read the next nine characters in three sets: owner, group, other. For example,
drwxr-xr-xis a folder the owner can change and everyone else can only open. - Read the third column for the owner and the fourth for the group, for example
steve staff.
Apply permissions to everything inside a folder
Changing a folder in Get Info does not change the files already inside it. Use Apply to enclosed items when every file and subfolder should match.
- Select the folder or disk in Finder, then choose File > Get Info.
- Expand Sharing & Permissions by clicking the arrow next to it.
- Click the lock icon and enter an administrator name and password.
- Set the privileges you want on the folder itself first.
- Click the Action pop-up menu at the bottom of the window and choose Apply to enclosed items.
- Wait for macOS to finish updating the enclosed items before you close the window.
This is a one-time copy. It replaces the BSD permissions on every enclosed item, and files you create later still get default permissions. Check the folder's own settings before you apply them.
Changing Permissions via Terminal
Use chmod when you need an exact numeric mode, such as making a shell script executable. You can only change permissions on items you own; prefix the command with sudo and enter an administrator password for items you do not own.
chmod 755 YourScriptName.shchmod sets the permission bits. 755 gives the owner read, write and execute, and gives the group and other users read and execute. Run cd into the file's folder first, or type the full path instead of the file name. Use chmod 644 filename for a document only you should edit, or chmod 711 foldername for a folder others can pass through but not list.
You should see: No output. Run ls -l YourScriptName.sh and the first column reads -rwxr-xr-x. A script can now run with ./YourScriptName.sh.
Changing Ownership and Group
Only the owner and administrators control an item's permissions, so a file copied from another account or another Mac often needs a new owner. Finder handles the owner; Terminal also changes the group.
- Select the item in Finder and choose File > Get Info.
- Expand Sharing & Permissions, click the lock icon, and enter an administrator name and password.
- If the new owner is not in the Name column, click the Add button below the list, select the user, then click Select.
- Select the new owner in the Name column.
- Click the Action pop-up menu and choose Make [user name] the owner.
- To change ownership in Terminal instead, run
sudo chown username filenameand enter your administrator password. - To change only the group, run
sudo chgrp groupname filename. Typeman chownorman chgrpin Terminal for every option.
Changing a file's owner switches off its setuid and setgid bits unless the change is made as root, which stops a modified program from keeping elevated rights.
Add or remove a user or group
The Name column only lists accounts with an explicit setting. Add a person or group to give them their own privilege, or remove them to fall back to the general setting.
- Select the item and choose File > Get Info.
- Expand Sharing & Permissions and click the lock icon to unlock it.
- To add someone, click the Add button below the list, select the user or group, then click Select.
- Choose their privilege from the pop-up menu next to their name.
- To remove someone, select them in the Name column and click the Remove button below the list.
- Close the window, or choose Action > Revert changes first to cancel.
Special Permissions
Beyond read, write and execute, each item has three special bits, written as a fourth leading digit in numeric modes. macOS also supports access control lists (ACLs) and BSD file flags, which override the basic permissions.
| Special permission | Effect on a file | Effect on a folder |
|---|---|---|
| Setuid (4000) | A program runs with the file owner's user ID instead of the person running it | New items inside take the folder's owner |
| Setgid (2000) | A program runs with the file's group ID | New items inside take the folder's group |
| Sticky bit (1000) | No effect in macOS | Only the item's owner, the folder's owner or root can delete or rename items inside |
| ACLs | An ordered list of allow and deny entries per user or group, checked before the basic permissions | Entries can be inherited by new files and subfolders |
BSD file flags (chflags) |
uchg stops the file being moved, renamed or deleted; uappnd allows appending only |
The same flags apply to folders |
A setuid program owned by root runs with root privileges for anyone, so it is a security risk. Leave these bits alone unless software documentation tells you to set them. To clear a flag, add no in front of its name, for example chflags nouchg filename.
Lock a file so it cannot be changed
Locking is lighter than a permission change. It protects a closed document from accidental edits and asks for confirmation before it goes to the Trash.
- Select the document in a Finder window or on the desktop.
- Choose File > Get Info.
- Click the arrow next to General if that section is collapsed.
- Select the Locked checkbox.
- To unlock it later, deselect Locked in the same place.
Anyone can unlock a locked document, so it is not a password. To protect folders and disks, change their permissions instead, or put the files in a password-protected ZIP on Mac.
Control which apps can access your files and folders
File permissions decide which accounts get in. Privacy & Security decides which apps get in. An app blocked here fails even when the file itself is set to Read & Write.
- Choose Apple menu > System Settings, then click Privacy & Security in the sidebar. You may need to scroll down.
- Click Files & Folders.
- For each app in the list, turn access to each location (such as Desktop, Documents or Downloads) on or off.
- Go back and click Full Disk Access for apps that need every file, including Mail, Messages and Safari data, Time Machine backups and some administrative settings.
- Turn the switch on for the app. To add an app that is not listed, click the Add button, select the app, then click Open.
- Quit and reopen the app so it picks up the new access.
On macOS 12 Monterey or earlier, the same lists are in System Preferences > Security & Privacy > Privacy. Grant Full Disk Access only to apps you trust, such as a backup tool or Terminal.
Ignore ownership on an external drive
A drive formatted on another Mac keeps that Mac's owners, so your account may be locked out. An administrator can tell your Mac to treat every file on the drive as owned by the current user.
- Click the Finder icon in the Dock to open a Finder window.
- Select the external disk, then choose File > Get Info.
- Click the arrow next to Sharing & Permissions to expand it.
- If the lock at the bottom right is locked, click it and enter an administrator password.
- Select the Ignore ownership on this volume checkbox.
The checkbox does not appear on a drive used for Time Machine backups. If you are not an administrator, ask the Mac's administrator to give you access to the disk.
Repair the disk with Disk Utility First Aid
First Aid finds and repairs errors in a disk's formatting and directory structure, which can cause odd file behaviour. It is not a permissions reset, so run it after the Get Info fixes fail. Back up your data first.
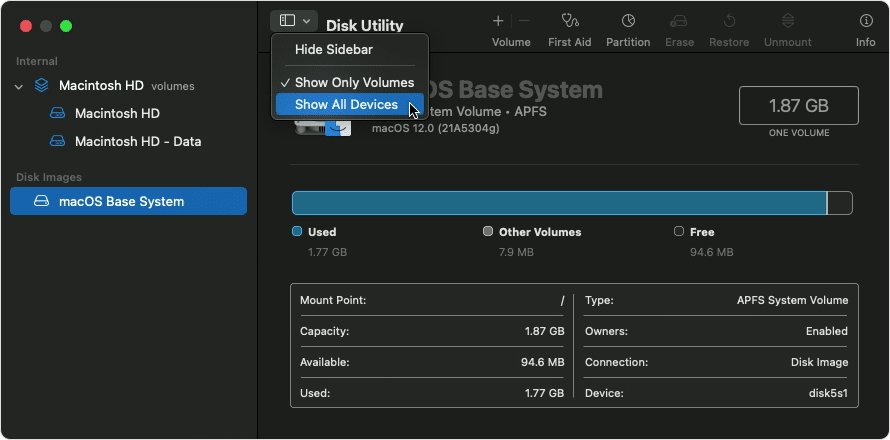
- Open Disk Utility from the Utilities folder inside Applications. For the startup disk, or a Mac that will not start, start up from macOS Recovery and choose Disk Utility > Continue.
- Choose View > Show All Devices.
- Select the last volume listed under the disk, such as Macintosh HD – Data.
- Click First Aid, then click Run (or Repair Disk). Enter your administrator password if asked.
- When it finishes, select the next item up the list and run First Aid again.
- Keep going up through each volume, then the container, then the disk itself.
- Quit Disk Utility. If you used Recovery, choose Apple menu > Restart.
If First Aid reports errors it cannot repair, Apple's next step is erasing the disk, which is why the backup comes first.
Verifying Changes
- Close the Info window, reselect the item, and press Command-I again. The Name column should show the new privilege and owner.
- In Terminal, run
ls -lin the item's folder. The first column and the owner and group columns should match what you set. - Log in to the other account (or ask its user) and open the item. Read only should open it but block saving; No Access should refuse to open it.
- For a script, run it with
./scriptname.sh. It should start instead of returning "Permission denied". - For app access, open Privacy & Security > Files & Folders or Full Disk Access and confirm the app's switch is on.
How to undo a permission change
- If the Info window is still open, click the Action pop-up menu and choose Revert changes. This undoes privilege, owner, and added or removed users since the window opened.
- If you already closed it, reopen Get Info, unlock it, and set each entry back by hand.
- In Terminal, run
chmodagain with the old number, such aschmod 644 filenamefor a document. - Restore the item from a Time Machine backup if many files changed through Apply to enclosed items.
Troubleshooting Permissions Issues
Match the message you see to a heading below. Each fix starts with the least invasive step.
"You don't have permission to access this item"
Your account has No Access or Write only on the item, or on a folder above it.
- Select the item and press Command-I.
- Expand Sharing & Permissions and check your account's privilege.
- Unlock with an administrator password and set your account to Read & Write or Read only.
- If your name is missing, click the Add button and add yourself, or make yourself the owner.
- Repeat the check on the enclosing folder, since a blocked parent folder hides everything inside it.
- If you are not an administrator, ask the Mac's administrator to change the setting.
"Permission denied" in Terminal
The file lacks the execute bit, you do not own it, or the path sits in protected app data.
- Run
ls -l filenameand check the permission letters and owner. - For a script without
x, runchmod 755 filename. - For a file you do not own, put
sudoin front of the command and enter your administrator password. - For Mail, Messages or Safari data, or Time Machine backups, add Terminal in Privacy & Security > Full Disk Access, then reopen Terminal.
Files in your home folder cannot be changed
Items copied from another account or Mac often keep the old owner.
- Press Shift-Command-H to open your home folder.
- Select the item you cannot change and press Command-I.
- Check that your account is the owner with Read & Write; if not, choose Action > Make [your name] the owner.
- For a folder of affected items, set the folder correctly, then choose Apply to enclosed items.
- If the item shows a Locked checkbox under General, deselect it.
- Run Disk Utility First Aid if the error spreads across many unrelated files.
You cannot move, copy or delete an item
The file is open, locked, the destination is read-only, or permissions block the move.
- Quit any app that has the file open.
- Unlock the file in Get Info if it shows a lock.
- Check the destination has enough free space.
- For an external drive, confirm it is APFS, Mac OS Extended or exFAT; NTFS drives are read-only on a Mac.
- Check permissions on both the item and the destination folder.
An app cannot open or save files in Desktop, Documents or Downloads
The app has not been granted access in the privacy settings.
- Open System Settings > Privacy & Security > Files & Folders.
- Find the app and turn on access for the location it needs.
- If the app needs every file, turn it on under Full Disk Access instead.
- Quit and reopen the app.
iCloud Drive files will not sync because of permissions
Some items in iCloud Drive have permissions your account lacks.
- Click the Finder icon in the Dock and select iCloud Drive in the sidebar.
- Find the error message at the top of the iCloud Drive folder.
- Click Repair in the message.
- Wait for the repaired files and folders to resume syncing.
No permissions for files on an external disk
The drive's files are owned by accounts from another Mac.
- Select the disk in Finder and choose File > Get Info.
- Unlock Sharing & Permissions with an administrator password.
- Select Ignore ownership on this volume.
- If the option is missing, the drive is a Time Machine backup disk; change individual item permissions instead.
Best Practices for Managing Permissions
A permission that is too open exposes files, and one that is too tight can stop apps from working. These habits keep both problems away.
| Practice | What to do | Why it matters |
|---|---|---|
| Principle of least privilege | Give each user Read only unless they genuinely need to edit | Fewer accounts can damage or delete the files |
| Regular audits | Recheck Get Info or ls -l on shared folders after adding or removing accounts |
Old entries keep access after a person leaves the Mac |
| Use groups wisely | Grant access to a group rather than to many individual users | One change updates everyone in the group |
| Back up important files | Keep a current Time Machine backup before bulk changes | Apply to enclosed items changes every file at once, and First Aid can end in an erase |
| Leave system folders alone | Do not change permissions on macOS system files or set a system-wide umask | Apple warns this can break apps or weaken security |
| Grant app access sparingly | Allow Full Disk Access only to apps that need it | It includes other apps' data and backups |
Frequently Asked Questions
How do I change permissions on a Mac?
Select the file or folder, choose File > Get Info, and expand Sharing & Permissions. Click the lock icon, enter an administrator password, then choose a privilege for each user or group. The options are Read & Write, Read only, Write only (Drop Box) and No Access.
How do I check permissions on a Mac?
Select the item in Finder and press Command-I, then look at Sharing & Permissions at the bottom. In Terminal, run ls -l in the folder to see the permission letters, the owner in the third column and the group in the fourth.
How do I access permissions on a Mac?
File permissions live in each item's Info window under Sharing & Permissions. App permissions for files are in System Settings > Privacy & Security, under Files & Folders and Full Disk Access. On macOS 12 or earlier, look in System Preferences > Security & Privacy > Privacy.
How do I allow permission on a Mac for an app?
Open System Settings > Privacy & Security and click Files & Folders, then turn on the locations the app needs. For access to every file, click Full Disk Access and turn on the app, adding it with the Add button if it is missing.
How do I fix "You don't have permission" on a Mac?
Open Get Info on the item, unlock Sharing & Permissions, and give your account Read & Write or Read only. If your account is not listed, add it or make yourself the owner. Check the enclosing folder too, because a blocked parent folder hides the items inside.
How do I fix no permissions on a file?
Make your account the owner through Action > Make [user name] the owner in Get Info, then set it to Read & Write. On an external drive, select Ignore ownership on this volume instead. In Terminal, sudo chown changes the owner of a file you do not own.
How do I get rid of permissions on a Mac?
Select the user or group in the Name column of Sharing & Permissions and click the Remove button below the list. To block someone instead of removing their entry, set their privilege to No Access. Unlock the section with an administrator password first.
How do I fix a download with no permissions on a Mac?
Select the downloaded file, press Command-I, and make sure your account owns it with Read & Write. If the app you use to open it is blocked, turn on its Downloads access in Privacy & Security > Files & Folders. For a script, run chmod 755 on it.
Does Disk Utility repair permissions on a Mac?
Disk Utility's First Aid repairs errors in a disk's formatting and directory structure, not individual file permissions. Use it when errors affect many files or the Mac behaves oddly. Change single items in Get Info and back up before running First Aid.
What does Apply to enclosed items do?
It copies a folder's current permissions to every file and subfolder inside it. The copy happens once, so files created later get default permissions. It replaces the existing settings on those items, so set the folder correctly and have a backup before you use it.