To print screen on a Mac, press Shift + Command + 3 to capture the entire screen. To screenshot only part of the screen, press Shift + Command + 4 and drag over the area you want to capture. Macs do not have a dedicated Print Screen key because macOS uses these keyboard shortcuts instead.
You can also press Shift + Command + 5 to open the Mac Screenshot toolbar, where you can capture the full screen, a window, or a selected area and change where screenshots are saved.
The same core shortcuts work on MacBook Air, MacBook Pro, iMac, Mac mini, Mac Studio, and other Macs running current versions of macOS.
Mac Print Screen Shortcuts
If you only need the shortcut, these are the main Mac equivalents of the Windows Print Screen key:
| What you want to capture | Mac screenshot shortcut |
|---|---|
| Entire screen | Shift + Command + 3 |
| Selected part of screen | Shift + Command + 4 |
| Specific window | Shift + Command + 4, then press Space |
| Screenshot toolbar | Shift + Command + 5 |
| Full screen to clipboard | Control + Shift + Command + 3 |
| Selection to clipboard | Control + Shift + Command + 4 |
| Touch Bar on supported older MacBook Pro models | Shift + Command + 6 |
How to Print Screen the Entire Screen on Mac
Use this method when you want an image of everything currently visible on the Mac display.
- Arrange the windows on your screen as you want them to appear.
- Press Shift + Command + 3 at the same time.
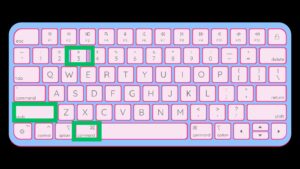
- Release the keys.
- Wait for the screenshot to save, or click the thumbnail that appears in the lower-right corner to edit it first.
By default, macOS saves the screenshot as a file on the desktop. If more than one display is connected, macOS can capture each display as a separate screenshot.
Print screen without saving a file
If you want to paste the screenshot directly into Messages, Mail, Word, Photoshop, Slack, or another app, add the Control key:
Control + Shift + Command + 3
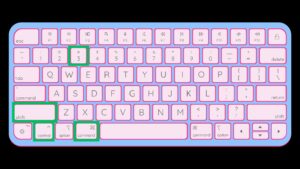
The screenshot goes to the clipboard rather than being saved as a normal screenshot file. Open the destination app and press Command + V to paste it.
How to Screenshot Part of the Screen on Mac
Press Shift + Command + 4 when you only need a specific area instead of the entire display.
- Press Shift + Command + 4.
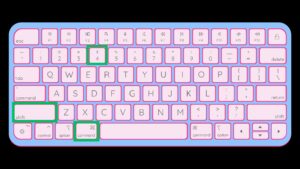
- Your pointer changes to a crosshair.
- Click and hold at one corner of the area you want to capture.
- Drag across the required area.
- Release the mouse or trackpad button to take the screenshot.
Press Esc before releasing the mouse or trackpad if you want to cancel the screenshot.
Move the selected screenshot area before capturing
If you selected the correct size but positioned the box incorrectly, keep holding the mouse or trackpad button and press and hold the Space bar. You can then move the entire selection without changing its dimensions.
Release the Space bar to continue resizing the selection, or release the mouse or trackpad to capture it.
Copy a selected screenshot directly to the clipboard
Use:
Control + Shift + Command + 4
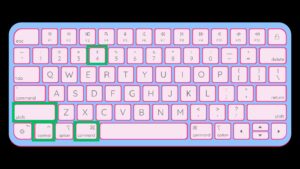
Select the required area and release the mouse or trackpad. The screenshot is copied to the clipboard, where you can paste it with Command + V.
How to Print Screen a Window on Mac
You do not need to manually crop a window from a full-screen screenshot. macOS can capture one application window directly.
- Open the window you want to capture.
- Press Shift + Command + 4.
- Press the Space bar.
- The pointer changes to a camera icon.
- Move the camera over the window you want.
- Click the highlighted window.
macOS captures the window without including unrelated windows or desktop content.
Screenshot a Mac window without the shadow
Window screenshots normally include the macOS drop shadow around the window. To remove it, press Shift + Command + 4, press Space, then hold the Option key while clicking the window.
This is useful when you need a cleaner screenshot for an article, documentation, presentation, or website.
How to Print Screen on Mac with Shift + Command + 5
Press Shift + Command + 5 to open the built-in Screenshot app and its capture toolbar. This method gives you more control than memorizing several separate shortcuts.
The toolbar includes options to:
- Capture the entire screen.
- Capture a selected window.
- Capture a selected portion of the screen.
- Record the entire screen.
- Record a selected portion of the screen.
- Choose where screenshots are saved.
- Set a screenshot timer.
- Show or hide the floating thumbnail.
Select the required capture mode and click Capture.
Take a screenshot with a timer on Mac
A timer helps when you need to open a menu, position the pointer, or prepare something on screen before the screenshot is taken.
- Press Shift + Command + 5.
- Click Options.
- Choose an available delay under Timer.
- Select the type of screenshot you want.
- Click Capture.
The screenshot is taken after the selected delay.
How to Copy a Screenshot on Mac Without Saving It
Windows users often expect Print Screen to place an image directly on the clipboard. You can get the same behavior on a Mac by adding Control to the normal screenshot shortcut.
| Action | Shortcut |
|---|---|
| Copy entire screen | Control + Shift + Command + 3 |
| Copy selected area | Control + Shift + Command + 4 |
| Copy a window | Control + Shift + Command + 4, then Space |
After taking the screenshot, press Command + V in an app that accepts images.
You can also Control-click the floating screenshot thumbnail and choose Save to Clipboard.
Where Do Screenshots Go on Mac?
Mac screenshots save to the desktop by default. The filename includes the screenshot date and time, which makes individual captures easier to identify when you take several screenshots in succession.
If you cannot find a screenshot on the desktop, press Shift + Command + 5, select Options, and look under Save to. A different folder may already be configured.
How to change where screenshots are saved on Mac
- Press Shift + Command + 5.
- Click Options.
- Look under Save to.
- Select Desktop, Documents, Clipboard, Mail, Messages, Preview, or another available destination.
- Choose Other Location if you want a specific folder.
macOS remembers the selected destination for future screenshots.
If you take screenshots regularly for work, creating a dedicated Screenshots folder keeps the desktop from filling with image files.
How to Edit a Screenshot on Mac
After taking a screenshot, a small thumbnail normally appears in the lower-right corner for a few seconds. Click it before it disappears to open the screenshot editor.
From there, you can crop the image, draw or write on it, add shapes and text, highlight an area, add a signature, rotate the image, or share it.
If you do nothing, the thumbnail disappears and macOS saves the screenshot automatically.
How to Screen Record on Mac
The same Shift + Command + 5 shortcut used for screenshots also includes screen recording.
- Press Shift + Command + 5.
- Select Record Entire Screen or Record Selected Portion.
- Open Options if you want to select a microphone or change the save location.
- Click Record.
- Click the Stop button in the menu bar when finished.
macOS saves screen recordings as video files rather than screenshots. You can also make screen recordings with QuickTime Player.
How to Print Screen on a Mac with a Windows Keyboard
You can still take screenshots when a Windows keyboard is connected to a Mac, although the key labels are different.
The Windows logo key normally functions as the Mac Command modifier on many standard PC keyboards connected to macOS. This means the full-screen shortcut is commonly:
Shift + Windows key + 3
For a selected area, use:
Shift + Windows key + 4
Keyboard mappings can differ if you changed the modifier keys in System Settings or use keyboard manufacturer software. If the shortcuts do not work, open the Mac keyboard settings and check how the Command and Option modifiers are mapped.
How to Screenshot the Touch Bar on MacBook Pro
Older MacBook Pro models equipped with a physical Touch Bar support a separate shortcut:
Shift + Command + 6
This captures the contents displayed across the Touch Bar. Current MacBook Pro models no longer include the Touch Bar, so the shortcut only matters for supported older hardware.
How to Change Screenshot Shortcuts on Mac
You can change the default screenshot shortcuts if they conflict with another app or you prefer different key combinations.
- Open the Apple menu.
- Select System Settings.
- Open Keyboard.
- Select Keyboard Shortcuts.
- Select Screenshots.
- Enable, disable, or modify the available screenshot shortcuts.
If a normal screenshot shortcut suddenly stops working, this is also the first place to check whether it has been disabled or reassigned.
Fix Screenshot Not Working on Mac
Check the screenshot keyboard shortcuts
Open System Settings > Keyboard > Keyboard Shortcuts > Screenshots and confirm that the required shortcuts are enabled.
Try the Screenshot app directly
Press Command + Space to open Spotlight, search for Screenshot, and open the app. If the Screenshot app works while the keyboard combination does not, the problem is likely related to the shortcut or keyboard.
Check where the screenshot is being saved
Press Shift + Command + 5 and open Options. Check the selected destination under Save to. The screenshot may be going to Documents or another folder rather than the desktop.
Check whether another app uses the shortcut
Screenshot tools, remote-desktop software, keyboard utilities, gaming apps, and productivity programs can assign their own global shortcuts. Quit recently installed utilities and test the macOS shortcut again.
Restart the Mac
If the Screenshot app stops responding completely, save your work and restart the Mac. Then test Shift + Command + 3 before opening other applications.
Some protected content cannot be captured
Some apps prevent screenshots of protected video or other restricted content. In those cases, the screenshot can appear black or the application window may not be captured normally.
Mac Screenshot Shortcuts Summary
| Screenshot task | Shortcut |
|---|---|
| Print entire Mac screen | Shift + Command + 3 |
| Capture selected area | Shift + Command + 4 |
| Capture one window | Shift + Command + 4, then Space |
| Open Screenshot toolbar | Shift + Command + 5 |
| Copy full screen to clipboard | Control + Shift + Command + 3 |
| Copy selection to clipboard | Control + Shift + Command + 4 |
| Capture Touch Bar | Shift + Command + 6 |
Frequently Asked Questions
What is the Print Screen key on a Mac?
Mac keyboards do not have a dedicated Print Screen key. Press Shift + Command + 3 to capture the entire display, which is the closest Mac equivalent to Print Screen on Windows.
How do I screenshot the whole screen on a MacBook?
Press Shift + Command + 3. The shortcut works on MacBook Air and MacBook Pro as well as desktop Macs.
How do I screenshot only part of the screen?
Press Shift + Command + 4, then drag the crosshair over the part of the screen you want to capture. Release the mouse or trackpad to take the screenshot.
How do I screenshot a specific window on Mac?
Press Shift + Command + 4, press the Space bar, then click the window. Hold Option while clicking if you do not want the window shadow included.
How do I screenshot and paste immediately on Mac?
Press Control + Shift + Command + 3 for the whole screen or Control + Shift + Command + 4 for a selected area. Then press Command + V to paste the image.
Where are Mac screenshots saved?
They save to the desktop by default. Press Shift + Command + 5 > Options to check or change the save location.
Why can’t I find my screenshot on the desktop?
The save location may have been changed. Open the Screenshot toolbar with Shift + Command + 5, select Options, and check the destination listed under Save to.
How do I screenshot without the thumbnail appearing?
Press Shift + Command + 5, open Options, and turn off Show Floating Thumbnail. Future screenshots will save without displaying the temporary preview.
Can I take a timed screenshot on Mac?
Yes. Press Shift + Command + 5, select Options, choose a timer, and then capture the screen.
What format are Mac screenshots saved in?
Standard Mac screenshots are saved as PNG files by default. On supported Macs running macOS Tahoe 26 or later, the Screenshot app also provides an HDR capture option that uses HEIF.
Can I change the screenshot keyboard shortcuts?
Yes. Open System Settings > Keyboard > Keyboard Shortcuts > Screenshots and change the shortcut assigned to the screenshot action you want.
Can I screen record with the Mac screenshot shortcut?
Yes. Press Shift + Command + 5 and select one of the screen recording controls. You can record the entire display or a selected portion of it.
How do I cancel a screenshot before taking it?
Press Esc while the screenshot selection or camera tool is active. macOS exits capture mode without saving an image.



Snipping Tool Download: Official Setup for Windows 11 & 10
[…] Hold Control with any of those shortcuts to copy to the clipboard instead of saving a file. Techdows covers the Mac side in more depth in how to take a screenshot on a Mac and how to print screen on a Mac. […]