To enter the boot menu on a new Lenovo laptop, turn it on or restart it and press F12 repeatedly as the Lenovo logo appears, or Fn + F12 if hotkey mode is enabled.
This guide covers the boot key for each Lenovo series, the Novo button, the Windows 11 route into UEFI, how to change the boot order permanently, and what to do when your USB drive is missing from the list.
Enter the boot menu on new Lenovo laptops
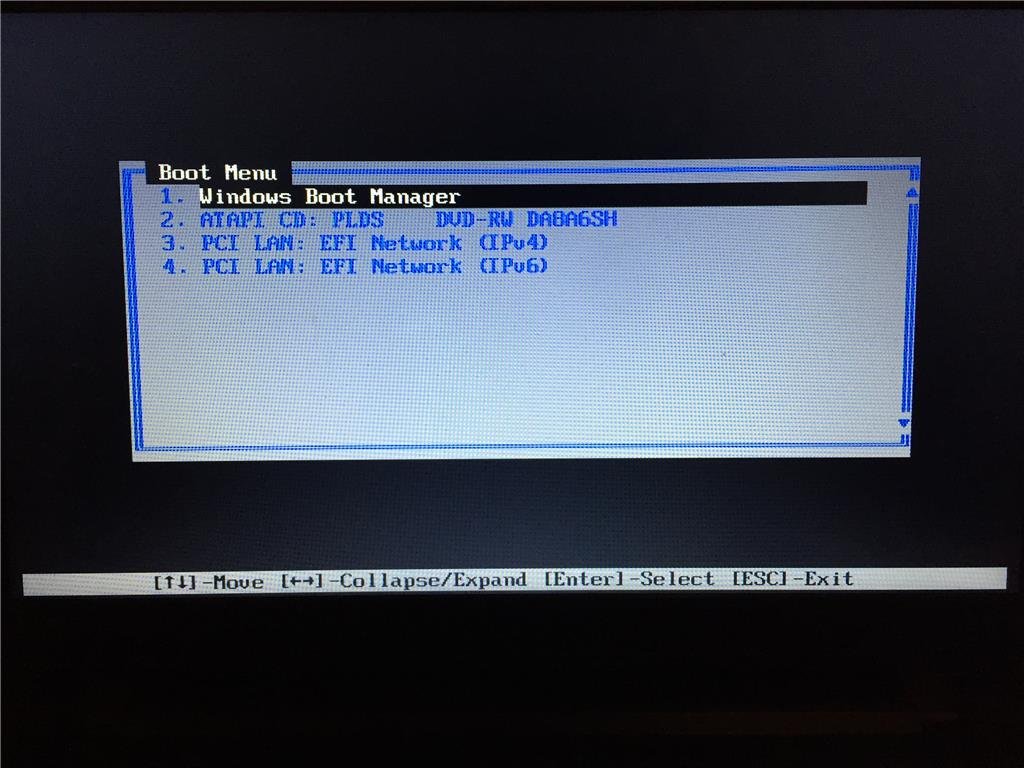
Lenovo's user guides for current IdeaPad, Yoga and Slim laptops name F12 as the interruption key that opens the boot device menu. The menu appears after the firmware initializes your devices, so the timing matters.
- Plug in the USB drive or other device you want to start from.
- Turn on or restart the laptop.
- Press F12 repeatedly as soon as the Lenovo logo appears. If nothing happens, restart and press Fn + F12 instead.
- Use the arrow keys to highlight a device in the boot device menu.
- Press Enter to start the laptop from that device.
The choice applies to this startup only. The next restart goes back to the normal boot order, which you can change in the UEFI/BIOS setup utility.
Lenovo boot menu key by laptop series
Lenovo splits its laptops into two firmware families, and the keys differ between them. Match your laptop to a row and use that route.
| Your laptop or situation | Key or route | What it opens |
|---|---|---|
| IdeaPad, Yoga or Lenovo Slim, one-time boot | F12 at the Lenovo logo (Fn + F12 with hotkey mode on) | Boot device menu for a single startup |
| IdeaPad, Yoga or Lenovo Slim, BIOS settings | F2 repeatedly at the Lenovo logo (Fn + F2 with hotkey mode on) | UEFI/BIOS setup utility, where the Boot menu sets the permanent order |
| ThinkPad or ThinkBook, BIOS settings | F1 (or Fn + F1) at the logo screen | UEFI BIOS menu; Startup > Boot on ThinkPad, Boot on ThinkBook |
| Consumer models with a Novo button | Press the Novo button with the laptop off | Novo Button menu, which includes UEFI/BIOS Setup |
| Function keys do not respond at startup | Windows 11 Advanced startup > UEFI Firmware Settings | UEFI firmware settings screen after a restart |
Using key combinations in startup
Lenovo laptops share the F1 to F12 function keys with hotkeys such as volume and brightness. A UEFI setting called hotkey mode decides which function a key performs when you press it alone.
With hotkey mode enabled, pressing F12 alone triggers its hotkey, so you must hold Fn to send the real F12. With hotkey mode disabled, F12 works directly.
- Shut down the laptop or select Restart from the Start menu.
- Hold down Fn with your left hand before the Lenovo logo appears.
- Tap F12 repeatedly while still holding Fn until the boot device menu opens.
- For BIOS settings instead, use Fn + F2 on IdeaPad and Yoga, or Fn + F1 on ThinkPad and ThinkBook.
- To stop needing Fn at startup, open the UEFI/BIOS setup utility, select Configuration > Hotkey Mode, press Enter and set it to Disabled.
- Select Exit > Exit Saving Changes to keep the new setting.
Using the Novo button
Many IdeaPad and Yoga laptops have a Novo button, which opens a startup menu without any key timing. Its position varies by model, so check the side edges or the user guide for your laptop.
- Shut down the laptop completely.
- Press the Novo button once instead of the power button.
- Wait for the Novo Button menu to appear on screen.
- Use the arrow keys to select UEFI/BIOS Setup, or the boot menu entry if your model lists one, and press Enter.
- In the setup utility, open the Boot menu to pick or reorder boot devices.
Open Lenovo UEFI firmware settings from Windows 11
If your laptop starts too fast to catch the logo, let Windows restart straight into the UEFI firmware settings. This works on any Lenovo laptop that boots Windows normally.
- Open Settings and select System > Recovery. On Windows 10, select Update & Security > Recovery.
- Next to Advanced startup, select Restart now.
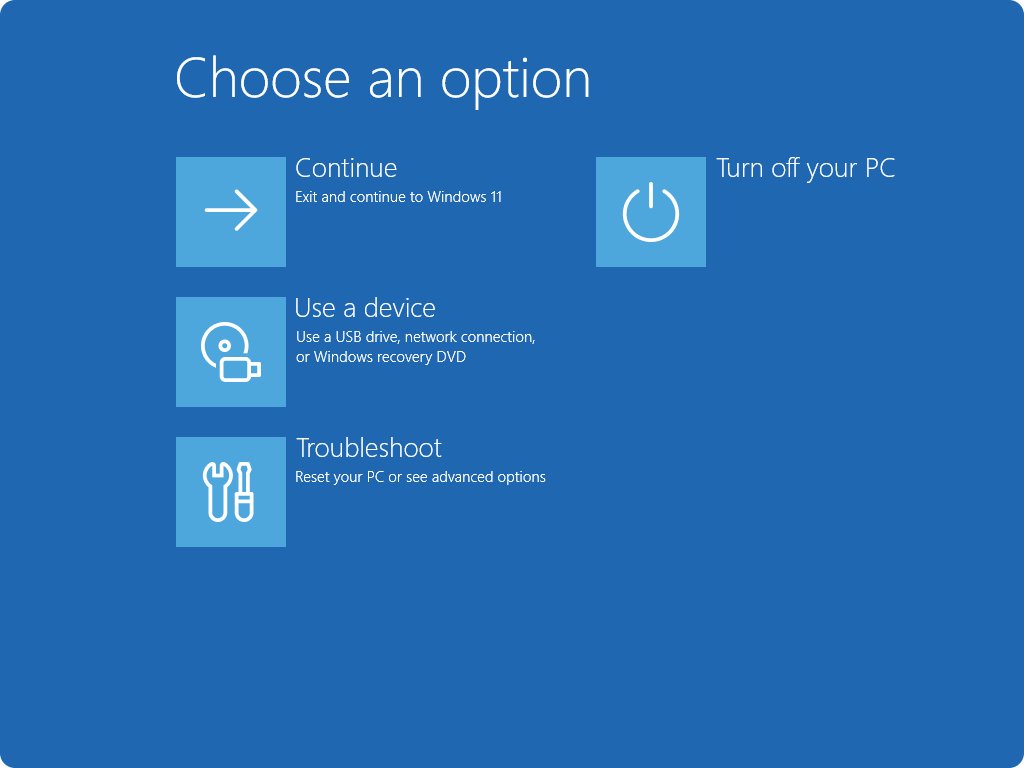
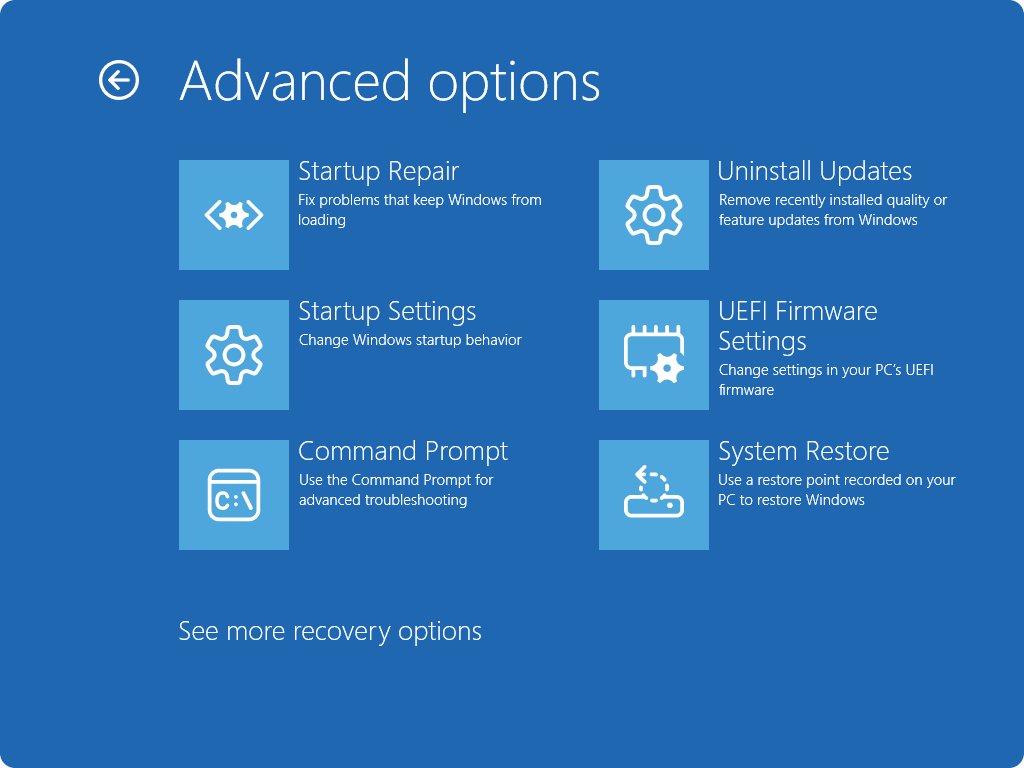
- On the blue recovery screen, select Troubleshoot > Advanced options.
- Select UEFI Firmware Settings, then Restart.
- The laptop opens its UEFI/BIOS setup utility, where the Boot menu lists every startup device.
You can also hold Shift while you select Power > Restart to reach the same recovery screen.
Change boot order on Lenovo laptops
The F12 menu is a one-time choice. To make a USB drive or another disk start first every time, change the order in the UEFI/BIOS setup utility.
- Restart the laptop and press F2 (IdeaPad, Yoga, Slim) or F1 (ThinkPad, ThinkBook) at the logo screen.
- On ThinkPad, select Startup > Boot to open the Boot Priority Order list. On ThinkBook, Yoga and IdeaPad, select Boot.
- In the EFI section, select the device you want to start from first, such as USB HDD or USB Boot.
- Move it to the top of the device list using the keys shown at the bottom of the screen.
- Press F10 to save the settings and exit, or select Exit > Exit Saving Changes.
- Move the internal drive with Windows back to the top when you no longer need the USB drive.
HP laptops use different keys, so if you also set up an HP machine, look up the HP boot menu key before you restart it.
What is a bootable USB?
A bootable USB is a flash drive that carries its own startup files, so the Lenovo firmware can start the laptop from it instead of the internal drive. Windows installation media and a Windows recovery drive are the two kinds most Lenovo owners need.
| Bootable USB type | How you make it | What it is for |
|---|---|---|
| Windows 11 installation media | Microsoft's media creation tool, or the Windows 11 multi-edition ISO for x64 devices | A reinstall or clean install of Windows 11 |
| Windows recovery drive | The Recovery Drive app built into Windows | Restoring the laptop to factory settings, including Lenovo's own customizations |
| Third-party tools and Linux installers | The vendor's own instructions | Diagnostics, disk tools or another operating system |
The media creation tool and the Windows 11 ISO only create media for x64 processors. Arm-based Lenovo laptops need the separate Windows 11 ISO for Arm64 devices.
Boot a Lenovo laptop from USB (USB boot setup)
Booting from USB takes two parts: a correctly prepared drive and the one-time boot menu. The steps below use Windows 11 installation media as the example.
- On a working PC, open Microsoft's Download Windows 11 page and select Download Now under Create Windows 11 Installation Media.
- Run the media creation tool and choose a USB flash drive as the target. The tool erases the drive, so use one without files you need.
- Plug the finished drive into a USB port on the Lenovo laptop.
- Restart the laptop and press F12 (or Fn + F12) repeatedly at the Lenovo logo.
- Select the USB entry, often listed as USB HDD or by the drive's brand name, and press Enter.
- Wait for Windows Setup to load from the drive, then follow its prompts.
If the laptop has no working function keys at startup, use the Novo button or Windows Advanced startup instead, then choose the USB drive from the Boot menu.
BIOS settings for a successful boot on Lenovo laptops
When the boot menu opens but the drive will not start, a firmware setting is usually the reason. Check these in the UEFI/BIOS setup utility before you remake the drive.
| Setting | Where to find it | What to set |
|---|---|---|
| Boot mode | UEFI/BIOS setup utility | UEFI for Windows 11. Microsoft says to make UEFI the first or only option when both UEFI and Legacy/CSM are enabled |
| USB drive format | Set when you create the drive | FAT32 for UEFI boot mode; legacy BIOS mode reads NTFS |
| Secure Boot | UEFI/BIOS setup utility | Leave it on. Microsoft advises turning it off only temporarily to address an issue, then turning it back on |
| Boot order | Boot menu, EFI section | Put the USB entry first for a permanent change, or leave the order alone and use F12 once |
| Hotkey mode | Configuration > Hotkey Mode | Disabled if you want F2 and F12 to work without Fn |
Press F10 or select Exit > Exit Saving Changes after any change, or the laptop discards it at restart.
Enter BIOS on a Lenovo laptop and remove BIOS password
Lenovo's UEFI BIOS can hold a power-on password, a supervisor password, a system management password and an NVMe password for the storage drive. You can remove any of them from the BIOS menu as long as you know the current password.
- Restart the laptop and press F1 at the logo screen on ThinkPad and ThinkBook, or F2 on IdeaPad and Yoga.
- Type the current supervisor password when the prompt appears. Pressing Enter without it opens the menu, but most settings stay locked.
- Select Security > Password with the arrow keys.
- Select the password type you want to remove, such as Power-On Password.
- Type the current password in the Enter Current Password field, leave Enter New Password blank and press Enter twice.
- Press Enter in the Changes have been saved window, then press F10 to save and exit.
A forgotten power-on password can be cleared this way with the supervisor or system management password. Without either, only a Lenovo-authorized service provider can remove it.
There is no service procedure for a forgotten supervisor password; Lenovo replaces the system board for a fee. A forgotten NVMe password cannot be reset and the data on that drive cannot be recovered, and repairs caused by forgotten passwords are not covered under warranty.
Update Lenovo BIOS safely: firmware update steps and fixes
Lenovo offers three official routes for a UEFI BIOS update. Keep the laptop connected to a working power outlet for the whole update.
| Route | Where to go | What happens |
|---|---|---|
| Lenovo Support website | pcsupport.lenovo.com, search your product name, then Drivers & Software > Manual Update > BIOS/UEFI | Download and install the latest UEFI BIOS package by following the on-screen instructions |
| Windows Update | Type Windows update in the search box, press Enter, then select Check for updates | An available UEFI BIOS package downloads and installs automatically |
| Lenovo Vantage (some models) | Device > System Update > CHECK FOR UPDATES | Follow the on-screen instructions to install the latest package |
The screen may stay blank for a few minutes while the laptop retrains its memory after the update. Do not press the power button; wait until the logo screen appears.
If the update fails, read the error message, confirm the package came from the Lenovo Support website, and check that the power adapter is plugged into a working outlet before you try again.
Boot a Lenovo laptop in safe mode (Windows 11)
Safe mode starts Windows with a limited set of files and drivers. It is not in the Lenovo boot menu; you reach it from the Windows Recovery Environment.
- Open Settings > System > Recovery and select Restart now next to Advanced startup. If Windows does not start, interrupt startup twice with the power button and Windows opens Automatic Repair on the third start.
- Select Troubleshoot > Advanced options > Startup Settings > Restart.
- Enter your BitLocker recovery key if the laptop asks for it.
- On the Startup Settings screen, press 4 or F4 for Enable Safe Mode, or 5 or F5 for Safe Mode with Networking.
- Restart the laptop to return to normal mode when you finish.
If the laptop keeps starting in safe mode, press Windows + R, type msconfig, open the Boot tab and clear Safe boot.
Boot your Lenovo laptop from a recovery USB
A recovery drive made with the Windows Recovery Drive app can restore the laptop to factory settings, even after a drive replacement. It does not include your personal files, so back those up separately.
- On the Lenovo laptop while it still works, search for Recovery Drive from Start and open it.
- Keep Back up system files to the recovery drive selected and select Next.
- Connect an empty USB drive, select it, select Next, then select Create.
- When you need it, plug in the drive, restart, press F12 (or Fn + F12) at the Lenovo logo and select the USB entry.
- When Windows Recovery Environment loads, select Recover from a drive.
- Choose Just remove my files or Fully clean the drive, then select Recover.
Microsoft recommends recreating the recovery drive once a year so it carries the latest Windows updates.
How to tell the Lenovo boot menu worked
- Confirm that a boot device menu or Novo Button menu replaced the usual Windows loading screen.
- Check that your USB drive appears in the device list by brand name or as a USB entry.
- After you select it, look for the installer or tool on that drive, not the Windows sign-in screen.
- If Windows loads anyway, the laptop skipped the device; work through the fixes below.
Boot device not displayed on boot menu?
The USB drive is missing from the Lenovo boot menu
The port, the drive's format or the drive's boot files are not recognized by the firmware.
- Move the drive to a different USB port on the laptop and restart.
- Open the UEFI/BIOS setup utility and confirm a USB entry such as USB HDD appears under Boot.
- For UEFI boot mode, use a drive formatted as FAT32; legacy BIOS mode reads NTFS.
- Recreate the drive with the vendor's own media tool, such as Microsoft's Windows installation media creator, so it carries valid boot files.
F12 does nothing and Windows starts normally
Hotkey mode is enabled, or the key press missed the short firmware window.
- Restart and hold Fn while tapping F12 from the moment the screen lights up.
- Use the Novo button if your model has one.
- Use Settings > System > Recovery > Advanced startup and choose UEFI Firmware Settings.
The Lenovo laptop is stuck on the logo or in a boot loop
Damaged system files, corrupted boot configuration data or an incompatible driver stop Windows from finishing startup.
- Unplug USB drives and other external devices, then restart.
- If Windows fails to start several times, let it open Automatic Repair; you can force this by holding the power button to shut down as the Windows logo appears, twice in a row.
- Select Troubleshoot > Advanced options > Startup Repair > Restart and let Windows scan and fix the problem.
- If the loop started after a Windows update, select Troubleshoot > Advanced options > Uninstall updates instead.
- If Startup Repair cannot fix it, select Troubleshoot > Reset this PC and choose whether to keep your files.
The Lenovo laptop does not start up at all
No power is reaching the laptop, or the start-up press did not register.
- Check that the power indicator is on and the adapter is connected to the laptop and a working outlet.
- If you use a power strip or surge protector, make sure it is switched on and working.
- Press the power button again to turn the laptop on.
- If it still does not start, call Lenovo Customer Center through the Lenovo support phone list.
The laptop shows a no bootable device message
The drive with Windows is not first in the boot order, or the firmware cannot read it.
- Hold the power button for 10 seconds until the screen turns off, wait about a minute, then turn it on again.
- Open the UEFI/BIOS setup utility and set the drive that holds Windows as the first boot device.
- Restart the laptop and check whether Windows loads.
- If the drive still is not detected, contact Lenovo support with your Lenovo serial number.
Common mistakes when opening the Lenovo boot menu
| Mistake | What happens | Fix |
|---|---|---|
| Pressing F12 once, or after the logo is gone | Windows starts normally | Tap the key repeatedly from the moment the screen lights up |
| Ignoring hotkey mode | F12 changes a hotkey instead of opening the menu | Hold Fn with F12, or disable Hotkey Mode |
| Using F1 on an IdeaPad or F2 on a ThinkPad | The BIOS setup utility does not open | F2 for IdeaPad, Yoga and Slim; F1 for ThinkPad and ThinkBook |
| An NTFS drive in UEFI mode | The USB drive is missing from the list | Recreate the drive with the media creation tool or format it FAT32 |
| Leaving the USB drive first in the boot order | The laptop keeps starting from the USB drive | Move the Windows drive back to the top |
| Pressing the power button during a BIOS update | The update can fail | Wait for the logo screen, even if the screen stays blank for minutes |
Lenovo boot menu key FAQ
What is the boot key for Lenovo laptops?
The boot menu key on current IdeaPad, Yoga and Lenovo Slim laptops is F12, pressed repeatedly at the Lenovo logo. If hotkey mode is enabled, press Fn + F12. The Novo button or Windows Advanced startup are alternatives when the key does not respond.
What is the Lenovo boot menu key on Windows 11?
The key is the same on Windows 11 and Windows 10, because the boot menu belongs to the laptop's firmware, not to Windows. Press F12 or Fn + F12 at the Lenovo logo, or use Settings > System > Recovery > Advanced startup to restart into UEFI.
What is the Lenovo boot key for the BIOS?
Press F2 at the Lenovo logo on IdeaPad, Yoga and Slim laptops, or F1 on ThinkPad and ThinkBook models. Add Fn when hotkey mode is enabled. The Novo Button menu also has a UEFI/BIOS Setup entry on models that include the button.
What is the Lenovo ThinkPad boot key?
Lenovo's ThinkPad guides send you to the UEFI BIOS with F1 at the logo screen. From there, Startup > Boot opens the Boot Priority Order list, where you select the USB drive and press F10 to save and exit.
How do I boot a Lenovo laptop from USB?
Plug in the bootable USB drive, restart, and press F12 or Fn + F12 at the Lenovo logo. Select the USB entry and press Enter. If the drive is not listed, try another port and check that it is formatted FAT32 for UEFI mode.
What is the boot key for Lenovo Yoga laptops?
Lenovo's Yoga 7 user guide names F12 for the boot device menu and F2 for the UEFI/BIOS setup utility. The Yoga guide also lists the Novo Button menu as another way into UEFI/BIOS Setup.
Which Lenovo boot key should I use for Windows installation?
Use F12 for a one-time start from the installation USB drive. For a permanent change, open the BIOS with F2 or F1, move USB Boot or USB HDD to the top of the boot order and press F10 to save.
Does changing the boot device damage a Lenovo laptop?
No. Opening the boot menu and choosing a device is a built-in firmware feature and changes nothing permanent. Changes in the BIOS setup utility do persist, so put the Windows drive back at the top of the boot order once you finish.
Bottom line: which Lenovo boot menu route to use
Press F12 (or Fn + F12) at the Lenovo logo for a one-time boot, and use F2 or F1 only when you need a permanent boot order change. F12 changes nothing permanent and works on IdeaPad, Yoga and Slim models; the Novo button and Windows Advanced startup cover laptops where the key timing is too tight.