To enable Copilot in Excel on Windows, go to File > Options > Copilot, tick Enable Copilot, select OK and restart Excel; your account also needs a Microsoft 365 plan that includes Copilot.
This guide covers the license check, the Windows and Mac settings, the web and mobile apps, opening Copilot, its three modes, and fixes for a missing button or an unsupported file.

The fastest way to enable Copilot in Excel
These steps apply to Excel for Windows signed in with a personal Microsoft account on Microsoft 365 Personal, Family or Premium.
- Open Excel and select File > Options.
- Select Copilot in the left pane.
- Tick the Enable Copilot checkbox.
- Select OK, then close and restart Excel.
- Open a workbook and select the Copilot button in the lower-right corner of the window.
Work or school accounts have no Enable Copilot checkbox. For them, Copilot appears when the license, update channel and privacy settings allow it.
Check that your Microsoft 365 account has Copilot access
Copilot in Excel is not part of every Microsoft 365 plan, and a free Microsoft account alone does not include it. Match your account to a row below before you change any setting.
| Account or label | Copilot in Excel? | Where to check |
|---|---|---|
| Microsoft 365 Personal, Family or Premium (personal Microsoft account) | Yes, but only the subscription owner can use it in the desktop apps | account.microsoft.com/services, or Start > your account on Windows 11 |
| Work or school account labelled M365 Copilot (Premium) | Yes, the full experience with priority access through the Copilot add-on | Sign in at m365.cloud.microsoft and scroll to your account at the bottom of the home page |
| Work or school account labelled M365 Copilot (Basic) | Yes, standard access without the add-on | Same label under your name at m365.cloud.microsoft |
| Work or school account labelled Copilot Chat (Basic) | No; Copilot in Word, Excel, PowerPoint and OneNote is not available | Ask your admin about a Copilot license |
| Business PC on Semi-Annual Enterprise Channel | No, until it moves to Current Channel or Monthly Enterprise Channel | File > Account, under Product Information |
If you are on a family plan as a member rather than the owner, Copilot will not appear in your desktop Excel. A Microsoft 365 trial is another way to try it.
Enable Copilot in Excel for Windows
The Enable Copilot checkbox arrived in Excel for Windows Version 2501. It applies to Excel only, on that PC only, and for anyone who uses that PC.
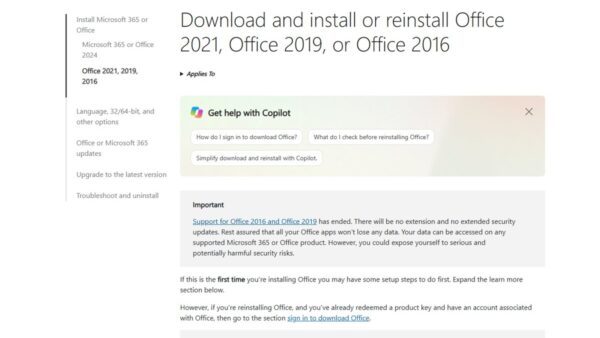
- Update Office first; you can download Microsoft Excel again if the app is not installed through Microsoft 365.
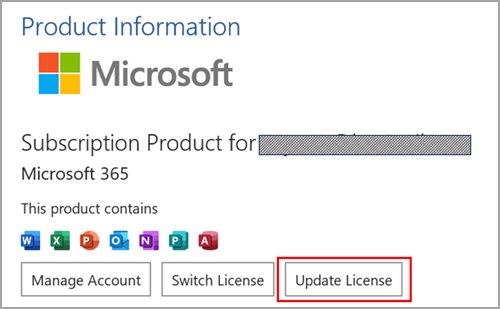
- Open Excel and select File > Account, then select Update License so the app picks up your Copilot entitlement.
- Select File > Options > Copilot.
- Tick Enable Copilot.
- Select OK.
- Close every Microsoft 365 app, then reopen Excel.
If Copilot is missing from the Options list, your Excel build is older than Version 2501 or you are signed in with a work or school account. Word, PowerPoint and OneNote each have their own checkbox.
Enable Copilot in Excel for Mac
On a Mac, the checkbox is in Excel's preferences from Version 16.93.2 onward.
- Open Excel and select the Excel menu in the menu bar.
- Select About Excel, then More Info…, then Refresh License.
- Open the Excel menu again and select Preferences.
- Under Authoring and Proofing Tools, select Copilot.
- Tick Enable Copilot.
- Close and restart Excel.
Copilot in Excel for the web, iPhone, iPad and Android
The web and mobile versions of Excel have no Enable Copilot checkbox. Copilot is on whenever your account qualifies, and what it can do depends on the platform.
| Where you use Excel | Copilot modes available | How to turn it on |
|---|---|---|
| Windows desktop | Edit, plan and chat | File > Options > Copilot > Enable Copilot |
| Mac desktop | Edit, plan and chat | Excel > Preferences > Authoring and Proofing Tools > Copilot |
| Excel for the web | Edit, plan and chat | No setting; refresh the page and allow third-party cookies if the license will not validate |
| iPad | Chat and plan; edit is rolling out | No setting; sign in with a qualifying account |
| iPhone | Chat; edit is rolling out | No setting; sign in with a qualifying account |
| Android | Chat | No setting; sign in with a qualifying account |
Open Copilot after enabling it
Copilot in Excel now opens from the Copilot Dynamic Action Button, which sits in the lower-right corner of the workbook rather than on the Home tab.
- Open a new or existing workbook.
- Select the Copilot button in the lower-right corner, or press F6 to move focus to it.
- Type a prompt in the chat pane on the right, or pick a suggested action.
- To keep the button out of the way, right-click it and select Dock.
- To put it back on the ribbon, right-click it and select Move to ribbon.
Alt + C on Windows and Cmd + Control + I on a Mac also focus the button, though both shortcuts are still rolling out by app and language. Move to ribbon needs Windows build 16.0.20129.15140 or macOS 16.109.525.2 or later, and the choice is remembered per app on the desktop.

Choose Copilot’s operating mode
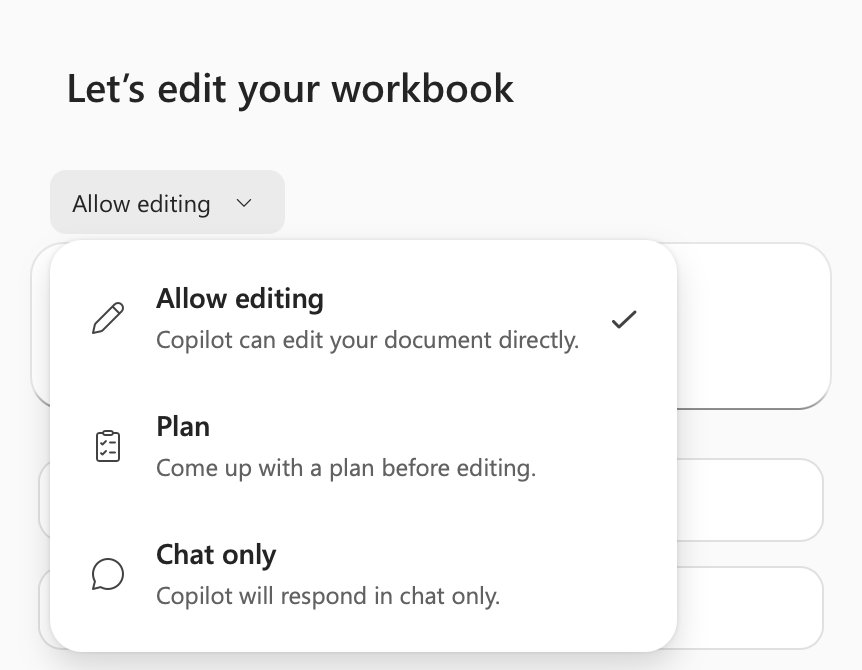
Copilot in Excel has three modes. Pick the one that matches how much control you want over changes to the workbook.
| Your situation | Mode | What happens |
|---|---|---|
| You want Copilot to do the work, such as merge sheets or build a report | Allow editing (default) | Copilot plans the steps, edits the workbook directly and checks the result |
| You want to approve changes before they happen | Plan | Copilot proposes a structured plan and waits for you to confirm it |
| You only want answers or analysis | Chat only | Copilot analyses the data and gives insights without changing the workbook |
The model picker in the upper-right corner of the Copilot pane defaults to Auto. A model you pick lasts only for the current session, and work accounts need an admin to allow Anthropic models.
Prepare the workbook for Copilot
- Save the file as an Excel Workbook (.xlsx); the Strict Open XML Spreadsheet format is not supported.
- Set Formulas > Calculation Options to Automatic, because Copilot editing requires it.
- If the file lives in SharePoint and is checked out, check it back in, then close and reopen it.
- Give columns clear header names so your prompts can refer to them by name.
- Turn AutoSave off if you want to try Copilot's changes without saving them to the workbook.
- Keep source workbooks on OneDrive, SharePoint or your computer if you want Copilot to import data from them.
Copilot works with AutoSave on or off. Saved changes are visible to anyone with access to the file, including coauthors.
How to check Copilot is enabled in Excel
- Open any workbook and look for the Copilot button in the lower-right corner.
- Press F6 and confirm focus lands on the Copilot button.
- Select it and confirm the chat pane opens on the right with suggested prompts.
- On Windows, reopen File > Options > Copilot and confirm Enable Copilot is still ticked.
- With a work account, check that m365.cloud.microsoft shows M365 Copilot (Basic) or M365 Copilot (Premium) under your name.
Verify Copilot’s results
Copilot's output can be wrong or misread your request, so check it before you rely on it, especially for financial, legal or medical decisions.
| What to check | How |
|---|---|
| Formulas Copilot wrote | Select the cells and read each formula in the formula bar against a few rows you can calculate yourself |
| Charts and PivotTables | Confirm the source range covers all rows and that totals match your own SUM |
| Edits you did not want | Press Ctrl + Z to undo, or restore an earlier copy from version history |
| Who changed what | Ask Copilot to review the workbook's change history, including who made changes and when |
| Web search answers | Open the citations Copilot attaches and confirm the figures at the source |
Use the thumbs-up or thumbs-down icons in the Copilot pane to report a bad answer.
Copilot is missing in Excel: troubleshooting steps
Is my Copilot enabled? There is no Copilot button in Excel
The button moved to the lower-right corner, or Excel has not picked up your license yet.
- Look in the lower-right corner of the workbook, not on the Home tab.
- On Windows, select File > Account > Update License, then close and restart all Microsoft 365 apps.
- On a Mac, select Excel > About Excel > More Info… > Refresh License, then restart.
- Install the latest Office updates.
Copilot is missing on a work PC
Copilot is not available on Semi-Annual Enterprise Channel.
- Select File > Account and read the channel under Product Information.
- Ask your IT help desk to move you to Current Channel or Monthly Enterprise Channel.
- Use Excel for the web in the meantime.
Copilot stays greyed out after the license refresh
Connected experiences are turned off in the account privacy settings.
- On Windows, select File > Account > Account Privacy > Manage Settings.
- Turn on Experiences that analyze your content and All connected experiences.
- On a Mac, open Preferences > Personal Settings > Privacy, then Manage Connected Experiences, and turn on the same options.
- Select OK, then restart Excel. With a managed work account, your IT admin controls these settings.
Copilot will not load in Excel for the web
Blocked third-party cookies stop Copilot from validating your license.
- Select the browser's Refresh button.
- Allow third-party cookies in the browser for Microsoft 365.
- Reload the workbook.
Fix the “Unsupported file state” message
The SharePoint file is checked out
Copilot cannot work on a file checked out from SharePoint.
- Check the file back in.
- Close the workbook and reopen it.
- If you cannot check it in, open the file in Excel for the web instead.
Your organization requires check-out on the site
Copilot in the Windows and Mac apps does not work on files from a library that requires check-out.
- Open the workbook in Excel for the web, where Copilot still works.
- Or save a copy to a location that does not require check-out.
The file is in Strict Open XML format
Strict Open XML Spreadsheet is not a supported format.
- Select File > Save As.
- Choose Excel Workbook (.xlsx) as the file type and save.
- Open the new .xlsx copy and select the Copilot button again.
How to disable Copilot in Excel
With a personal Microsoft account, clearing the checkbox hides Copilot in Excel without changing your wider privacy settings.
- On Windows, select File > Options > Copilot and clear Enable Copilot, then select OK.
- On a Mac, open Excel > Preferences > Authoring and Proofing Tools > Copilot and clear Enable Copilot.
- Close and restart Excel.
- Repeat in Word and PowerPoint, and on each device, if you want Copilot off there as well.
You cannot turn Copilot off in Excel for the web, iPhone, iPad or Android. With a work account, Copilot in Excel cannot be switched off on its own; it follows the organization's Microsoft Copilot Chat admin settings.
Copilot in Excel FAQ
Why can't I see Copilot in Excel?
Usually the button has moved to the lower-right corner, your plan lacks Copilot, or Excel has not refreshed its license. Select File > Account > Update License, restart, install updates, and check that connected experiences are on in Account Privacy settings.
Where is the Copilot button in the latest Excel?
It is the Copilot Dynamic Action Button in the lower-right corner of the workbook. Press F6 to focus it from the keyboard. Right-click it and select Move to ribbon if you prefer a ribbon button, or Dock to shrink it to the side.
How do I enable Copilot in Microsoft 365?
Copilot comes with Microsoft 365 Personal, Family and Premium, and with work plans that carry an M365 Copilot label. Once your plan qualifies, update the apps, refresh the license under File > Account, and tick Enable Copilot under File > Options > Copilot on Windows.
How do I enable Copilot in Microsoft Word?
Word uses the same setting as Excel. On Windows, go to File > Options > Copilot in Word, tick Enable Copilot, select OK and restart Word. The checkbox needs Word Version 2412 or later on Windows, or Version 16.93 or later on a Mac.
How do I enable Copilot in MS Office apps all at once?
There is no single switch. Each app, Word, Excel, PowerPoint and OneNote, has its own Enable Copilot checkbox, and each one applies only to that app on that device. Repeat the setting in every app and on every PC or Mac you use.
How do I enable Copilot in Microsoft Outlook?
Outlook uses a Turn on Copilot toggle instead of a checkbox. In the new Outlook for Windows and Outlook on the web, open Settings > Copilot. On Mac, iOS and Android, open Quick Settings > Copilot. The choice applies to Outlook on all your devices.
Can I disable Copilot after enabling it?
Yes, on Windows and Mac with a personal Microsoft account. Clear Enable Copilot under File > Options > Copilot on Windows, or under Preferences > Authoring and Proofing Tools > Copilot on a Mac, then restart Excel. The web and mobile apps have no off switch.
Does Copilot work in Excel on Android and iPhone?
Yes, with fewer modes. Android offers chat only. iPhone offers chat with editing rolling out, and iPad offers chat and plan with editing rolling out. Windows, Mac and the web support all three modes: edit, plan and chat.
How do I use Microsoft Copilot in Excel for work?
Open the workbook, select the Copilot button and describe the task, naming the columns or ranges involved. Use Plan mode to approve changes first, or Chat only to analyse data without edits. Check every formula and chart before sharing the file with coworkers.
How do I enable Copilot on my PC outside Excel?
Copilot in Excel is separate from the standalone Copilot app for Windows. To chat with Copilot outside Office, you can install the Microsoft Copilot app and sign in with your Microsoft account.
The bottom line on enabling Copilot in Excel
Confirm your plan includes Copilot first, then tick Enable Copilot under File > Options > Copilot and restart Excel. Most cases of a missing Copilot come down to the license, not the setting. A plan without Copilot, a stale license, Semi-Annual Enterprise Channel or disabled connected experiences will all hide it, whatever the checkbox says, and the button itself now sits in the lower-right corner instead of the ribbon.