To set up a mail merge in Word, open the Mailings tab, choose Start Mail Merge, connect a recipient list with Select Recipients, insert merge fields, preview the results and select Finish & Merge.
This guide walks through each step with an Excel list, then covers mailing labels, envelopes, bulk email, merge rules and the problems beginners hit most.
How to set up a mail merge letter in Word fast
These steps work in the Word desktop app on Windows with a list already saved in Excel. Each step has its own section further down if you need more detail.
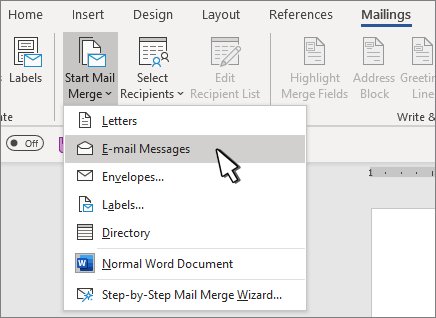
- Open a blank document in Word and go to Mailings > Start Mail Merge > Letters.
- Select Select Recipients > Use an Existing List, pick your Excel file and select Open.
- Choose the sheet that holds your list and select OK.
- Type the letter, then place the cursor where the address goes and select Address Block > OK.
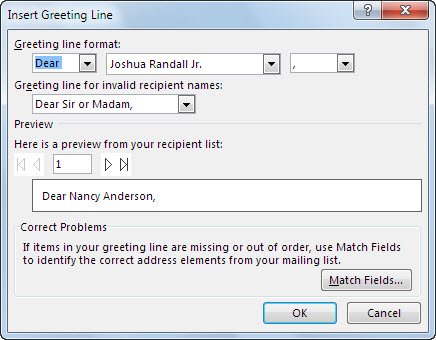
- Place the cursor where the salutation goes and select Greeting Line > OK.
- Select Preview Results and use Next and Previous to check a few records.
- Select Finish & Merge > Print Documents or Edit Individual Documents.
- Go to File > Save so the letter stays linked to the list.
What mail merge does in Word
Mail merge combines one main document with a list of recipients and produces a personalized copy for each row. Word works with three pieces, and knowing them makes every later step easier to follow.
| Piece | What it is | Example |
|---|---|---|
| Main document | The Word file that holds the text every recipient sees, plus merge fields as placeholders | A letter with an Address Block and Greeting Line |
| Data source | The list of recipients; each column heading becomes a merge field | An Excel sheet, Outlook contacts or a list typed in Word |
| Merged document | The output, one personalized version per record | 50 printed letters, or 50 separate emails |
| Document types | What Start Mail Merge can produce | Letters, E-mail Messages, Envelopes, Labels and Directory |
What you need to start a mail merge in Word
| Requirement | Why it matters |
|---|---|
| Word desktop app (Windows or Mac) | Word for the web keeps mail merge settings in an existing file but cannot run a merge or edit merge settings |
| A recipient list | Excel, an Access database, Outlook contacts, a tab- or comma-delimited text file, or a new list typed in Word |
| One heading row in the list | Merge field names come from the column headings, so each column needs a clear name |
| The list stored locally or on a file share | Word does not support a data source at an HTTP location |
| A MAPI-compatible email program such as Outlook | Only needed for an email merge; Word hands each message to it for sending |
| Label or envelope product details | Only needed for labels and envelopes; the vendor and product number are printed on the package |
Step 1: Create or clean up your recipient list in Excel
Most merge problems start in the spreadsheet, so fix the list before Word ever sees it. Microsoft advises finishing every change to the spreadsheet before you connect it to the Word document.
- Put one heading in each column of row 1, such as First_Name, Last_Name, Address, City, State, ZIP and Email.
- Keep every recipient on the first sheet of the workbook, one row per person, with no blank rows in the middle.
- Select the ZIP or postal code column, go to Home and in the Number group choose Text from the Number Format box so leading zeros survive.
- Format percentage columns as Text if you want the value shown as typed; the percentage format multiplies the cell value by 100 during a merge.
- If the list is a .csv or .txt file, open Excel, go to Data > From Text/CSV, set the ZIP column to Text in the preview and select Load.
- Save the workbook on your PC and close it before you start the merge.
No list yet? Skip Excel entirely: Select Recipients > Type a New List builds one inside Word and saves it as an .mdb database file you can reuse.
Step 2: Start mail merge in Word from the Mailings tab
The Mailings tab holds every merge command. If the ribbon is new to you, a quick look at the Word ribbon tabs and groups makes the rest of this guide easier to follow.
- Open Word and create a blank document, or open the letter you have already written.
- Select the Mailings tab.
- Select Start Mail Merge and choose the document type: Letters, E-mail Messages, Envelopes, Labels or Directory.
- For a guided version with Next buttons, choose Step-by-Step Mail Merge Wizard instead; it opens a pane that walks through the same stages.
- Save the file now with File > Save so later steps are not lost.
Step 3: Connect Word to your recipient list
| Where your list lives | Choose under Select Recipients | What happens next |
|---|---|---|
| Excel workbook or .csv file | Use an Existing List | Browse to the file, select Open, pick the sheet, leave Cell Range blank for the whole sheet and select OK |
| Access or another database | Use an Existing List > New Source | The Data Connection Wizard opens; choose the source type and select Next |
| Outlook contacts | Choose from Outlook Contacts | Outlook must be your default email program; pick the contacts and select OK |
| Nowhere yet | Type a New List | Fill in the form; Word saves the list as an .mdb file for reuse |
Once a list is connected, the merge commands such as Address Block and Insert Merge Field stop being dimmed.
Step 4: Write your main document for the mail merge
The main document is everything that stays the same for every recipient. Write it as a normal Word document and leave room for the personalized parts.
- Type the body of the letter, email, or label text exactly as every recipient should see it.
- Leave an empty line where the address will go and another where the salutation will go.
- Press Ctrl + Shift + 8 to show paragraph marks so you can see where each field will land.
- Type any fixed symbols that belong beside data, such as a $ sign before an amount field or a % sign after a percentage field.
- Save the document.
Step 5: Insert merge fields in Word
Merge fields are placeholders that pull values from your list. Address Block and Greeting Line are ready-made collections of fields; Insert Merge Field adds one column at a time.
- Click where the address belongs and select Mailings > Address Block, choose a name format and select OK.
- Click where the salutation belongs, select Greeting Line, choose the name style and select OK.
- Click where a single value belongs, such as a first name inside a sentence.
- Select the down-arrow under Insert Merge Field and pick the column, for example First_Name.
- If the field is not listed, select Insert Merge Field, choose Database Fields, pick the field and select Insert.
- Save the document.
To change the font or size of merged text, select the merge field itself and format it like any other text.
Step 6: Preview your mail merge results
Preview is the check that the merge worked before anything prints or sends. Look at several records, including one with a long name and one with a missing value.
- Select Mailings > Preview Results; the fields switch to real data from the first record.
- Select Next and Previous to move through several records.
- Confirm the address lines, greeting, ZIP codes, dates and amounts look right in each one.
- Select Preview Results again to return to the field codes if you need to edit.
- Fix any problem in the spreadsheet or the field placement, then preview again.
Step 7: Filter or sort mail merge recipients
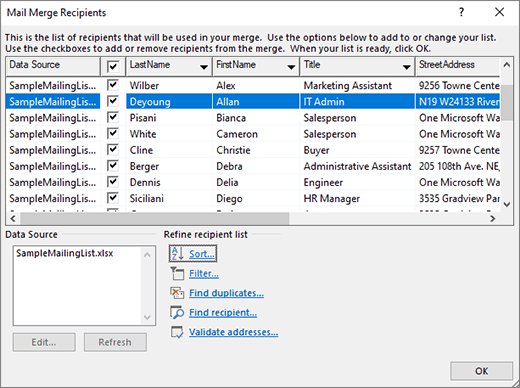
Edit Recipient List lets you leave people out or change the merge order without touching the spreadsheet.
- Select Mailings > Edit Recipient List; every record is checked by default.
- Clear the check box beside anyone who should not get this mailing.
- Select Sort and choose up to three fields, each ascending or descending, then select OK.
- Select Filter, choose a field and a comparison such as Equal to, Contains or Is blank, type a value and select OK.
- Select Find duplicates to see records that share a first and last name, and clear the extras.
- Select OK to close the dialog; Word keeps the sort and filter with the document.
Filter comparisons ignore capitalization, so "ny" matches "NY". Clearing a check box excludes the record from this merge without deleting it from the list.
Step 8: Finish the merge with Finish & Merge
| Finish & Merge option | Use it when | Result |
|---|---|---|
| Edit Individual Documents | You want to review or tweak single letters before printing | A new Word document holding every merged copy, ready to edit and print |
| Print Documents | The preview looked right and you are ready to print | The merged copies go straight to your printer |
| Send E-mail Messages | The main document is an email and the list has an email column | One separate email per recipient through your email program |
Edit Individual Documents is the safest first choice for a large batch: you see every page before paper or ink is used.
How to set up a mail merge email in Word
An email merge needs a MAPI-compatible email program such as Outlook, and an email address for every recipient in the list.
- Go to Mailings > Start Mail Merge > E-mail Messages.
- Select Select Recipients and connect a list that has an email column.
- Add Greeting Line and any other fields, then select Preview Results to check them.
- Select Finish & Merge > Send E-mail Messages.
- In To, choose the email address column; type a Subject line.
- In Mail format, keep HTML or choose Plain text.
- Under Send records, choose All, Current record or a From and To range, then select OK.
Word sends a separate message to each address. It cannot CC or BCC other people or attach files, but links in the body work.
How to create mailing labels with mail merge in Word
The wizard is the simplest route for labels because it copies your layout to every label for you.
- Go to Mailings > Start Mail Merge > Step-by-Step Mail Merge Wizard and select Labels.
- Select Next: Starting document > Label Options, choose the Label vendors and Product number from the package and select OK.
- If your labels are not listed, select New Label, enter the measurements, name it and select OK.
- Select Next: Select recipients, select Browse, pick your list and select Open > OK.
- Select Next: Arrange your labels > Address block > OK.
- Select Update all labels so the address block fills every label, not just the first.
- Select Next: Preview your labels, adjust spacing if needed, then move to the final wizard step and select Print.
How to create envelopes with mail merge in Word
Test one envelope before you merge a whole box; feed direction and offsets vary by printer.
- Go to Mailings > Start Mail Merge > Envelopes.
- In Envelope Options, choose the envelope size, or Custom size, and set fonts and offsets if needed.
- On the Printing Options tab, confirm the Feed method, load the envelope as the illustration shows and select OK.
- Type your return address in the top-left corner if you want one on every envelope.
- Select Select Recipients and connect your list.
- Click in the delivery area and select Address Block > OK.
- Select Preview Results, check a few records, then select Finish & Merge > Print Documents.
How to save and reuse a mail merge document in Word
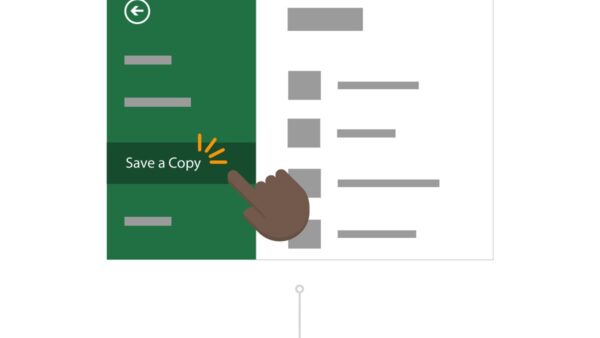
- Select File > Save on the main document; the save keeps the link to your recipient list.
- Next time, open the same document and select Yes when Word asks to keep the connection to the data source.
- Update the spreadsheet first if recipients changed, then use Edit Recipient List and Refresh to load the new rows.
- Change the check boxes, sort or filter for this round, preview and select Finish & Merge again.
Keep the spreadsheet in the same folder and under the same name; moving or renaming it breaks the link Word saved.
Common mail merge problems in Word and fixes
Word shows the wrong field names, or merge commands are dimmed
Field names come from row 1 of the list, and commands stay dimmed until a list is connected.
- Check that row 1 of the spreadsheet holds one clear heading per column.
- Select Select Recipients and reconnect the list.
- If Address Block shows the wrong column, use Match Fields to pair Word's address parts with your column names.
ZIP codes lose leading zeros
The column is stored as a number, so 00399 becomes 399.
- Close the Word document.
- In Excel, select the ZIP column and choose Text in Home > Number Format.
- Retype any codes already stripped of zeros, save, and reconnect the list.
Dates, currency or percentages look wrong
Excel number formats do not always carry through a merge.
- Format the column in Excel with the category you want, such as Currency.
- Format percentage columns as Text to stop the value being multiplied by 100.
- Type the $ or % symbol beside the merge field in the main document.
Blank lines or missing parts appear in addresses
Address Block expects columns Word cannot match, or some rows have empty cells.
- Select Match Fields and pair each address part with the right column.
- Fill or delete the empty cells in the spreadsheet.
- Use Preview Results to confirm the gap is gone.
The greeting says "Dear ,"
The name column is empty for that record, or Greeting Line is mapped to the wrong column.
- Open Edit Recipient List and use Filter with Is blank on the name column to find empty rows.
- Fill the names in the spreadsheet or clear those records.
- Open Match Fields and check the first and last name mappings.
Only the first label has fields
The layout was added to one label and never copied to the rest.
- Return to the arrange step of the wizard.
- Select Update all labels.
- Preview again; every label should now show a different record.
The mail merge email does not send
No MAPI-compatible email program, no email column, or Outlook contacts used with a different Outlook version.
- Make Outlook, or another MAPI-compatible program, your default email app.
- Confirm the list has an email column with an address in every row.
- In Send E-mail Messages, set To to that email column.
- If you use Outlook contacts, use the same Office version for Outlook and Word.
Useful mail merge rules in Word for beginners
Rules sit under Mailings > Rules in the Write & Insert Fields group. They change what each recipient sees based on their data.
| Rule | What it does | Beginner use |
|---|---|---|
| If…Then…Else | Shows one text when a condition is met and other text when it is not | Add "Past due" only for customers with an overdue date |
| Skip Record If | Leaves out recipients whose field meets a condition | Skip anyone whose Country is not US |
| Next Record | Moves to the next record without starting a new page | Fill several entries on one page or label sheet |
| Next Record If | Moves to the next record only when a condition is met | Group rows that share a value |
| Ask | Prompts once and shows the answer in several places | Enter one event date for the whole batch |
| Fill-in | Prompts for text you type during the merge | Reuse one invite for different meetings |
| Merge Record # | Shows the record's position in the list after sorting and filtering | Waitlist positions |
| Merge Sequence # | Numbers records in the order they merge | Number each letter |
| Set Bookmark | Stores a value once for use elsewhere in the document | Repeat one value in several places |
Best practices for a smooth mail merge in Word
| Practice | Why |
|---|---|
| Finish editing the spreadsheet before connecting it | Word reads the list as it was when connected; late edits need a refresh |
| Keep the list on the first sheet with plain headings | Clear headings become clear merge field names |
| Format ZIP, currency and percentage columns in Excel first | Leading zeros and percentages break if left as numbers |
| Store the list on your PC or a file share | HTTP locations are not supported as a data source |
| Send a test to yourself first | Use Current record in Send E-mail Messages or print one envelope |
| Choose Edit Individual Documents for big print runs | You review every page before paper is used |
| Save the main document and the list together | Moving the list breaks the saved connection |
Quick example: A simple personalized letter with mail merge
A three-column list and one sentence show how fields turn into finished text.
| What you set up | Example content |
|---|---|
| Excel row 1 (headings) | First_Name | City | Amount |
| Excel row 2 (one recipient) | Maria | Austin | 120 |
| Main document text | Dear «First_Name», thank you for your order of $«Amount» from the «City» store. |
| Merged result for row 2 | Dear Maria, thank you for your order of $120 from the Austin store. |
| Finish choice | Edit Individual Documents to review, then print |
Word mail merge checklist
| Check | Done when |
|---|---|
| List has one heading row and no blank rows | Row 1 holds names like First_Name, City, ZIP |
| ZIP and number columns formatted | ZIP shows as Text; percentages and currency look right in Excel |
| Document type chosen | Start Mail Merge matches letters, email, labels or envelopes |
| List connected | Address Block and Insert Merge Field are no longer dimmed |
| Fields placed | Address, greeting and single fields sit where you want them |
| Recipients filtered | Only the right check boxes stay ticked in Edit Recipient List |
| Results previewed | Several records checked with Next and Previous |
| Merge finished and saved | Output printed or sent; main document saved |
Word mail merge FAQ
How do I set up a mail merge in Excel?
Excel holds the recipient list, but the merge itself runs in Word. Put one heading per column in row 1, keep the data on the first sheet, format ZIP codes as text and save the file. Then connect it in Word with Select Recipients > Use an Existing List.
How do I set up a mail merge letter in Word?
Go to Mailings > Start Mail Merge > Letters, connect your list with Select Recipients, then add Address Block and Greeting Line. Select Preview Results to check records and Finish & Merge to print or create individual letters.
How do I set up a mail merge email?
Choose Start Mail Merge > E-mail Messages, connect a list with an email column, add fields, then select Finish & Merge > Send E-mail Messages. Pick the email column in To, type a subject and select OK. Outlook or another MAPI-compatible program sends the messages.
How do I set up a mailing list for a mail merge?
The simplest list is an Excel sheet with one column per detail and one row per person. If you have none, select Select Recipients > Type a New List in Word. Word saves that list as an .mdb database file you can reuse.
Can I use a mailing list from Outlook for a mail merge?
Yes. Select Select Recipients > Choose from Outlook Contacts and pick the contacts. Outlook must be your default email program, and for email merges it should be the same version as Word.
Can I add attachments or CC someone in a mail merge email?
No. Word sends one separate message to each address and cannot add attachments or CC and BCC recipients. You can put links in the message body instead, for example to a shared file.
Can I do a mail merge in Word for the web?
No. Word for the web keeps the merge settings in a document made in the desktop app, but it cannot run a merge or change merge settings. Open the file in the Word desktop app to merge.
Why does my mail merge drop the zeros from ZIP codes?
The ZIP column is stored as a number, so Excel removes leading zeros. Format the column as Text in Excel before connecting it, retype any codes already changed, then reconnect the list in Word.
Bottom line: Mailings tab or mail merge wizard in Word?
Use the Mailings tab buttons for letters and email, and the Step-by-Step Mail Merge Wizard for labels. Letters and email need only a handful of buttons in a fixed order, while the wizard's Update all labels step stops the most common label mistake. Either way, a clean Excel list with text-formatted ZIP codes prevents most problems.