To replace an iPad battery, book Apple battery service online, at a Genius Bar or with an Apple Authorized Service Provider, or do it yourself with Apple's Self Service Repair manual on supported models.
This guide covers how to check battery health first, what each route costs, the official DIY procedure, and what to check once the new battery is in.
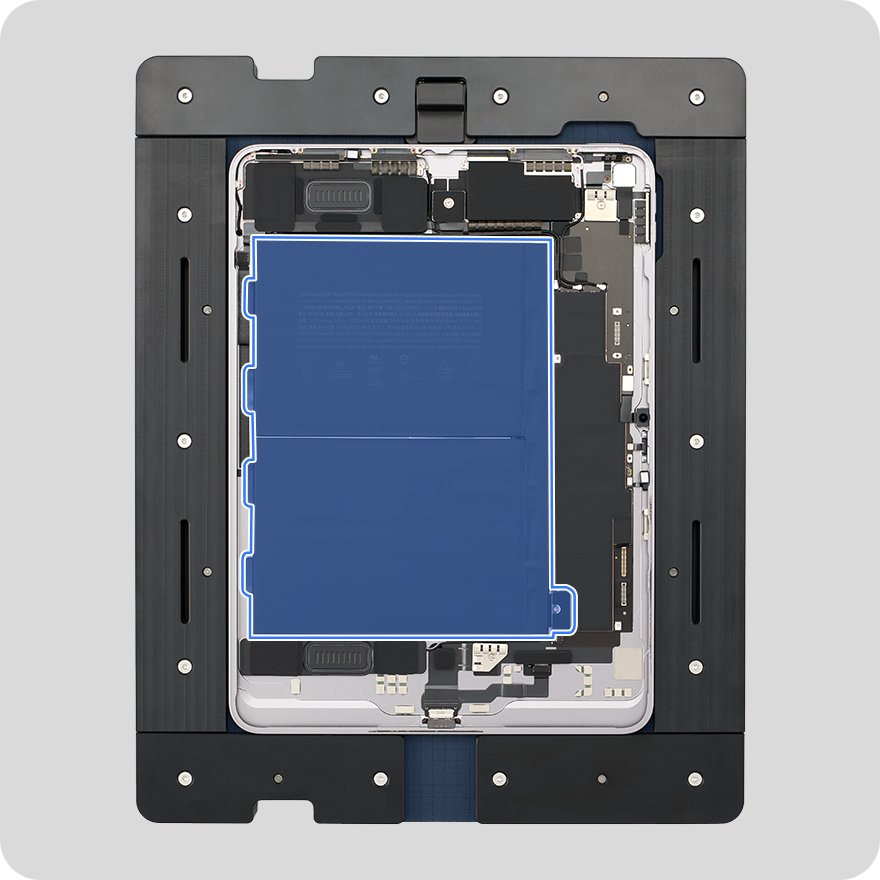
How to get an iPad battery replaced by Apple
Apple battery service is the route Apple recommends for beginners. Apple's battery page states that built-in lithium-ion polymer batteries should be serviced by Apple or an authorized service provider.
- Back up the iPad to iCloud or your computer before you hand it over.
- Open Apple's Apple Service and Repair for iPad page at support.apple.com/ipad/repair.
- Under How much will it cost?, choose your iPad line and exact model to see the Battery service estimate.
- Select Get started and describe the battery problem.
- Choose In Person to visit a Genius Bar or Apple Authorized Service Provider, or By Mail to receive a prepaid shipping box.
- Track the repair afterwards in My Support or the Apple Support app, signed in with your Apple Account.
Apple inspects the iPad to set the final fee. A shipping fee may be added if Apple needs to ship the device.
Apple battery service vs AppleCare vs Self Service Repair for iPad
| Your situation | Use this route | What it costs you |
|---|---|---|
| Battery is defective and the iPad is under one year old | Apple Limited Warranty service | Covered; the warranty includes service for a defective battery |
| You have AppleCare and battery health is below 80% | AppleCare battery service | No additional fee, according to Apple's AppleCare page |
| You have AppleCare and need the iPad working quickly | Express Replacement Service | Apple ships a replacement first and places a temporary hold on your card |
| Out of warranty, battery simply worn out | Out-of-warranty Apple battery service | The fee shown in Apple's estimator for your model |
| Out of warranty and you already repair electronics | Self Service Repair with Apple's repair manual | Parts plus tool rental or purchase; warranty does not cover damage you cause |
| Battery is swollen, dented or punctured | Apple or an Apple Authorized Service Provider only | Service fee; never open the iPad yourself |
Understanding your iPad battery: lifespan, capacity and charge cycles
Every iPad uses a built-in lithium-ion battery with soft battery cells. It wears down with use, and Apple treats it as a consumable part.
| Fact | What Apple states | What it means for you |
|---|---|---|
| Design lifespan | Retains up to 80% of original capacity at 1000 complete charge cycles | A battery below 80% is past its designed life |
| Charge cycle | One cycle equals using 100% of the battery's capacity, not one plug-in | Charging from 50% twice counts as one cycle |
| Why batteries fail | Capacity and performance decline over time on all rechargeable batteries | Runtime shortens and you charge more often |
| Signs it needs service | Needing to charge more and more frequently | Check Battery Health before you book a repair |
| Warranty position | The one-year warranty covers a defective battery, not wear from normal use | A worn battery out of warranty is a paid service |
| Who should replace it | Apple or an authorized service provider | DIY is for experienced technicians on supported models |
How to check iPad battery health and cycle count
Battery Health shows capacity, cycle count, manufacture date and first use date. It appears on iPad Pro (M4 and M5), iPad Air (M2, M3 and M4), iPad mini (A17 Pro) and iPad (A16).
- Open the Settings app on your iPad.
- Tap Battery.
- Tap Battery Health.
- Read the capacity figure and the cycle count.
- Compare the capacity with 80%; below that figure, the battery has passed its designed lifespan.
If Battery Health is missing from Battery settings, your model does not support the feature. Use the daily usage view under Battery and how often you charge as your guide instead.
Preparing for the iPad battery replacement
Apple's repair manual lists the same first steps for every iPad repair. Most of them also apply before an Apple Store or mail-in appointment.
| What you need | Why | Applies to |
|---|---|---|
| A current backup | Apple's first step before any repair; in Settings, tap your name, iCloud, iCloud Backup, then Back Up Now | Every route |
| Your model and serial number | The cost estimator and some genuine part orders need them | Every route |
| The repair manual for your exact model | You need its manual ID to buy genuine parts | Self Service Repair |
| A fully discharged battery | A discharged battery is less likely to suffer a thermal event | Self Service Repair |
| Battery-safe workspace | Nonflammable ESD-safe bench, 2 feet from paper, sand container within reach, ventilation, fireproof enclosure within 20 feet | Self Service Repair |
| Safety gear | Heat-resistant gloves and safety glasses with side shields | Self Service Repair |
| Model-specific tools | Heated display removal fixture, repair tray, torque driver, JCIS bit, adhesive roller, ESD-safe tweezers, nylon probe | Self Service Repair |
To drain the battery for a DIY repair, disconnect all cables, raise display brightness to the highest setting, turn on Wi-Fi and Bluetooth, and play a video. Apple's manual says not to repair the device if you cannot determine the battery level.
Step-by-step guide to replacing the iPad battery with Self Service Repair
These steps summarise Apple's battery procedure for the iPad Air 11-inch (M3). Apple publishes a separate manual for each supported model, so read the one for your iPad in full before you start.
Apple's battery replacement troubleshooting covers iPad Air (M2) and later, iPad Pro (M4) and later, iPad mini (A17 Pro) and iPad (A16). Older models go to Apple or an authorized provider.
- Back up the iPad, discharge the battery fully, disconnect all cables, remove cases and covers, then turn the iPad off.
- Put on an ESD wrist strap attached to a grounded ESD mat, plus heat-resistant gloves and safety glasses.
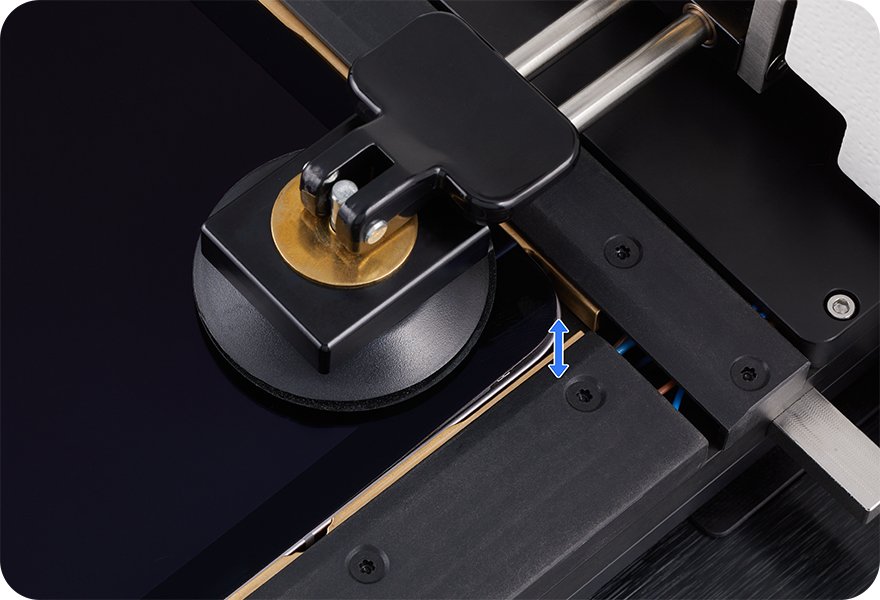
- Remove the display as the manual's Display procedure describes: heat the adhesive in the heated display removal fixture, cut it with the adhesive cutter, then disconnect the display, Multi-Touch and microphone flex cables.
- Check the battery. If it is dented, punctured or otherwise damaged, stop and book service instead.
- Use the torque driver and JCIS bit to remove the crosshead screw from the battery connector.
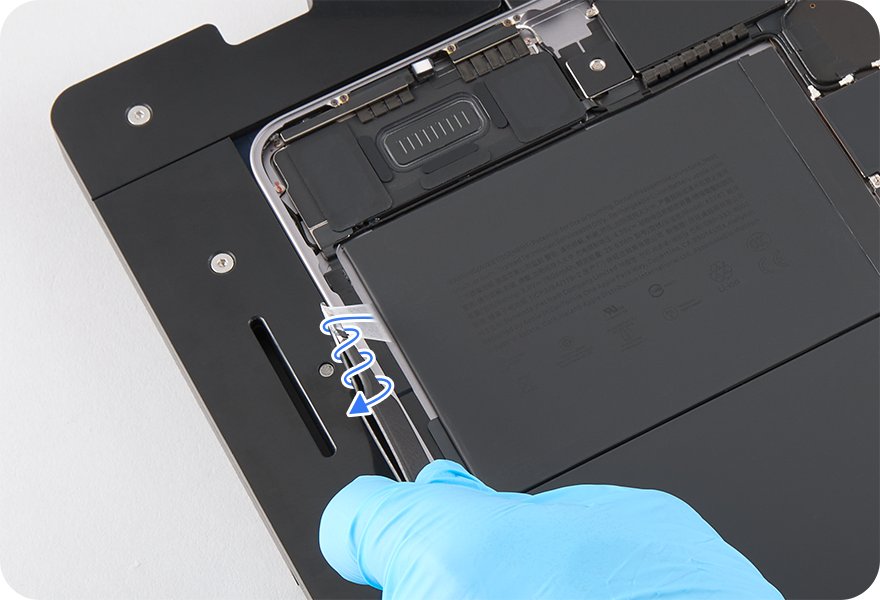
- Twist each of the four battery adhesive strips around ESD-safe tweezers and pull them out in the order the manual shows, keeping the tweezers parallel to the battery.
- Gently wiggle the battery free of the enclosure, then clean residual adhesive with ethanol or IPA wipes, keeping them off flex cables and foam.
- Peel the white liner off the new battery, slide its connector into the logic board as you lower it, and fit a new crosshead screw with the green torque driver.
- Roll the adhesive activation roller over each strip 10 times, remove the protective cover, reinstall the display, then charge the iPad for a few minutes.
Gently shake the iPad after reassembly. Apple's manual says that if the battery feels loose, you must remove the display and battery again and fit another replacement battery.
Order genuine parts from the Self Service Repair Store using your manual ID, and return the old battery for recycling as the store instructs.
Post-replacement tips: how to check a new iPad battery works
- Charge the iPad with a recommended USB-C power adapter plugged into a wall outlet, not a computer port.
- Confirm the iPad starts up completely and the charging icon appears.
- Open Settings, tap Battery, then tap Battery Health on supported models and check the capacity and cycle count.
- If you also replaced the display, follow the onscreen prompt to run Repair Assistant with the latest non-beta iPadOS and an internet connection.
- Use the iPad normally for a few days and compare the daily usage under Battery with your old runtime.
Apple guarantees its own service and replacement parts for 90 days or the remaining term of your Apple warranty, whichever is longer.
Common iPad battery replacement challenges and troubleshooting
iPad will not turn on after the battery replacement
A new battery ships uncharged, or the iPad entered a deep discharge state.
- Connect a compatible cable to a power adapter in a wall outlet.
- Charge for at least 10 minutes; a deeply discharged iPad can need 20 to 30 minutes.
- Look for the charging icon within two minutes of plugging in.
- If nothing appears after charging, reopen only if you are confident with the manual; otherwise book Apple service.
iPad battery does not charge or charges slowly
Debris in the port, a weak adapter, or a faulty cable is more common than a bad battery.
- Turn the iPad off and unplug all cables.
- Clean the charging port with a small, dry, nonmetallic soft-bristled brush; never use compressed air.
- Try a different cable and a different USB-C power adapter.
- Gently move the cable at the port; an intermittent connection with a working cable means the iPad needs service.
Battery adhesive strip breaks during removal
The strip was pulled against a part or at the wrong angle.
- If you can still see the strip, grip it with the tweezers, wrap it and keep twisting until it comes out.
- If it cannot be retrieved, insert only the flat end of the black stick at an insertion point where a strip is already fully removed.
- Stop at once if the battery dents or punctures, and take the iPad to Apple.
Battery smokes, hisses or suddenly puffs out
A battery thermal event, triggered by damage or improper handling.
- Pour all of the clean, dry sand over the battery or device at once.
- Contact local fire authorities if you need help.
- Leave and ventilate the room for 30 minutes.
- Wait 30 minutes, then use heat-resistant gloves to move the device into the fireproof enclosure for at least 2 hours.
iPad battery still drains fast after replacement
App and background activity can drain any battery, new or old.
- Open Settings and tap Battery.
- Tap View All Battery Usage and check which apps used the most power.
- Review On screen, Background and Notifications activity for the top apps and adjust them.
When to seek professional help for an iPad battery
Apple's own manual warns that improper battery replacement can cause fire, injury, data loss or device damage.
| Situation | Go to | Reason |
|---|---|---|
| You have never repaired a sealed device | Apple or an Apple Authorized Service Provider | Apple says only experienced technicians should replace a battery |
| Your model has no Apple repair manual | Apple or an Apple Authorized Service Provider | No official DIY procedure or parts exist for it |
| iPad is under warranty or covered by AppleCare | Apple | DIY damage is not covered by Apple's warranty or AppleCare plans |
| Battery is swollen, dented or punctured | Apple or an Apple Authorized Service Provider | Apple's manual says stop and do not remove the battery |
| You cannot tell the battery's charge level | Apple or an Apple Authorized Service Provider | Apple's manual says not to repair the device |
| No heated display removal fixture | Apple, or rent the tools from the Self Service Repair Store | The display adhesive must be heated before cutting |
iPad battery replacement FAQ
Can my iPad battery be replaced?
Yes. Apple replaces iPad batteries through its battery service, in person at a Genius Bar or Apple Authorized Service Provider, or by mail. Recent models also have official Self Service Repair manuals with a battery procedure.
How much does it cost to replace an iPad battery?
The price depends on the model and your coverage. Apple's US estimator showed $149 for iPad Air battery service in October 2026. AppleCare covers batteries below 80% capacity at no additional fee, and a defective battery is covered within the one-year warranty.
Can I replace the iPad battery myself?
Yes, on supported models with Apple's Self Service Repair manual, genuine parts and the specified tools. Apple aims it at people experienced with electronics repair, and damage you cause is not covered by the warranty or AppleCare.
Is there a video showing how to replace an iPad battery?
Apple's Self Service Repair manuals for supported iPads include a Repair Videos section next to the written procedures. Use the written battery procedure for your exact model as the primary reference, because tools and steps differ between models.
Where can I replace my iPad battery near me?
Book a Genius Bar appointment at an Apple Store or visit an Apple Authorized Service Provider. Start from Apple's iPad repair page with Get started. Authorized providers set their own fees and give their own estimate.
Can you replace the battery in an iPad Pro?
Yes. Apple battery service covers iPad Pro, and iPad Pro (M4) and later models have Self Service Repair manuals that include the battery. Check the estimate for your exact iPad Pro model on Apple's repair page.
Can the battery in an older iPad like the iPad mini 4 or iPad 6th generation be replaced?
Use Apple's Get started service flow to check. Apple's Self Service Repair battery guidance covers only recent models, so older iPads go to Apple or an Apple Authorized Service Provider for battery service.
Can an iPad battery be repaired instead of replaced?
No. A worn lithium-ion battery cannot be restored; Apple services it by replacing the battery. Apple's manual also recommends installing only new batteries, because used cells can be damaged during removal.
Does AppleCare cover iPad battery replacement?
Yes. Apple's AppleCare page says an iPad battery holding less than 80 percent of its original capacity is covered, with no additional fee. Check your coverage status on Apple's coverage site or in the Apple Support app.
Bottom line: should you replace your iPad battery yourself?
Check Battery Health first, then use Apple battery service or AppleCare unless you already repair sealed electronics. The DIY route needs a heated display fixture, torque drivers and a fire-safe workspace, and any damage you cause voids warranty and AppleCare coverage.