Most Remote Desktop faults trace back to the host PC: Remote Desktop switched off, the RDP listener not running, TCP port 3389 blocked, or an .rdp display value that no longer matches your monitors.
This guide fixes the 9 issues that stop or spoil a session, from authentication errors and blank screens to licence warnings, lag and missing audio.
The fastest fix when Remote Desktop will not connect
Run these checks on the host PC, the machine you are trying to reach. They clear the three settings behind most failed connections.
- On the host PC, select Start > Settings > System > Remote Desktop.
- Set Enable Remote Desktop to On, then select Confirm.
- Note the PC name shown on the same page. You connect with that name.
- Open Services and confirm Remote Desktop Services and Remote Desktop Services UserMode Port Redirector are running.
- Open
wf.msc, select Inbound Rules, and enable Remote Desktop – User Mode (TCP-In) and Remote Desktop – User Mode (UDP-In) for all profiles. - On your own PC, open Remote Desktop Connection, type the host PC name, and select Connect.
Still refused after these steps? The longer walkthrough in Fix: Remote Desktop Not Working in Windows 10/11 covers the same host in more detail.
Match your symptom to the right fix
Each row points at the section that finishes that job. Start with the row that matches what you see on screen.
| What you see | Go to | Why |
|---|---|---|
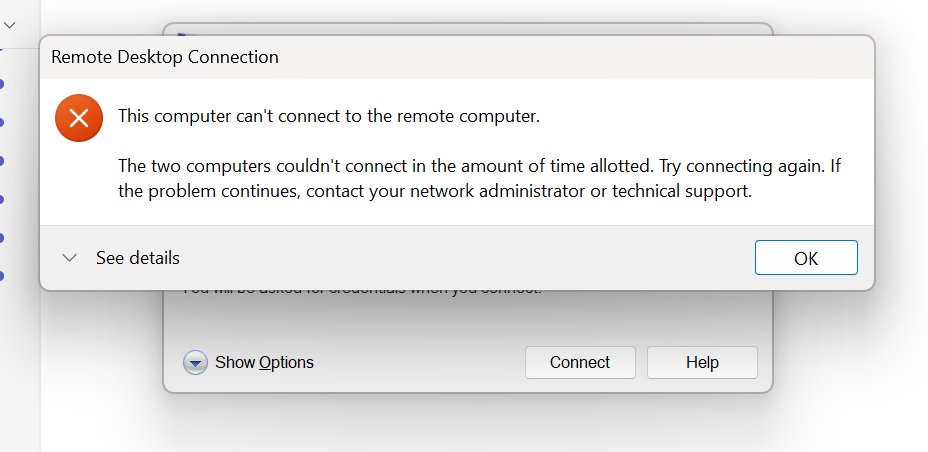
| "Remote Desktop can't connect to the remote computer" | Issue 1 | Remote access is off, the listener is down, or a firewall blocks port 3389 |
| Credentials rejected, or a CredSSP error | Issue 2 | Group membership, a user right, or an unpatched CredSSP on one end |
| Session opens tiny, stretched, or on one monitor only | Issue 3 | The .rdp file carries a fixed width and height |
| Mouse and typing lag behind | Issue 4 | Auto bandwidth detection or compression has been switched off |
| Black screen with only a cursor | Issue 5 | The shell did not load, or the graphics stack stalled |
| Connection sits and then times out | Issue 6 | Name resolution, a changed listening port, or no route from outside the network |
| "No Remote Desktop License Servers available" | Issue 7 | The 120-day grace period on a session host has ended |
| Host CPU or memory pinned, sessions crawling | Issue 8 | Disconnected sessions are still holding processes |
| No sound, or no microphone in the session | Issue 9 | audiomode and audiocapturemode, or a redirection policy on the host |
What you need before you start
| Requirement | Detail |
|---|---|
| Host edition | Windows Pro, Enterprise, Education or Windows Server. Home editions cannot host a Remote Desktop session. |
| Client edition | Any Windows edition, including Home. macOS, iOS and Android connect through Windows App or the Remote Desktop app. |
| Account rights | Membership of the Administrators group to change the setting, and membership of Remote Desktop Users to connect. |
| Network | The host powered on, reachable, and allowing Remote Desktop through its firewall. |
| Default port | TCP 3389, stored as PortNumber under HKEY_LOCAL_MACHINE\SYSTEM\CurrentControlSet\Control\Terminal Server\WinStations\RDP-Tcp. |
| Outside the network | A VPN, or port forwarding on the router. Microsoft recommends the VPN. |
Issue 1: Unable to Connect to Remote Desktop
The client reports that remote access is not enabled, the computer is off, or it is not available on the network. The two usual root causes are a stopped RDP-TCP listener and a blocked port.
- On the host, open Registry Editor and check
HKEY_LOCAL_MACHINE\SYSTEM\CurrentControlSet\Control\Terminal Server. The DWORDfDenyTSConnectionsmust be0. - Check
HKEY_LOCAL_MACHINE\SOFTWARE\Policies\Microsoft\Windows NT\Terminal Servicesas well. If a policy setsfDenyTSConnectionsto1, it overrides the Settings app. - Check
HKEY_LOCAL_MACHINE\SYSTEM\CurrentControlSet\Control\Terminal Server\WinStations\RDP-Tcp. The DWORDfEnableWinStationmust be1. - Start the Remote Desktop Services service. Select Yes when Windows offers to restart Remote Desktop Services UserMode Port Redirector with it.
- Run
qwinstaon the host. The linerdp-tcpmust show the stateListen. - Open a command prompt as administrator and run
gpresult /H c:\gpresult.html. In the report, find Allow users to connect remotely by using Remote Desktop Services under Computer Configuration\Administrative Templates\Windows Components\Remote Desktop Services\Remote Desktop Session Host\Connections. - If that policy reads Disabled, set it to Enabled or Not configured in the Group Policy Object Editor, then run
gpupdate /forceon the host.
Issue 2: Authentication Errors
Two error texts dominate here. "The system administrator has restricted the type of logon" is a rights problem, and "CredSSP encryption oracle remediation" is a patch-level problem.
- On the host, open Settings > System > Remote Desktop and select Select users that can remotely access this PC. Newer builds label this Remote Desktop users.
- Select Add, type the account name, then select OK. Administrators already have access.
- If the account is already listed, open the Group Policy Object Editor against the host and go to Computer Configuration\Windows Settings\Security Settings\Local Policies\User Rights Assignment.
- Open Access this computer from the network and confirm Remote Desktop Users, or a parent group, appears in the list. Add it if a policy removed Everyone.
- For a CredSSP encryption oracle remediation error, install all pending Windows updates on both the client and the host. The fix is the CredSSP update for CVE-2018-0886 on each end.
- Leave Network Level Authentication enabled. It forces authentication before the session starts and is the recommended setting.
Lowering the Encryption Oracle Remediation protection level restores the connection but reopens the vulnerability on the patched machine. Patch the other end instead.
Issue 3: Screen Resolution and Display Issues
Remote Desktop stores display settings in the .rdp file, not in the host. A session that opens at the wrong size is reading a stale desktopwidth and desktopheight pair.
- Close the session. For a one-off size, run
mstsc /v:HOST-PC /w:1920 /h:1080from the Run box. - For a permanent change, run
mstsc /edit Default.rdp. Each user has a hidden Default.rdp in the Documents folder, and saved .rdp files live there too. - Set
desktopwidth:i:1920anddesktopheight:i:1080in the file. Any value from 200 to 8192 pixels is accepted. - Set
dynamic resolution:i:1so the session resolution follows the window as you resize it. - Set
smart sizing:i:1if you would rather scale the existing content to the window than change the resolution. - Set
screen mode id:i:2to start full screen, or1to start windowed. - For several monitors, set
use multimon:i:1. Runmstsc.exe /lto list local display IDs, then setselectedmonitors:s:with the IDs you want, separated by commas. - Reconnect with
mstsc HOST-PC.rdpand check the session fills the displays you chose.
Text still too small on a high-DPI laptop? Scaling the local desktop first often helps more than changing the session, and How to Zoom In and Out on Desktop Screen in Windows covers that.
Issue 4: Lagging or Slow Performance
RDP adapts to the link automatically unless something turned that off. Check the .rdp values before blaming the connection.
- Open the .rdp file with
mstsc /edit filename.rdp. - Set
bandwidthautodetect:i:1so the client measures available bandwidth. This is the default. - Set
networkautodetect:i:1so the client detects the network type. - Set
compression:i:1to keep RDP bulk compression on for data sent to your device. - Set
videoplaybackmode:i:1so video uses RDP multimedia streaming rather than raw screen updates. - Drop the session resolution with
desktopwidthanddesktopheight. Fewer pixels means less to send on a slow link. - Set
audiomode:i:2while you test. Silencing the session removes the audio stream from the link. - Reconnect over a wired connection or a VPN and compare the responsiveness.
Issue 5: Blank Screen on Connection Attempt
The session authenticates, then shows black with a visible cursor. The desktop shell failed to load, or the graphics stack stalled.
- Press Windows logo key + Ctrl + Shift + B inside the session to reset the graphics driver.
- If the screen stays black, press Ctrl + Alt + End to reach the security options screen. Ctrl + Alt + Del goes to your own PC instead.
- Select Task Manager. Use the arrow keys and Enter if the mouse does not respond.
- Open the Details tab and look for
explorer.exeanduserinit.exein the process list. - If
explorer.exeis missing, open Registry Editor on the host and go toHKEY_LOCAL_MACHINE\SOFTWARE\Microsoft\Windows NT\CurrentVersion\Winlogon. - Confirm the
Shellvalue data readsexplorer.exe. Back up the key before changing it. - If the value is correct and the screen is still black, perform a clean boot on the host to find the startup app or service responsible.
A screen that flickers rather than stays black is usually a local display fault, and Fix Screen Flashing Issue in Windows 10 handles that case.
Issue 6: Connection Timeout
A timeout means the packets never arrived. Work outwards: name, port, route.
- Connect using the host IP address instead of its name. If the IP works, the fault is name resolution, not Remote Desktop.
- Check
HKEY_LOCAL_MACHINE\SYSTEM\CurrentControlSet\Control\Terminal Server\WinStations\RDP-Tcpon the host. The DWORDPortNumbershould read0x00000d3d, which is 3389. - If
PortNumberdiffers, connect ashostname:portorIPaddress:portinstead. - Restart the Remote Desktop Services service after any port change.
- Open
wf.mscon the host, select Inbound Rules, and confirm Remote Desktop – User Mode (TCP-In) and Remote Desktop – User Mode (UDP-In) are enabled for all profiles. - Connecting from outside the network? Set up a VPN so the client joins the same network. Microsoft recommends this over exposing the PC.
- If you must use port forwarding, map port 3389 on the router to the host internal IPv4 address, restrict the source IP where the router allows it, and set a strong password on every account with remote access.
Issue 7: License Issues
This one only appears on a Remote Desktop Services deployment on Windows Server. Each user or device connecting to a session host needs a Remote Desktop Services client access licence, an RDS CAL.
A new session host runs for a 120-day grace period with no licence server. Once that period ends, clients need a valid RDS CAL before they can sign in.
- Confirm the host is a Remote Desktop Session Host on Windows Server. A Windows client edition never asks for an RDS CAL.
- Check how long the session host has been in service. Past 120 days, the grace period has expired and a licence server is mandatory.
- Install and activate a Remote Desktop Licensing server, then install your RDS CALs on it.
- Match the CAL version to the session host. Later CALs cover earlier hosts, but a Windows Server 2022 CAL cannot serve a Windows Server 2025 session host.
- Install the CALs on a licence server running the same Windows Server version as the CALs, or a later one.
- Choose the licensing model. Per device CALs are assigned to hardware and up to 20 percent can be revoked. Per user CALs are assigned in Active Directory and cannot be revoked.
- Open Remote Desktop Licensing Manager and check how many CALs are issued against how many you own.
Per device temporary CALs are issued on first sign-in and last 90 days. Per user CALs show a 60-day expiry that extends each time the user signs in.
Issue 8: High Resource Consumption
Disconnected sessions keep running. Closing the Remote Desktop window ends nothing, so processes, memory and CPU stay allocated on the host.
- Run
qwinstaon the host to list every session with its name, user, ID and state. Sessions markedDiscare disconnected but still alive. - Warn the user first with the
msgcommand. Logging someone off without warning can lose unsaved work. - Run
logoff <sessionID>to end a session and delete it from the server. All its processes stop. - Add
/server:<servername>to act on a different session host, and/vto see what the command is doing. - Inside your own session, sign out from Start rather than closing the window, so the session is deleted instead of parked.
- Open Task Manager on the host and sort the Details tab by CPU or Memory to find the process holding the resources.
Full Control permission is required to log off anyone else. You can always log yourself off from your own session.
Issue 9: Audio Issues
Audio has two independent directions. Playback sends the session's sound to your speakers, and recording sends your microphone into the session.
- Open the connection file with
mstsc /edit filename.rdp. - Set
audiomode:i:0to play sounds on your local device. That is the default.1plays them on the host and2mutes them. - Set
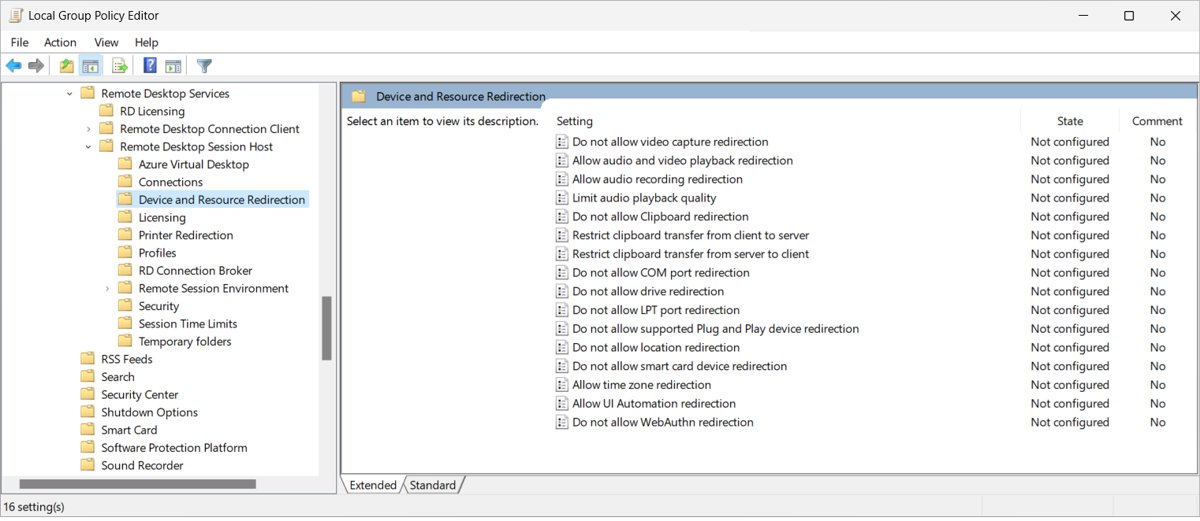
audiocapturemode:i:1to redirect your microphone into the session. The default is0, which is why microphones often appear missing. - If audio is still silent, open the Group Policy editor against the host and go to Computer Configuration > Administrative Templates > Windows Components > Remote Desktop Services > Remote Desktop Session Host > Device and Resource Redirection.
- Set Allow audio and video playback redirection to Enabled.
- Set Allow audio recording redirection to Enabled for microphone access.
- Run
gpupdate /forceon the host and reconnect.
The most restrictive setting wins. A policy that blocks redirection on the host overrides an .rdp file that allows it.
Test the port before you change anything else
Run this from another PC on the same network as the host. It separates a network problem from a Remote Desktop problem in one step.
Test-NetConnection -ComputerName HOST-PC -Port 3389 -InformationLevel Detailed-ComputerName takes the host name or IP address. -Port 3389 tests the default RDP listening port. -InformationLevel Detailed adds the name resolution and route results to the output.
You should see: TcpTestSucceeded : True means the port is reachable and the fault lies in the session itself. False means a firewall, a route or a stopped listener is blocking it.
How to check it worked
- Run
qwinstaon the host. Therdp-tcpline must readListen. - On a Windows Server host, open Remote Desktop Connection, type
localhost, and select Connect. Success here rules out the server and points at the network. - Run
Test-NetConnection -ComputerName HOST-PC -Port 3389from another PC and confirmTcpTestSucceeded : True. - Reconnect and confirm the session fills the resolution you set, with no black border and no stretched text.
- Play a sound inside the session and confirm it reaches the device you chose in
audiomode.
Fix Remote Desktop when it still will not connect
Remote Desktop never connects, with no error to work from
The RDP-TCP listener is not running, or another application has taken port 3389.
- Run
qwinstaon the host and look forrdp-tcpin theListenstate. - Run
cmd /c 'netstat -ano | find "3389"'in an elevated PowerShell window and note the PID listening on the port. - Run
cmd /c 'tasklist /svc | find "<pid>"'with that PID to name the process holding it. - If the process is not Remote Desktop Services, reconfigure that application to use another port.
- Restart the Remote Desktop Services service and test again.
"Remote Desktop cannot connect to the remote computer"
Remote access is off, a self-signed certificate is missing, or the service account lacks permissions.
- Confirm
fDenyTSConnectionsis0andfEnableWinStationis1on the host. - Check
HKEY_LOCAL_MACHINE\SYSTEM\Setup. BothSystemSetupInProgressandOOBEInProgressmust be0, or the machine is still in Sysprep state. - Open the Certificates snap-in for the Computer account on the host, expand Remote Desktop, and delete the RDP self-signed certificate.
- Restart the Remote Desktop Services service and refresh the snap-in. Windows recreates the certificate.
- If it is not recreated, open
C:\ProgramData\Microsoft\Crypto\RSA\, right-click MachineKeys, and confirm Builtin\Administrators has Full control and Everyone has Read and Write.
Remote Desktop works on the same network but not from a different network
Remote Desktop is a peer-to-peer connection, so it needs a route into the host network.
- Connect to the network over a VPN first, then start Remote Desktop. The client then behaves as if it were local.
- If port forwarding is the only option, find the host internal IPv4 address under Settings > Network & Internet > Status > View your network properties.
- Map port 3389 on the router to that internal address.
- Restrict the source IP or network on the router so the port is not open to the whole internet.
- Set a static internal IP on the host, or use Dynamic DNS, so the mapping survives an address change.
Conclusion
Check the host first every time: Remote Desktop enabled, the RDP-TCP listener in the Listen state, and port 3389 reachable. Only then edit the .rdp file for display, performance and audio faults. Connection failures live on the host and in the network path, while resolution, lag and audio faults live in the .rdp file the client reads. Fixing them in that order stops you changing client settings against a host that was never listening.
Frequently Asked Questions
How do you use Remote Desktop Connection?
Turn on Enable Remote Desktop under Settings > System > Remote Desktop on the host PC and note its PC name. On the other device, open Remote Desktop Connection, type that name, select Connect, and sign in with an account allowed to connect.
Where is Remote Desktop Connection located?
Type Remote Desktop Connection in the taskbar search box and open it. It also starts from the Run box as mstsc, and mstsc /? shows the full usage dialog with every switch the client accepts.
Do I need Remote Desktop Connection?
Only if you connect to a PC from another device. If you use your PC locally, leave Remote Desktop off. Enabling it opens a port and makes the PC reachable from the local network, so turn it on only on trusted networks.
Why is Remote Desktop Connection installed on my PC?
The client ships with Windows as mstsc.exe, on Home editions too. Having the client installed does not make your PC reachable. Only turning on Enable Remote Desktop on a Pro, Enterprise, Education or Server edition does that.
Is Remote Desktop Connection good?
It gives full access to a remote PC's apps, files and network resources, with multiple monitor support, device redirection and single sign-on. Keep Network Level Authentication enabled, since it forces authentication before the session starts.
Do I need Microsoft Remote Desktop instead?
On Windows, use the built-in Remote Desktop Connection client. On macOS, iOS, iPadOS and Android, use Windows App, which replaces the Remote Desktop client. Microsoft recommends Windows App wherever it supports your platform.
Can Remote Desktop allow more than 2 connections?
Concurrent remote sessions are a Remote Desktop Services feature of Windows Server. Every user or device connecting to a session host needs an RDS CAL issued by a Remote Desktop Licensing server once the 120-day grace period ends.
Why does Remote Desktop not connect from a different network?
Remote Desktop creates a peer-to-peer connection, so the client needs direct access to the host. From outside the host network, connect through a VPN, or forward port 3389 on the router to the host's internal IP address.
What version of Remote Desktop Connection do I have?
Run mstsc /? to open the Remote Desktop Connection usage dialog. On macOS, iOS, iPadOS and Android, the version is shown inside Windows App, which Microsoft updates through the relevant app store.
Why does Remote Desktop cannot connect to the remote computer keep appearing?
That message covers three causes: remote access is not enabled, the remote computer is off, or it is not available on the network. Check fDenyTSConnections is 0, run qwinsta for an rdp-tcp listener in the Listen state, then test port 3389.