To change USB power settings in Windows 11, open Edit power plan, select Change advanced power settings, expand USB settings > USB selective suspend setting, and choose Enabled or Disabled for battery and plugged-in power.
This guide also covers the per-hub switch in Device Manager, the powercfg commands, wake settings, sleep and shutdown behavior, docks, and what to do when USB devices still drop out.
Method 1: Change USB selective suspend in Power Options
USB selective suspend lets Windows put an idle USB port to sleep without touching the other ports. Turning it off is the usual fix for a mouse, audio interface or external drive that keeps dropping out.
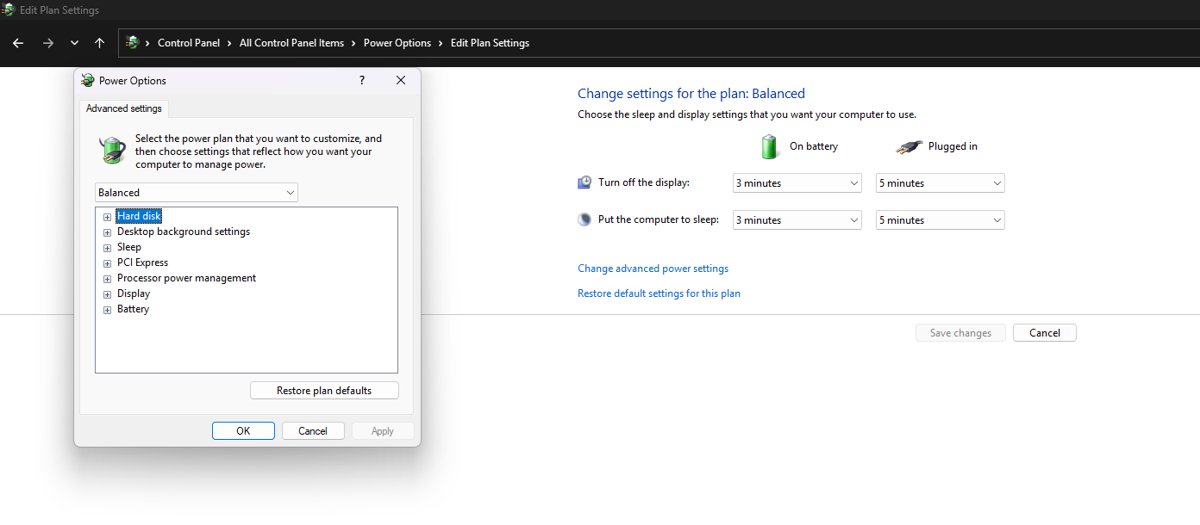
- Select Start, type edit power plan, and open Edit power plan from the results.
- On the Change settings for the plan page, select Change advanced power settings.
- In the Power Options dialog, expand USB settings, then expand USB selective suspend setting.
- Set Plugged in to Disabled to keep USB ports powered while the PC is on the charger.
- On a laptop, set On battery to Disabled only if the device also drops out away from the charger.
- Select Apply, then OK.
The change applies to the active power plan only. If you switch plans later, repeat these steps for the new plan.
Leaving On battery at Enabled is the better choice on most laptops, because a suspended port stops drawing power while you are unplugged.
What USB power settings do in Windows 11
Windows spreads USB power control across four places. Each one solves a different problem, so it helps to know which one you are changing.
| Setting | Where it lives | What it controls | Default |
|---|---|---|---|
| USB selective suspend | Power Options > Change advanced power settings > USB settings | Whether Windows can suspend an idle USB port on its own | Enabled |
| Allow the computer to turn off this device to save power | Device Manager > USB Root Hub (or another USB device) > Properties > Power Management | Whether Windows can power down that one hub or device | Varies by device |
| Allow this device to wake the computer | Device Manager > keyboard, mouse or network adapter > Power Management | Whether a key press or click wakes the PC from sleep | Varies by device |
| Stop USB devices when my screen is off to help save battery | Settings > System > Power & battery > Energy recommendations | Whether Windows blocks USB devices while the screen is off | Battery-powered PCs only |
| Power mode | Settings > System > Power & battery > Power mode | The overall balance between battery life and performance | Balanced |
Microsoft's driver documentation states that selective suspend is on by default and strongly recommends keeping it on, because a port that never suspends can stop the processor from reaching deeper low-power states. Turn it off to fix a real problem, not as a general tweak.
Before you change anything: identify the USB power problem
Match what you see to a row, then go straight to the method that fixes it.
| What happens | Most likely cause | Go to |
|---|---|---|
| A USB device disconnects after a few idle minutes | Selective suspend is powering down the port | Method 1 or Method 3 |
| One device drops out while others keep working | Windows is allowed to turn off that hub or device | Method 2 |
| USB devices stop working after the screen turns off (laptop) | Energy recommendation that stops USB devices when the screen is off | Method 4 |
| A USB keyboard or mouse will not wake the PC, or wakes it by accident | Wake setting on the device | Method 5 |
| Devices do not come back after sleep, hibernate or a restart | Sleep or fast startup behavior | Method 6 |
| Devices on a dock show Code 10, 24 or 43, or a notification says the device needs more power | Dock, cable or port limits | Method 7 |
| You changed many settings and want the defaults back | Custom plan values | Method 9 |
Method 2: Stop Windows from turning off USB hubs in Device Manager
This switch is per hub or per device, so you can protect one port without changing the whole power plan.
- Select Start, type device manager, and open Device Manager.
- Expand Universal Serial Bus controllers.
- Right-click USB Root Hub and select Properties.
- Open the Power Management tab.
- Clear Allow the computer to turn off this device to save power, then select OK.
- Repeat for every USB Root Hub entry, because you cannot always tell which one serves the port you use.
- For a Bluetooth keyboard or headset, expand Bluetooth, open the adapter's Power Management tab, and clear the same box.
What If the Power Management Tab Is Missing? Device Manager only shows the tab when the device's driver supports power management. A missing tab is not a fault. Use Method 1 or Method 3 instead, which work regardless of the driver.
Method 3: Change USB selective suspend with Command Prompt or Terminal
Use this when you manage several PCs or the Power Options dialog will not save. Select Start, type cmd, right-click Command Prompt, and select Run as administrator. Windows Terminal running as administrator works the same way.
The first GUID is the USB settings group and the second is USB selective suspend setting. SCHEME_CURRENT targets whichever plan is active.
powercfg /setacvalueindex SCHEME_CURRENT 2a737441-1930-4402-8d77-b2bebba308a3 48e6b7a6-50f5-4782-a5d4-53bb8f07e226 0Sets USB selective suspend to Disabled (index 0) while the PC runs on AC power. To change the battery value instead, run the same line with /setdcvalueindex in place of /setacvalueindex.
You should see: The command returns to the prompt with no message. Running powercfg /query SCHEME_CURRENT 2a737441-1930-4402-8d77-b2bebba308a3 then lists the setting with its current AC and DC indexes.
Use Different Settings for Plugged In and Battery: run /setacvalueindex ... 0 to disable it on the charger and leave the /setdcvalueindex value untouched, so the laptop still saves power when unplugged.
Enable USB Selective Suspend Again: run powercfg /query SCHEME_CURRENT 2a737441-1930-4402-8d77-b2bebba308a3, note the index listed for Enabled, and run the same /setacvalueindex or /setdcvalueindex line with that index instead of 0.
If the dialog does not show the new value straight away, run powercfg /setactive SCHEME_CURRENT to reapply the active plan.
Method 4: Adjust Windows 11 power mode
Power mode does not switch individual USB ports, but Best power efficiency makes Windows more aggressive about idle hardware. The energy recommendation that stops USB devices when the screen is off lives on the same page.
- Select Start > Settings > System > Power & battery.
- Under Power mode, choose Balanced or Best performance for Plugged in if USB devices misbehave on the charger.
- Set the On battery value the same way if the problem happens unplugged.
- On a laptop, open Energy recommendations on the same page.
- If Stop USB devices when my screen is off to help save battery is listed as applied, open the related setting and turn it off.
- If Power mode is greyed out, open Control Panel > System and Security > Power Options and select Balanced, then return to Settings.
Microsoft's Teams Rooms guidance ties the screen-off USB setting to unexpected USB disconnections: when an idle USB device keeps the PC out of a deeper power state, Windows can reset that device. The recommendation only appears on battery-powered PCs.
Method 5: Manage USB wake settings
Wake settings decide whether a USB keyboard or mouse can bring the PC out of sleep. Turn it on if you want a key press to wake the PC. Turn it off if a bumped mouse keeps waking it overnight.
- Open Device Manager and expand the category that lists your USB keyboard or mouse.
- Right-click the USB keyboard or mouse and select Properties.
- Open the Power Management tab.
- Select Allow this device to wake the computer to let it wake the PC, or clear it to stop it.
- Select OK, then put the PC to sleep and test with one key press or click.
- To see every device currently allowed to wake the PC, run
powercfg /devicequery wake_armedin Command Prompt. - To remove one from that list, run
powercfg /devicedisablewake "Device name"with the name exactly as the previous command printed it.
Check Which Devices Can Wake Your PC: powercfg /devicequery wake_programmable lists every device you are allowed to arm, and powercfg /lastwake reports what woke the PC last time.
On Modern Standby laptops, Microsoft's wake-source guidance notes that external USB keyboards and mice may need more than one press, and their wake may be disabled to save battery. The Device Manager wake box mainly affects classic sleep states, not Modern Standby.
Method 6: Control USB power during sleep, hibernate, or shutdown
Windows itself does not keep USB ports charging while the PC is off. That behavior is set by the PC's firmware, so the Windows side and the firmware side need separate changes.
- Check BIOS/UEFI for Always-On USB Charging: restart into your PC's firmware setup and look in the power or USB section for an option that charges USB devices while the PC is asleep or off. The name varies by manufacturer, so check the PC maker's manual.
- If You Want USB Ports to Charge While Sleeping: enable that firmware option, and plug the phone into the port the manual marks as a charging port.
- If You Want USB Power Off During Sleep or Shutdown: disable that firmware option, then leave selective suspend at Enabled.
- If devices do not come back after a shutdown, open Control Panel > System and Security > Choose what the power buttons do.
- Select Change settings that are currently unavailable.
- Clear Turn on fast startup (recommended) and select Save changes. Microsoft does not recommend this as a permanent setting, so turn it back on if it does not help.
- You can also customize the power button and lid from the same page.
Fast startup puts every device into a low-power state instead of a full shutdown, which is why some USB hardware only recovers after a Restart. Microsoft's own advice for devices that fail after sleep or hibernate is to reconnect them or restart, and to keep their drivers current.
Method 7: Fix USB-C dock, Thunderbolt, and USB4 power problems
Docks add a second power source and a second set of limits. Windows shows a notification for most of these problems; open Start, type usb, and select USB settings to make sure Connection notifications is on.
- Update Dock Firmware and System Drivers: install the dock's firmware update from its maker and the PC's chipset and Thunderbolt drivers from the PC maker, then restart.
- Use the Right Cable: use the cable that came with the dock or a certified USB4 or Thunderbolt cable. A cable without the right features limits both data and charging.
- Plug the dock into a port on the PC that supports USB4 or Thunderbolt, not into a second dock or hub.
- Check Dock Power: connect the dock's own power adapter. When Windows says a USB device might need more power, plug the PC into the charger and disconnect unused USB devices.
- If devices on a Thunderbolt dock show a yellow warning with Code 10, Code 24 or Code 43 after sleep, unplug and reattach the dock.
- If reattaching does not help, restart the PC.
If the PC maker also lists a BIOS or UEFI update, update the PC's firmware before testing the dock again.
Microsoft documents the dock failure for PCs with fast startup on, when the dock is plugged or unplugged while the PC is in Modern Standby, hibernate or shut down. Avoid docking and undocking while the PC is asleep. For charging, the PC, charger and cable all have to support the same USB Power Delivery level.
Method 8: Use power troubleshooting and reports
The legacy Power troubleshooter has been removed from newer Windows 11 releases, and only Windows 11 version 22H2 and older still run it from Settings > System > Troubleshoot > Other troubleshooters. The powercfg reports below work on every version and show what is keeping USB devices awake or asleep.
- Open Command Prompt as administrator and close other apps, because the energy report should run on an idle PC.
- Create a Power Efficiency Report: run
powercfg /energy. It watches the system for 60 seconds and saves an HTML report in the current folder; review the errors and warnings it lists. - Create a Battery and Sleep Study Report: on a Modern Standby laptop, run
powercfg /sleepstudyfor the last three days of standby sessions and what kept the PC active during them. - Run
powercfg /batteryreportfor battery capacity and usage history. - Run
powercfg /lastwaketo see which device woke the PC most recently. - Open each HTML file from File Explorer in the folder where you ran the command.
Method 9: Reset your power plan
Every change in this guide can be walked back by hand. Do this if battery life dropped after your changes or you no longer need the fix.
- Reset One Power Plan Through Control Panel: open Control Panel > System and Security > Power Options and select Balanced.
- Select Change plan settings > Change advanced power settings, expand USB settings > USB selective suspend setting, and set both On battery and Plugged in to Enabled.
- In Device Manager, reselect Allow the computer to turn off this device to save power on each USB Root Hub you changed.
- In Settings > System > Power & battery, set Power mode back to Balanced.
- If you turned off fast startup, reselect Turn on fast startup (recommended) under Choose what the power buttons do.
- Restore All Default Power Schemes: if a custom plan is still selected, switch to Balanced as above; Power mode only works with Balanced or a plan based on it.
Screen, sleep and hibernate timeouts are not specific to USB; change them with the wider Windows power management settings.
Recommended USB power settings for common situations
| Situation | USB selective suspend | Hub power management | Power mode |
|---|---|---|---|
| For a Desktop PC with audio gear, capture cards or external drives | Plugged in: Disabled | Cleared on the hubs those devices use | Balanced or Best performance |
| For a Laptop Used at a Desk on a dock | Plugged in: Disabled; On battery: Enabled | Leave selected unless one device drops | Plugged in: Balanced |
| For Maximum Battery Life | Both: Enabled | Leave selected | On battery: Best power efficiency |
| A USB keyboard or mouse that must wake the PC | No change | No change; select the wake box on the device | No change |
| A mouse that wakes the PC by accident | No change | Clear the wake box on the mouse | No change |
How to check your USB power changes worked
- Reopen Change advanced power settings and confirm USB selective suspend setting shows the values you chose for both columns.
- Run
powercfg /query SCHEME_CURRENT 2a737441-1930-4402-8d77-b2bebba308a3and check that the AC or DC index matches what you set. - Reopen a USB Root Hub's Power Management tab and confirm the box is still cleared after a restart.
- Leave the problem device idle for longer than it used to take to disconnect; it should stay listed in Device Manager with no warning icon.
- Run
powercfg /devicequery wake_armedand confirm only the devices you want are listed.
Troubleshooting USB devices that still disconnect
The device still drops out after disabling selective suspend
Another switch is still allowing Windows to power it down, or the plan you edited is not the active one.
- Confirm the active plan in Control Panel > Power Options is the one you edited.
- Clear Allow the computer to turn off this device to save power on every USB Root Hub and on the device itself (Method 2).
- On a laptop, check Energy recommendations for the screen-off USB setting (Method 4).
- Connect the device directly to the PC instead of through a hub.
A yellow warning icon or "USB device not recognized"
The device or its driver reported a problem, which power settings do not fix.
- In Device Manager, right-click the device with the yellow exclamation mark and select Properties.
- Read the error code under Device status.
- Follow Microsoft's fix for that code, then reconnect the device.
"USB device might need more power"
The port cannot supply what the device needs, often because the PC is on a low battery or powering other devices.
- Plug the PC into its charger.
- Give the device its own power supply, or use a powered hub.
- Disconnect USB devices you are not using.
Devices stop working after sleep or hibernate
The device did not resume cleanly from a low-power state.
- Unplug and reconnect the device, or reattach the dock.
- Restart the PC rather than shutting it down, so fast startup is bypassed.
- Update the device, chipset and dock drivers from the manufacturer.
Important notes about Modern Standby and USB power
Most new Windows 11 laptops use Modern Standby instead of classic S3 sleep. Run powercfg /availablesleepstates to see which one your PC uses.
| What changes on Modern Standby | What it means for USB power |
|---|---|
| The PC stays in a low-power running state while asleep | USB devices and background tasks can still draw power during sleep |
| Microsoft advises against changing Device Manager power settings on these PCs | Clearing the hub power box can cause significant battery drain |
| The Device Manager wake box mainly affects classic sleep states | Changing it may not change whether a USB keyboard wakes the PC |
| USB keyboard and mouse wake may be disabled to save battery | Press a key more than once, or use the power button |
| The sleep model cannot be switched in BIOS | Changing from Modern Standby to S3 requires a clean reinstall of Windows |
| Hibernate may be missing on InstantGo PCs | Use sleep or shut down instead |
On these laptops, prefer disabling selective suspend for Plugged in only, and use powercfg /sleepstudy to confirm battery drain in standby did not rise after your change.
USB power settings in Windows 11: frequently asked questions
How do I change USB power settings in Windows 11?
Open Edit power plan, select Change advanced power settings, and expand USB settings > USB selective suspend setting. Choose Enabled or Disabled for On battery and Plugged in, then select Apply. For one hub or device, use the Power Management tab in Device Manager.
How do I change USB power settings in Windows 10?
The steps match Windows 11. Open Power Options, select Change plan settings > Change advanced power settings, and expand USB settings > USB selective suspend setting. The Device Manager Power Management tab and the powercfg commands also work the same on Windows 10.
How do I access USB power settings?
USB power settings are in two places. The plan-wide setting is under Power Options > Change advanced power settings > USB settings. The per-device setting is on the Power Management tab of each USB Root Hub in Device Manager, under Universal Serial Bus controllers.
How do I adjust power to USB ports?
You can stop Windows from cutting power to idle ports, but you cannot raise the power a port supplies. Disable USB selective suspend or clear the hub's power-saving box. For a device that needs more power, use its own power adapter or a powered hub.
How do I change USB power output?
Windows has no setting that increases a port's power output; the port's hardware sets that limit. Faster charging needs a PC, charger and cable that all support the same USB Power Delivery level. Some laptops add a firmware option to charge phones while the PC is off.
How do I change USB settings on a PC?
Select Start, type usb, and open USB settings to turn Connection notifications on or off. Power behavior is changed in Power Options and in Device Manager, as shown in Methods 1 and 2.
Should I disable USB selective suspend?
Only if a USB device keeps disconnecting. Microsoft recommends keeping selective suspend on because idle ports that never suspend increase power use. On a laptop, disable it for Plugged in and leave On battery enabled.
USB power settings in Windows 11: bottom line
Disable USB selective suspend for Plugged in only, and clear the hub power box only on the hub a problem device uses. That stops the dropouts on the charger while the laptop still saves power on battery, which is the trade-off Microsoft's own guidance favors.