To use a laptop screen as an external monitor, install the Wireless Display feature on the laptop, open Projecting to this PC, then press Windows logo key + K on the main PC and pick the laptop.
This tutorial covers the Windows wireless route, the Mac options (AirPlay Receiver and Sidecar), Remote Desktop, third-party display apps, the display settings to tune afterwards, and fixes for connection, resolution and lag problems.
The fastest way to use a laptop screen as a monitor in Windows
Both computers need Wi-Fi turned on. The laptop is the receiver, running the Wireless Display app in Windows 11, and the other PC sends its picture to it.
- On the laptop, select Start > Settings > System > Projecting to this PC.
- Select Optional features, install Wireless Display, and then select Back to set your projection preferences.
- Type wireless display in the taskbar search box on the laptop and open Wireless Display.
- On the main PC, press Windows logo key + K and select the laptop from the list.
- Press Windows logo key + P on the main PC and choose Extend to use the laptop as a second screen.
Choose Duplicate instead if you want the laptop to show the same picture as the main screen.
Understanding the basics of using a laptop as an external monitor
An external monitor is any extra screen that shows part or all of a computer's desktop. A laptop can fill that role, but only through software, because its display ports are built to connect it to a monitor, not to receive a picture.
Microsoft's own cable instructions for laptops all run one way: the laptop's USB-C, HDMI or DisplayPort socket sends its picture out to a TV, monitor or projector. To make a laptop the receiving screen, use one of the wireless or network routes below.
| Requirement | What it means | Applies to |
|---|---|---|
| Miracast support on the sending PC | Press Windows logo key + K; if the PC cannot cast, Windows says you need to connect an external display with a cable | Projecting to this PC |
| Wireless Display optional feature | Installed on the receiving laptop from Settings > System > Projecting to this PC | Projecting to this PC |
| Windows 11, version 22H2 or later | Uses the Wireless Display app; earlier versions and Windows 10 use the Connect app | Receiving laptop |
| Wi-Fi turned on | Both computers need Wi-Fi on, and the receiving app must be open | Projecting to this PC |
| Windows Pro on the remote PC | Windows Home cannot host Remote Desktop connections | Remote Desktop |
| Same Apple Account with two-factor authentication | Both Apple devices within 10 meters (30 feet), with Wi-Fi, Bluetooth and Handoff on | Sidecar |
Methods for using a laptop screen as an external monitor
| Your setup | Use this method | Why |
|---|---|---|
| Windows PC sending to a Windows laptop | Method 1: Projecting to this PC | Built into Windows; the laptop becomes an extra display you can extend or duplicate to |
| Mac sending to a MacBook | Method 2: AirPlay Receiver | A Mac set as an AirPlay receiver can act as a display for another Mac |
| Mac sending to an iPad | Method 2: Sidecar | Apple's extend-or-mirror feature for iPad, wired or wireless |
| Mixed Windows and Mac, or a PC without Miracast | Method 3: Third-party display software | Works over the network instead of Miracast |
| You only need to see and control another PC's desktop | Method 4: Remote Desktop | Shows the remote PC in a window on the laptop; the remote PC must run Windows Pro |
Method 1: Using Windows built-in Projecting to this PC feature
Do the first five steps on the laptop that will act as the monitor, then switch to the main PC.
- On the laptop, select Start > Settings > System > Projecting to this PC.
- Under Add the "Wireless Display" optional feature to project to this PC, select Optional features.
- Next to Add an optional feature, select View features and type wireless display.
- Select the check box next to Wireless Display, select Next, and then select Install.
- Select Back, set your preferences on the Projecting to this PC page, then open the Wireless Display app from taskbar search.
- On the main PC, press Windows logo key + K, or search for Cast and select Connect to a wireless display.
- Select the laptop's name in the list and follow any prompt that appears on the laptop.
- Press Windows logo key + P on the main PC and choose Extend.
On Windows 10, select Add a feature instead of View features, and launch the Connect app in place of Wireless Display. Windows 10 support ended on October 14, 2025, so Microsoft recommends moving to Windows 11.
Method 2: Using macOS Sidecar and AirPlay Receiver
Sidecar turns an iPad, not a MacBook, into a second display. To use a MacBook screen as a display for another Mac, turn on AirPlay Receiver on the MacBook first.
Sidecar needs macOS Catalina 10.15 or later on the Mac and iPadOS 13 or later on the iPad, both signed in to the same Apple Account.
- On the MacBook that will act as the display, open System Settings and click General.
- Click AirDrop & Continuity and turn on AirPlay Receiver.
- Click the Allow AirPlay for pop-up menu and choose Current User to limit it to devices on your Apple Account.
- On the sending Mac, click Control Center in the menu bar, click Screen Mirroring, and choose the MacBook.
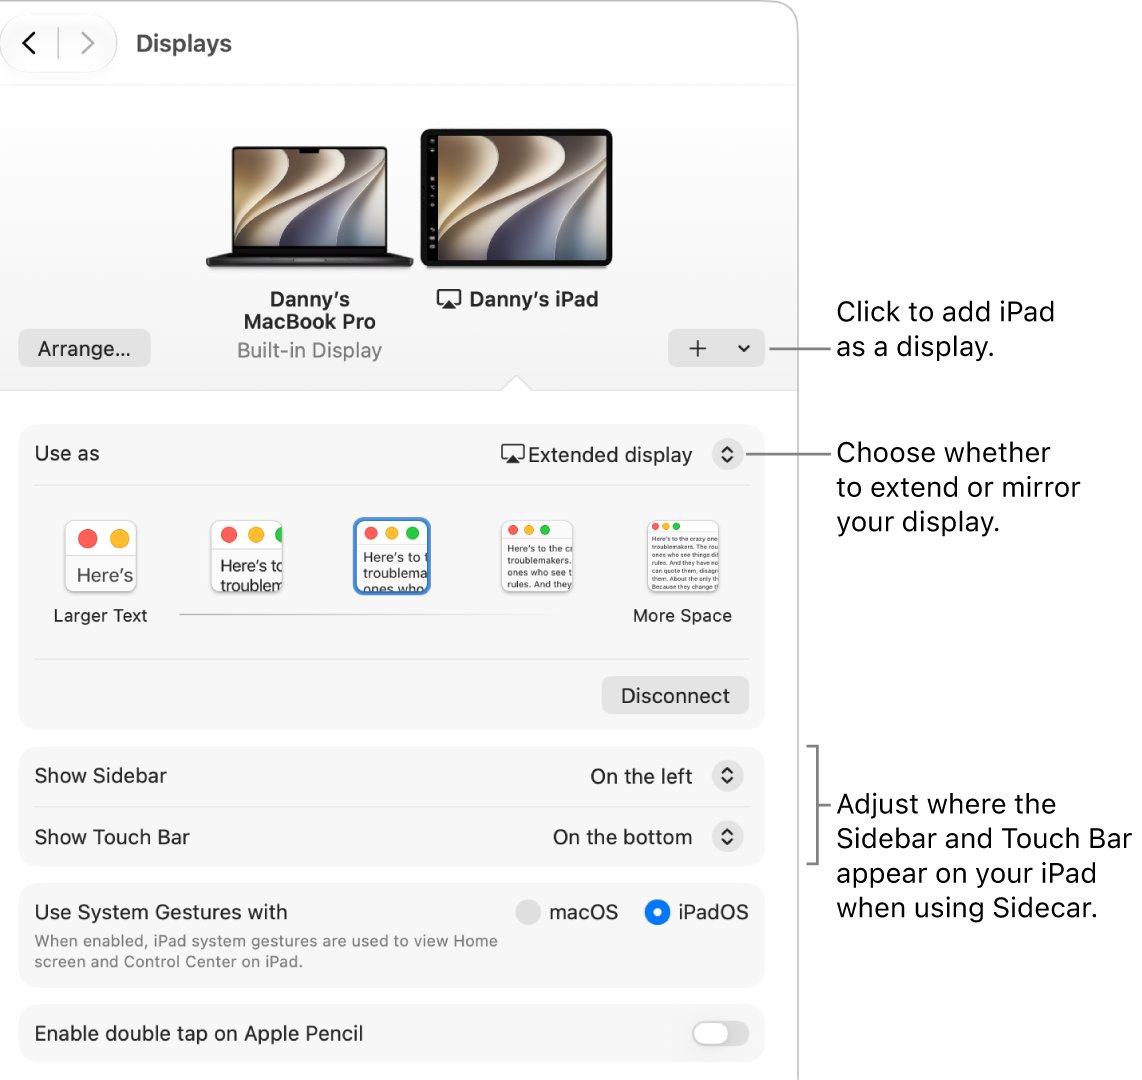
- For an iPad instead, open System Settings > Displays on the Mac, click the Add Display menu, and choose the iPad.
- Choose your iPad in Displays and use the Use as pop-up menu to switch between extend and mirror.
Connecting an iPad by USB keeps it charged during a Sidecar session.
Method 3: Using third-party software
Third-party extended-display apps send the desktop over your network or a USB cable, so they work where Miracast does not. Each one has its own pairing steps, but the setup follows the same pattern.
- Download the app only from the developer's own website or the Microsoft Store, never from a download portal.
- Install the sending part of the app on the main PC and the viewer part on the laptop.
- Connect both computers to the same network, or link them with the cable the app supports.
- Start the viewer on the laptop and pair it from the main PC, following the app's prompts.
- On the main PC, open Settings > System > Display and arrange the new screen to match where the laptop sits.
Method 4: Using Remote Desktop applications
Remote Desktop does not extend the main PC's desktop. It shows the other PC's whole desktop on the laptop, which is enough when you only need to watch or control that machine from a second screen.
- On the PC you want to view, select Start > Settings > System > Remote Desktop.
- Turn on Remote Desktop and select Confirm.
- Note the name shown under PC name.
- On the laptop, type Remote Desktop Connection in the taskbar search box and open it.
- Enter the PC name, select Connect, and sign in with the account on that PC.
On a MacBook, use Windows App and add the PC name there. The PC being viewed must run Windows Pro, and you can fix Remote Desktop connection errors if it refuses to connect.
Optimizing your setup with a laptop as a second screen
Once the laptop shows the desktop, three areas make it comfortable: display settings, keyboard shortcuts and how you organise apps across the two screens.
| Area | Setting or shortcut | What it does |
|---|---|---|
| Manage display settings | Settings > System > Display, then drag the screens and select Apply | Matches the on-screen layout to where the laptop physically sits |
| Manage display settings | Display resolution > the (Recommended) option | Gives the sharpest picture for the selected screen |
| Manage display settings | Scale & layout > Scale | Makes text and apps larger or smaller on the selected screen |
| Keyboard shortcuts | Windows logo key + P | Switches between PC screen only, Duplicate, Extend and Second screen only |
| Keyboard shortcuts | Windows logo key + Shift + Left arrow or Right arrow | Moves the active window to the monitor on the left or right |
| Application organization | Windows logo key + Z | Opens snap layouts to split one screen between several apps |
| Application organization | Multiple displays > Remember window locations based on monitor connection | Puts windows back where they were when the laptop reconnects |
Check the laptop is working as an extended monitor
- On the main PC, open Settings > System > Display.
- Select Identify and check that a number appears on the laptop screen as well as the main screen.
- Move the mouse pointer off the edge of the main screen toward the laptop; it should appear on the laptop.
- Drag an open window across, or press Windows logo key + Shift + Right arrow, and confirm it lands on the laptop.
- If the pointer stops at the edge, drag the display boxes into the correct order and select Apply.
Disconnect the laptop and go back to one screen
- On the main PC, press Windows logo key + P and choose PC screen only.
- Close the Wireless Display app on the laptop to stop it receiving.
- On a Mac, click Control Center > Screen Mirroring and deselect the device under Mirror or Extend to.
- For Remote Desktop, close the Remote Desktop Connection window on the laptop.
Troubleshooting common issues with a laptop second monitor
Connectivity issues: the laptop does not appear in the Cast list
The laptop is not discoverable, the receiving app is closed, or Wi-Fi is off on one side.
- Turn on Wi-Fi on both computers from the Network icon on the taskbar.
- On the laptop, open Settings > System > Projecting to this PC and make the PC discoverable.
- Open the Wireless Display app on the laptop and leave it running.
- Press Windows logo key + K on the main PC again and pick the laptop.
Windows says you need to connect an external display with a cable
The sending PC does not support Miracast, so it cannot cast to the laptop.
- Update the sending PC's drivers through Settings > Windows Update > Check for updates.
- Get the latest Wi-Fi and graphics drivers from the PC maker's website.
- If Windows still reports no Miracast support, use Method 3 or Method 4 instead.
The connection drops or keeps failing
A stale pairing record or a stuck connection on either computer.
- Restart both the main PC and the laptop.
- On the main PC, open Settings > Bluetooth & devices > Devices.
- Under Wireless displays & docks, select the laptop and choose Remove device.
- Press Windows logo key + K and connect to the laptop again.
Resolution problems: the laptop screen looks blurry or the wrong size
The laptop screen is using a resolution or scale that does not match its panel.
- On the main PC, open Settings > System > Display and select the laptop's display box.
- Open the Display resolution list and choose the (Recommended) option.
- Under Scale & layout, set Scale to the (Recommended) value.
- If the resolution keeps changing on its own, update the graphics driver from Settings > Windows Update > Check for updates.
Lag and performance: the mouse or video stutters on the laptop
Wireless display streams over Wi-Fi, so distance and radio interference slow it down.
- Move the laptop closer to the main PC and away from other wireless devices.
- Update the Wi-Fi and graphics drivers on both computers from the PC maker's website.
- For Sidecar, connect the iPad with a USB cable instead of wirelessly.
- Restart both computers and connect again.
Laptop screen as a monitor FAQ
Can I use my laptop screen as a monitor?
Yes, through software rather than a cable. On Windows, install the Wireless Display feature on the laptop and cast to it with Windows logo key + K. On a Mac, turn on AirPlay Receiver. Remote Desktop and third-party display apps also work.
Can I use a laptop screen as a monitor for a PC?
Yes, if the PC supports Miracast. Install Wireless Display on the laptop, open the Wireless Display app, then press Windows logo key + K on the PC and select the laptop. Press Windows logo key + P and choose Extend to use it as a second screen.
Can I use another laptop as a 2nd screen?
Yes. Treat the second laptop as the receiver: install Wireless Display on it, open Projecting to this PC, and cast to it from the first laptop with Windows logo key + K. Both laptops need Wi-Fi turned on, and the receiving app must stay open.
Can I use my laptop's HDMI port to connect a PC to its screen?
Do not count on it. A laptop's HDMI, USB-C and DisplayPort sockets are designed to send the laptop's picture out to a TV, monitor or projector. To show another computer on the laptop, use Projecting to this PC, AirPlay Receiver or Remote Desktop.
How do I use a monitor and laptop screen at the same time?
Connect the monitor with a cable, then press Windows logo key + P and choose Extend. Open Settings > System > Display, drag the screens to match their real positions, and select Apply. Choose Duplicate if you want both screens to show the same thing. If Windows ignores the cable, fix a second monitor that is not detected.
How do I use a TV as a second screen for a laptop?
Connect the laptop to the TV with an HDMI cable, or press Windows logo key + K to cast to a Miracast-capable TV. A Miracast adapter plugged into the TV's HDMI port works when the TV lacks Miracast. Then press Windows logo key + P and choose Extend.
How do I use two screens on a laptop?
Connect the second screen by cable or cast to it with Windows logo key + K. Press Windows logo key + P and choose Extend. Move a window between screens with Windows logo key + Shift + Left arrow or Right arrow.
How do I use split screen on a laptop?
Press Windows logo key + Left arrow or Right arrow to snap the active window to one half of the screen, then pick a second window for the other half. Windows logo key + Z opens snap layouts with more arrangements on Windows 11.
My laptop screen is broken. How do I use an external monitor?
Plug the monitor into the laptop's video port, then press Windows logo key + P. Each press cycles through PC screen only, Duplicate, Extend and Second screen only, so press it repeatedly until the picture appears on the monitor.
Why does Windows say my PC does not support Miracast?
The sending PC's Wi-Fi or graphics hardware or drivers cannot cast wirelessly. Update drivers from the PC maker and Windows Update. If Windows still reports no support, use a third-party display app or Remote Desktop to show the PC on the laptop.
Conclusion: the best way to use a laptop as an external monitor
Use Projecting to this PC when both machines run Windows, and AirPlay Receiver when both are Macs. Both are built into the operating system, need no extra software, and let you extend the desktop rather than only view another PC. Keep Remote Desktop for controlling a second computer and third-party apps for mixed or Miracast-less setups.

![Dual boot Linux Mint and Windows 10 or 11 [beginner’s guide]](https://techdows.com/wp-content/uploads/2026/10/Linux-Mint-live-session-desktop-with-the-application-menu-open.jpg)
![Microsoft refund : Store & Xbox A-Z refund guide [2026]](https://techdows.com/wp-content/uploads/2026/10/Xbox-Support-Request-a-refund-for-digital-games-page-with-Sign-In-button-600x338.jpg)