To make a Word document fillable, turn on the Developer tab, insert content controls such as text boxes, check boxes, date pickers and drop-down lists where people should answer, then lock the rest with Developer > Restrict Editing.
This guide covers each field type, setting field properties, protecting and testing the form, sharing it, and the Mac and web differences.
Step by Step Tutorial: Making a Word Document Fillable
These steps are for Word on Windows, including Word for Microsoft 365. Fillable forms cannot be created in Word for the web.
- Select File > Options > Customize Ribbon, tick Developer under the list of tabs and select OK.
- Type the form's questions and labels in the document.
- Click where the first answer should go, then select a control in the Developer tab's Controls group, such as Plain Text Content Control.
- Repeat for every answer, using Check Box, Date Picker or Drop-Down List controls where they fit.
- Select a control and then Properties to set its options, such as the list choices.
- Select Developer > Restrict Editing, choose your restrictions and select Yes, Start Enforcing Protection.
- Save the file and send it.
Understanding Fillable Forms in Microsoft Word
A fillable Word form is an ordinary document with content controls placed where answers go. Controls can show instructions to the user that disappear once they type.
| Control | What the user does | Use it for |
|---|---|---|
| Plain Text Content Control | Types unformatted text | Names, addresses, short answers |
| Rich Text Content Control | Types formatted text and several paragraphs | Longer comments or descriptions |
| Check Box Content Control | Ticks or clears a box | Yes/no questions and consent boxes |
| Date Picker Content Control | Picks a date from a calendar | Dates of birth, start dates |
| Drop-Down List Content Control | Chooses one item from your list only | Fixed answers such as departments |
| Combo Box Content Control | Chooses from your list or types a new answer | Lists that need an Other option |
| Picture Content Control | Inserts an image | Photos or signatures as images |
| Building Block Gallery Content Control | Chooses a block of boilerplate text | Templates with alternative clauses |
| Legacy Forms | Older form fields and ActiveX controls | Compatibility with older versions of Word |
Preparing Your Document
- Show the Developer tab: right-click any ribbon tab, select Customize the Ribbon, tick Developer under Main Tabs and select OK.
- To start from a form template, select File > New, type Forms in Search for online templates, press Enter, right-click a result and select Create.
- To start from scratch, select File > New > Blank document.
- Type every question and label first, and use a table to line up labels and answer cells.
- Decide which answers are free text, which are fixed choices and which are dates before you add any control.
Creating Fillable Fields in Word
Hover over any icon in the Controls group to see which control it inserts.
- Text field: click where the answer goes and select Developer > Plain Text Content Control, or Rich Text Content Control to allow bold, italic and several paragraphs.
- Check box: click where the box goes and select Developer > Check Box Content Control.
- Date picker: click where the date goes and select Developer > Date Picker Content Control.
- Drop-down list: select Developer > Drop-Down List Content Control, or Combo Box Content Control if users may type their own answer.
- Picture: select Developer > Picture Content Control.
- Older field types: select Developer > Legacy Forms and choose a legacy form control or ActiveX control.
- To remove a control you placed by mistake, right-click it and select Remove content control.
Customizing Fillable Fields
- Select the content control you want to change, then select Developer > Properties.
- For a drop-down list or combo box, select Add under Drop-Down List Properties, type a choice in Display Name such as Yes, and select OK.
- Repeat Add until every choice is in the list.
- For a date picker, choose the date display format in its properties.
- Leave Contents cannot be edited cleared on drop-down lists; when it is ticked, users cannot pick a choice.
- Select OK to save the properties, then repeat for the next control.
Protecting Your Form
Protection stops people changing your questions while leaving the answer fields open. The method below locks the document as read-only and makes the field areas editable for everyone.
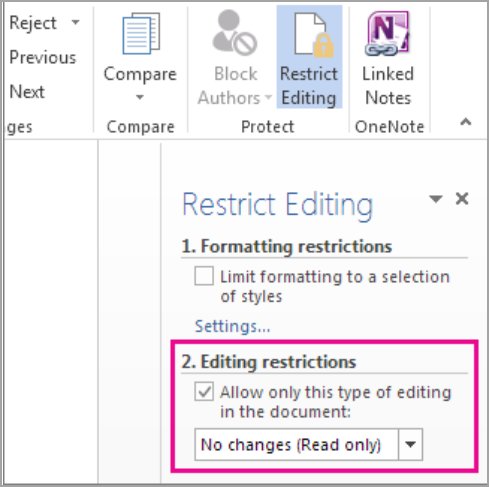
- Select Developer > Restrict Editing (also on Review > Restrict Editing).
- Under Editing restrictions, tick Allow only this type of editing in the document and select No changes (Read only).
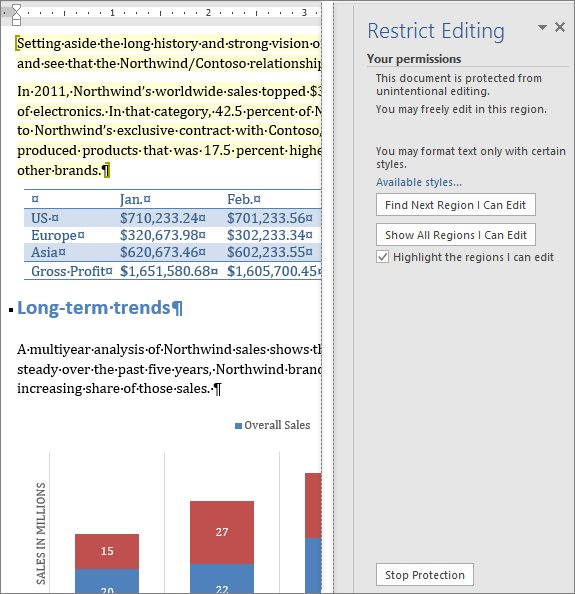
- Select the first answer area; hold Ctrl and select the other answer areas.
- Under Exceptions, tick Everyone so anyone can fill in those parts.
- Under Start enforcement, select Yes, Start Enforcing Protection.
- Type a password in Enter new password (optional), confirm it and select OK; Microsoft cannot recover a forgotten password.
To protect only part of a long document, split it into sections and protect only the sections you choose.
Testing Your Fillable Form
- Save the protected form, close it and open it again.
- Click each text field and type a test answer.
- Open each drop-down list and pick every choice to check the wording.
- Tick and clear each check box, and pick a date in each date picker.
- Try to change a question label; Word should block the edit.
- Print a test copy; the boxes around content controls do not print, so check the layout still reads clearly.
Saving and Distributing Your Fillable Form
- To share one copy, save the form as a normal Word document (.docx) and send it by email or a shared OneDrive link.
- To reuse the form, save it as a Word template (.dotx) so each use starts from a clean copy; choose .dotm only if the form uses macros.
- Keep templates in the Custom Office Templates folder inside your Documents folder so they appear when you start a new document.
- Tell recipients to open the form in desktop Word; Word for the web shows the form but cannot create one.
- Ask people to save the filled form under a new name, then send it back.
How to make a fillable form in Word for Mac
- Show the Developer tab if it is not already on the ribbon.
- Select File > New Document, or File > New from Template to start from a template, and save the file.
- Click where an answer goes and select Developer > Text Box, Check Box or Combo Box.
- Select Options to set the field's properties.
- Select Developer > Protect Form to lock it; select Protect Form again to unlock and keep editing.
What happens after making a Word document fillable?
| Who | What they see |
|---|---|
| Person filling the form | Clickable fields with your instruction text, which disappears when they type |
| Person filling a protected form | Only the answer areas accept typing; labels and questions cannot change |
| Anyone printing the form | Answers print, but the boxes around content controls do not |
| You, the form owner | Open Restrict Editing and stop protection, with the password if set, to edit questions |
| Someone opening it in Word for the web | Changes made in desktop Word appear, but new forms cannot be built there |
Additional Tips and Best Practices
These tips for making a Word document fillable prevent the most common form complaints.
| Tip | Why |
|---|---|
| Use a drop-down list instead of a text field for fixed answers | Answers come back consistent and easy to sort |
| Use plain text controls unless formatting is needed | Stops people pasting oversized or styled text |
| Put labels and controls in a table | Keeps fields aligned when someone types a long answer |
| Protect the form before sending | Recipients cannot edit your questions by mistake |
| Store the password safely | Microsoft cannot retrieve a forgotten protection password |
| Save a .dotx template copy | You always have an unfilled original |
Fix fillable form problems in Word
Why can't I make changes to my Word document?
The document is protected, set to open read-only, or open in Protected View.
- Select Enable Editing if a Protected View bar appears.
- Select File > Info > Protect document and clear Always Open Read-Only if it is set.
- If it is your form, open Developer > Restrict Editing and stop protection with the password.
- If the owner or your organization set the restriction, ask them to change it.
Users can't pick a choice in a drop-down list
Contents cannot be edited is ticked in the control's properties.
- Stop protection on the form.
- Select the drop-down list and select Developer > Properties.
- Clear Contents cannot be edited, select OK and protect the form again.
The Developer tab is missing
Word hides the Developer tab by default.
- Select File > Options > Customize Ribbon.
- Tick Developer in the list of tabs and select OK.
Can't create a fillable form in Word online
Creating fillable forms is not available in Word for the web.
- Open the document in the Word desktop app.
- Add the controls and protection there, then save; the changes show when you reopen it in Word for the web.
Additional Resources
- Create a form in Word that users can complete or print — Microsoft's reference for every content control on Windows and Mac
- About content controls — How controls work and how to show the Developer tab
- Allow changes to parts of a protected Word document — Restrict Editing with exceptions and passwords
- Save a Word document as a template — Template file types, including .dotx and .dotm
Frequently Asked Questions
How do I make a Word document fillable?
Show the Developer tab under File > Options > Customize Ribbon, then insert content controls such as text, check box, date picker and drop-down list where answers go. Lock the rest of the document with Developer > Restrict Editing before sending it.
How do I make a Word document editable?
Select Enable Editing on the Protected View bar. If it still will not change, go to File > Info > Protect document and clear Always Open Read-Only, or switch the mode menu at the top right from Viewing to Editing.
How do I make a Word document read only?
Select File > Info and choose to always open the document read-only or view-only. Readers can still copy it and save a new copy under another name, so use Restrict Editing for stronger control.
Why can't I make edits to a Word document?
The file may be open in Protected View, set to always open read-only, or protected with Restrict Editing by its owner or organization. Enable editing, clear the read-only option, or ask the owner to remove the restriction.
Can I make a Word document fillable online?
No. Creating fillable forms is not available in Word for the web. Build the form in the Word desktop app on Windows or Mac and save it; the form then opens in Word for the web.
How do I create a Word document to use as a form?
Select File > New and either pick Blank document or search the online templates for Forms and select Create on a result. Then add content controls from the Developer tab.
Do the boxes around fillable fields print?
No. You can print a form built with content controls, but the boxes around the controls do not print. Only the text and the answers people entered appear on paper.
Conclusion
Build the form in desktop Word with content controls, protect it with Restrict Editing, test it once, and keep a .dotx template copy for reuse. Content controls give each answer the right field type, protection keeps your questions intact, and a template means every new form starts clean.