To add the Mimecast tab in Outlook, install the Mimecast Essentials for Outlook add-in from More apps > Add apps (new Outlook and Outlook on the web) or All Apps > Get Add-ins (classic Outlook), then pin it so it stays on the ribbon.
This guide covers each Outlook version, the admin route for a whole organisation, turning the add-in back on in classic Outlook, and fixes for a missing tab.
Step-by-Step Guide to Add Mimecast Tab in Outlook
Mimecast publishes its Outlook add-in in Microsoft Marketplace as Mimecast Essentials for Outlook. These steps work in the new Outlook for Windows and in Outlook on the web, which share the same layout.
- Verify prerequisites first: you need a work account in an organisation that already uses Mimecast email security.
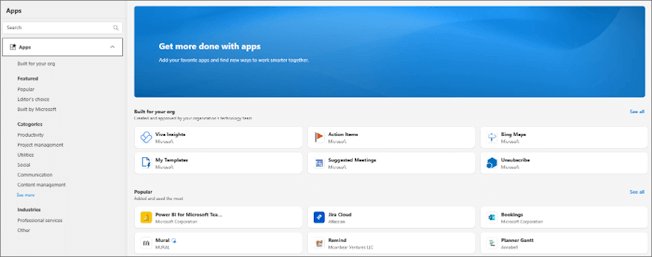
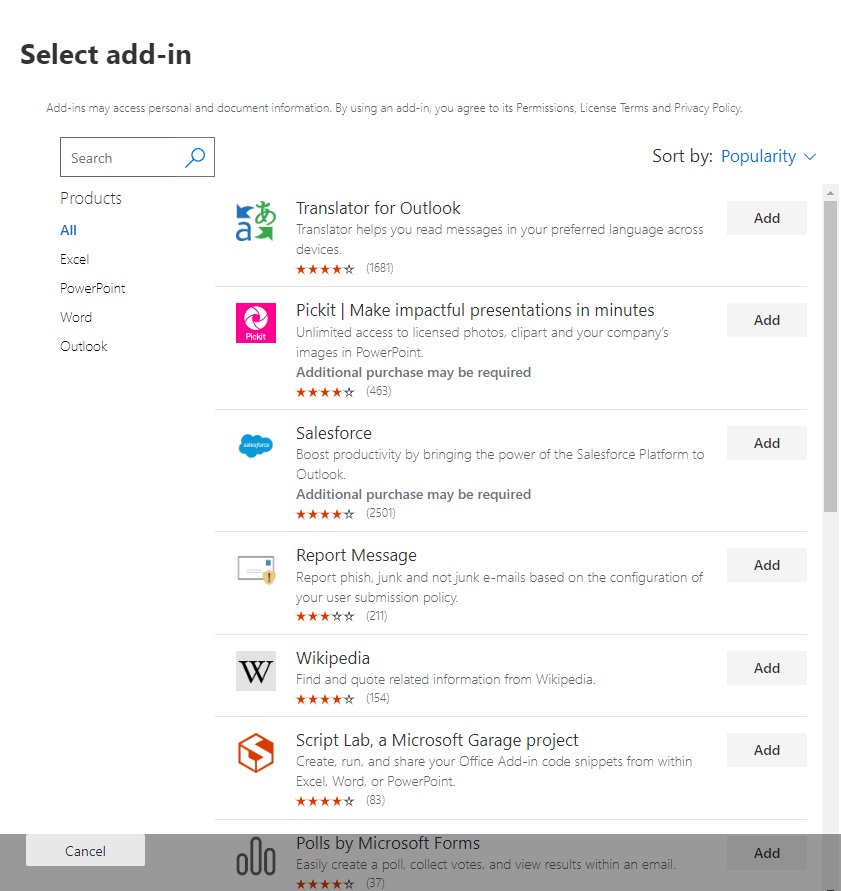
- Open Outlook and select More apps on the ribbon or the app bar, then select Add apps.
- Type Mimecast in the search box and select Mimecast Essentials for Outlook to install the Mimecast Outlook add-in.
- Review the details and privacy policy, then select Add.
- Open More apps again, right-click the Mimecast entry and select Pin to add the Mimecast tab to the ribbon and the message action bar.
- Open any email and select the pinned Mimecast button to access the Mimecast tab and its panel.
If Add apps is missing or Mimecast is not listed, your organisation controls add-ins centrally. Ask IT to deploy it, which is covered in the admin section below.
Which route applies to your Outlook?
The Mimecast tab sits in a different place in each Outlook client. Match your setup to a row before you start clicking.
| Your situation | Use this route | Why |
|---|---|---|
| New Outlook for Windows | More apps > Add apps, then Pin | Add-ins live under More apps until you pin them |
| Outlook on the web (OWA) | More apps > Add apps, then Pin | Same store and pin option as the new Outlook |
| Classic Outlook for Windows | Home > All Apps > Get Add-ins | The store opens from the Home tab or the ellipsis on the Simplified Ribbon |
| Outlook for Mac | See more items (…) > Get Add-ins | The Mac ribbon hides the store behind the overflow button |
| Add apps is greyed out or missing | Ask IT to deploy it from the Microsoft 365 admin center | Centrally deployed add-ins appear without any user action |
| The tab vanished after a crash in classic Outlook | File > Manage Add-ins or the COM add-ins list | Outlook can turn an add-in off; it has to be switched back on |
Understanding Mimecast and Its Benefits in Outlook
Mimecast is an email security service that filters mail before it reaches your mailbox. The Outlook add-in gives you a panel inside Outlook for the parts of that service that users control.
| What the add-in gives you | Benefit in Outlook |
|---|---|
| Report suspicious messages | Flag a phishing or spam email to your security team without forwarding it |
| Manage blocked senders | Stop a sender from reaching you through the Mimecast filter |
| Manage permitted senders | Let a sender through that Mimecast would otherwise hold |
| Held message queues | Review mail Mimecast is holding back and release what you need |
| Publisher | Mimecast Services Ltd., listed in Microsoft Marketplace under Outlook |
| Licensing | Marked as "additional purchase may be required", so it works only for organisations with a Mimecast subscription |
Prerequisites for Adding Mimecast Tab in Outlook
Check these prerequisites before installing. Most failures to add the tab trace back to one of these rows rather than to Outlook itself.
| Requirement | What you need | How to check |
|---|---|---|
| Compatible Microsoft Outlook version | New Outlook, Outlook on the web, classic Outlook from Microsoft 365, or Outlook 2016/2019 at the build Microsoft lists for add-ins | In classic Outlook, open File and its account page to see the build number |
| Operating system requirements | Windows for the new and classic Outlook, macOS for Outlook for Mac, or any current browser for Outlook on the web | Use the Outlook client your organisation supports |
| Administrative permissions | None to install for yourself; an Exchange admin is needed to deploy it to other users | If Add apps is greyed out, your admin has blocked self-installs |
| Outlook add-in support | A Microsoft 365 or Exchange Online work mailbox; add-ins cannot be installed by users in shared mailboxes | The More apps or All Apps button shows on your ribbon |
| Mimecast account and licensing | Your organisation must hold a Mimecast subscription that covers your mailbox | Ask IT whether your address is protected by Mimecast |
| Network and security settings | Outlook must reach Microsoft Marketplace and Mimecast's servers; a proxy or firewall that blocks them stops the panel from loading | The add-in opens a blank or error panel when the connection is blocked |
Install the Mimecast Outlook add-in in classic Outlook
Classic Outlook for Windows opens the same store from the Home tab. The steps below match the current Microsoft 365 build.
- Open classic Outlook and select the Home tab.
- Select All Apps. On the Simplified Ribbon, select the … button first.
- Select Add Apps or Get Add-ins, whichever your build shows.
- Search for Mimecast and select Mimecast Essentials for Outlook.
- Select Add and close the store window.
- Restart Outlook so the Mimecast button loads on the Home tab.
Enable Mimecast Add-In in Outlook
An installed add-in can be turned off, either by you or by Outlook. Turn it back on from the add-in manager in classic Outlook for Windows.
- In classic Outlook, select File > Manage Add-ins.
- Find Mimecast in the list.
- In the Turned on column, select the check box next to it.
- If your organisation uses a desktop (COM) version of the Mimecast add-in, select File > Options > Add-ins instead.
- Check whether Mimecast sits under Disabled Application Add-ins. If it does, set Manage to COM Add-ins and select Go.
- Select the check box next to the Mimecast add-in and select OK.
- Restart Outlook to enable the add-in.
Add Mimecast Tab to the Ribbon
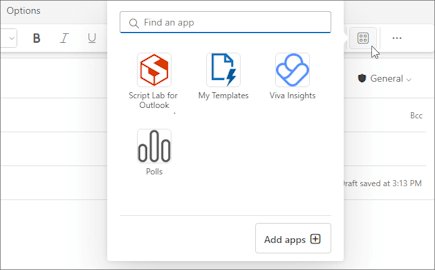
In the new Outlook and on the web, an installed add-in stays hidden under More apps until you pin it. In classic Outlook, a tab or group can be hidden through ribbon customisation.
- In the new Outlook or Outlook on the web, select More apps on the ribbon.
- Right-click the Mimecast entry and select Pin.
- In classic Outlook, right-click an empty part of the ribbon and select Customize the Ribbon.
- Under the main tabs list, select the check box next to any tab that is hidden, such as the Home tab, where the Mimecast button sits.
- Select OK to save the ribbon layout.
- If the layout is badly changed, select Reset > Reset all customizations in the same window.
Deploy the Mimecast add-in to every user from the admin center
Admins can push the add-in so the Mimecast tab appears for users without any install. You need the Exchange admin role, and users need Exchange Online mailboxes.
- Sign in to the Microsoft 365 admin center.
- Select … Show all, then Settings > Integrated apps.
- Select the Add-ins link near the top of the page, then Deploy Add-in.
- Select Next, choose the Office Store option and select Mimecast Essentials for Outlook, then accept the terms.
- Choose Everyone, Specific users/groups or Just me. Test with Just me first.
- Select Deploy and wait for the green checkmark.
- Tell users to restart Outlook. Microsoft says a deployed add-in can take up to 24 hours to reach every client, and ribbon icons can take 24-72 hours.
Assign the add-in to a top-level group rather than to individuals. Users in nested groups do not receive centrally deployed add-ins.
Accessing Mimecast in Outlook
Once installed, the Mimecast tab or button appears in different places depending on what you are doing in Outlook.
- To access the Mimecast tab while reading mail in the new Outlook or on the web, select Apps on the message action bar or More apps on the ribbon, then Mimecast.
- While writing an email, select the Message tab, then Mimecast. If it is not visible, select Apps.
- In classic Outlook, select the Home tab while reading, or the Message tab while composing, and select the Mimecast button.
- If the button is not on the ribbon in classic Outlook, select All Apps and pick Mimecast there.
- Use the left app bar in classic Outlook as a second entry point, or select More Apps there.
Configuring Mimecast Settings in Outlook
The Mimecast panel shows the options your organisation enabled. To configure Mimecast settings, open the panel from an email and work through the area you need.
| Setting area | What you can change | Who controls it |
|---|---|---|
| Blocked senders | Add or remove addresses Mimecast should stop | You, within the limits set by IT |
| Permitted senders | Add or remove addresses Mimecast should always let through | You, within the limits set by IT |
| Held messages | Review and release mail held by the filter | You, unless IT restricts release |
| Report a message | Send a suspicious email to the security team | You |
| Which features appear | Turn panel features on or off for users | Your Mimecast administrator |
| Who gets the add-in | Assign to everyone, specific users or groups | Your Microsoft 365 Exchange admin |
Verify the Integration
A working install shows the Mimecast button in the same place every time you open a message.
- Restart Outlook fully, then open any email in your inbox.
- Confirm the Mimecast button shows on the ribbon or under Apps on the message action bar.
- Select it and confirm the Mimecast panel opens without a sign-in or error message.
- In classic Outlook, open File > Options > Add-ins and confirm Mimecast is listed under Active Application Add-ins if you use the desktop version.
- Start a new email and confirm Mimecast also appears on the Message tab if your organisation enabled it there.
Troubleshooting Common Issues When Adding Mimecast Tab in Outlook
Mimecast tab not visible in Outlook
The add-in is installed but not pinned, is turned off, or the ribbon tab is hidden.
- In the new Outlook or on the web, open More apps, right-click Mimecast and select Pin.
- In classic Outlook, open File > Manage Add-ins and select the Turned on check box.
- Check File > Options > Add-ins for Mimecast under Disabled Application Add-ins and turn it back on through COM Add-ins > Go.
- Right-click the ribbon, select Customize the Ribbon and make sure the Home tab is ticked.
Compatibility issues with your Outlook version
An old Outlook build or a shared mailbox does not load web add-ins.
- Install all Office updates, then restart Outlook.
- Open your own mailbox rather than a shared one; users cannot install add-ins in shared mailboxes.
- Try Outlook on the web. If Mimecast works there, the problem sits in the desktop client.
- Ask IT which Outlook client your organisation supports for Mimecast.
Issues with Mimecast login or authentication
The panel needs your work account, and Mimecast must protect that mailbox.
- Sign in with the same work account you use for Outlook.
- Confirm with IT that your address is covered by the Mimecast licence.
- Close the panel, restart Outlook and open it again.
- If sign-in still loops, ask IT to check the Mimecast configuration for your account.
Errors during add-in installation or the add-in not working
Self-installs are blocked, or the local add-in cache holds a broken copy.
- If Add apps or Get Add-ins is greyed out, ask IT to deploy Mimecast from Integrated apps.
- Admins: if no deployed add-ins appear for anyone, run
Get-OrganizationConfig | fl AppsForOfficeEnabledin Exchange Online PowerShell and set it to True if it returns False. - In classic Outlook, close Outlook and delete the contents of
%LOCALAPPDATA%\Microsoft\Office\16.0\Wef\, then reopen it. Clear the whole folder, not single files. - Wait up to 24 hours after a central deployment before treating a missing tab as a fault.
Nothing above works: contact support
The problem sits in your organisation's Mimecast or Microsoft 365 setup.
- Note your Outlook build number from the account page under File, and the exact error text.
- Contact your IT helpdesk first; it administers both the add-in and your Mimecast account.
- IT can open a case with Mimecast support, or with Microsoft support for a deployment fault.
Best Practices for Using Mimecast in Outlook
| Practice | Why it helps |
|---|---|
| Report suspicious mail through the Mimecast button | The security team receives the message intact, with headers |
| Pin the add-in once | It stays on the ribbon and the message action bar in every session |
| Check held messages before asking senders to resend | Missing mail is often waiting in the held queue |
| Keep permitted senders short | Every permitted address skips part of the filter |
| Keep Outlook updated | Add-ins rely on current Outlook builds to load |
Security Considerations
Install Mimecast only from the store inside Outlook or through your admin. A store listing shows the publisher, Mimecast Services Ltd., and the permissions it requests.
Use the official Microsoft Marketplace listing or an admin deployment, and never add senders to your permitted list just to stop a warning. Add-ins can read the messages you open, so the source matters, and a permitted sender bypasses part of the filtering that protects your mailbox.
FAQs: How to Add Mimecast Tab in Outlook
What is the Mimecast tab in Outlook?
The Mimecast tab is the button or panel added by the Mimecast Essentials for Outlook add-in. It lets you report suspicious email, manage blocked and permitted senders, and review held messages without leaving Outlook.
How do I add the Mimecast tab to Outlook?
Select More apps > Add apps in the new Outlook or on the web, or Home > All Apps > Get Add-ins in classic Outlook. Search for Mimecast, select Add, then pin it so it stays on the ribbon.
How do I get the Mimecast tab in Outlook if the store does not list it?
Your organisation has blocked self-installs. An Exchange admin must deploy Mimecast Essentials for Outlook from Settings > Integrated apps in the Microsoft 365 admin center. It can take up to 24 hours to appear.
What if the Mimecast tab does not appear?
Pin it from More apps in the new Outlook, or turn it on in File > Manage Add-ins in classic Outlook. Also check the Disabled Application Add-ins list under File > Options > Add-ins and restart Outlook.
Are there any prerequisites to add the Mimecast tab?
Yes. You need a work mailbox on Microsoft 365 or Exchange Online, an organisation with a Mimecast subscription, and an Outlook client that supports add-ins. Shared mailboxes cannot install add-ins themselves.
Can I add the Mimecast tab on Outlook Web Access (OWA)?
Yes, if your organisation allows it. In Outlook on the web, select More apps > Add apps, add Mimecast, then right-click it under More apps and select Pin so it shows on the ribbon.
How do I install Mimecast for a whole organisation?
Sign in to the Microsoft 365 admin center, go to Settings > Integrated apps > Add-ins > Deploy Add-in, pick Mimecast Essentials for Outlook from the store and assign it to everyone or to a group.
How do I use Mimecast in Outlook?
Open an email and select the Mimecast button on the ribbon or under Apps. The panel lets you report the message, block or permit its sender, and check your held message queue.
How do I open Mimecast in Outlook?
Select the pinned Mimecast button on the ribbon. If it is not pinned, select More apps in the new Outlook or on the web, or All Apps in classic Outlook, and choose Mimecast.
How do I check that Mimecast is installed in Outlook?
Open any email and look for Mimecast on the ribbon or under Apps. In classic Outlook, File > Manage Add-ins lists every installed add-in with a Turned on check box.