To run a virtual machine on Windows 11, turn on Hyper-V (Pro and Enterprise editions) or install VirtualBox or VMware Workstation Pro (any edition, including Home), then create a VM from an operating system ISO and start it.
This guide covers the hardware you need, all three hypervisors step by step, how much RAM and disk to give a VM, networking, TPM for Windows 11 guests, and fixes for the problems that stop a VM from starting.
The fastest way to run a virtual machine on Windows 11
On Windows 11 Pro or Enterprise, Hyper-V is already part of Windows, so there is nothing to download except the ISO for the system you want to run. On Windows 11 Home, skip to Method 2.
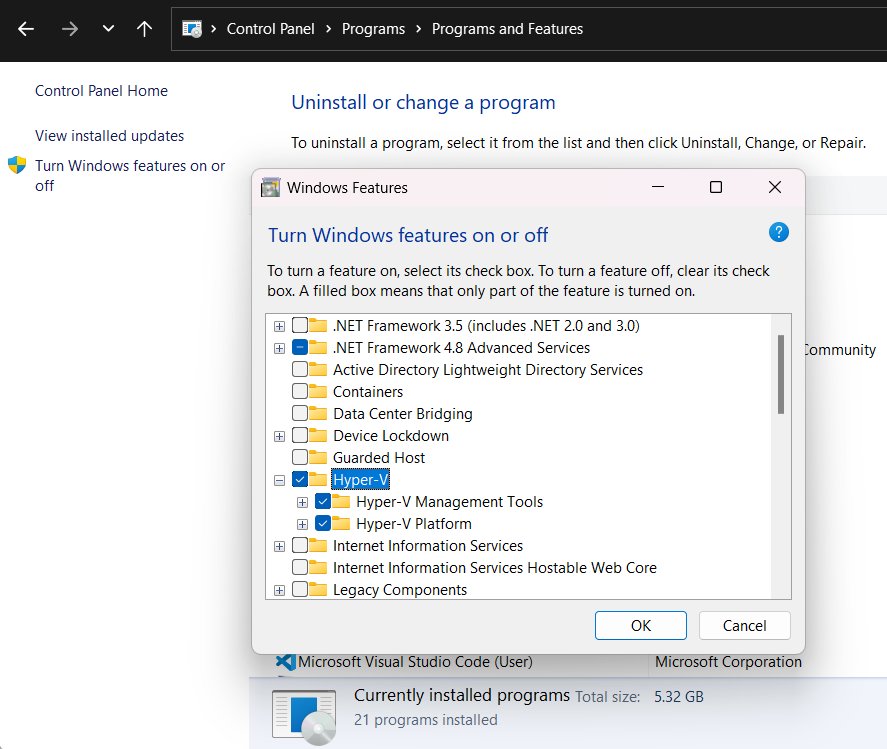
- Select Start, type Turn Windows features on or off and open it.
- Tick Hyper-V, select OK and restart the PC when asked.
- Select Start, type Hyper-V Manager and open it.
- In the Actions pane, select New > Virtual Machine and follow the wizard: choose Generation 2, set the memory, and on Installation Options pick Install an operating system from a bootable image file with your ISO.
- Select Finish, right-click the new VM and choose Connect…, then select Action > Start.
What you need before you start a virtual machine on Windows 11
Every hypervisor needs hardware virtualization turned on in the PC's firmware. Hyper-V also needs a specific Windows edition.
| Requirement | Minimum | How to check |
|---|---|---|
| Windows edition for Hyper-V | Windows 11 Pro or Enterprise (Hyper-V can't be installed on Home) | Settings > System > About shows the edition |
| Windows edition for VirtualBox or VMware | Any 64-bit Windows 11 edition, including Home | Same as above |
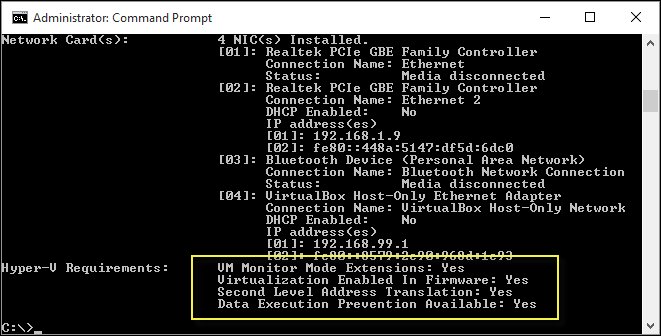
| Processor | 64-bit CPU with Second Level Address Translation (SLAT) and Intel VT or AMD-V | Run systeminfo.exe and read the Hyper-V Requirements lines |
| Virtualization in firmware | Intel VT or AMD-V turned on in BIOS or UEFI, plus hardware DEP (Intel XD bit, AMD NX bit) | systeminfo.exe reports Yes for each Hyper-V requirement, or says a hypervisor has been detected |
| Memory | 4 GB for Hyper-V itself, plus the RAM each running VM gets | Task Manager > Performance > Memory |
| Disk space | Enough for every virtual disk and snapshot; a Windows 11 guest needs 64 GB | Settings > System > Storage |
| Operating system media | An ISO file of the system you want to install, plus its licence | Download from the OS vendor, e.g. Microsoft's Windows 11 download page |
If systeminfo.exe prints A hypervisor has been detected. Features required for Hyper-V will not be displayed., virtualization is already on and running.
Choose the right virtual machine software
All three run full operating systems in a window. The deciding factors are your Windows edition and whether Hyper-V is already in use on the PC.
| Your situation | Use this | Why |
|---|---|---|
| Windows 11 Pro or Enterprise, running Windows or Linux guests | Option 1: Hyper-V | Built into Windows, no download, supports Secure Boot and a virtual TPM for Windows 11 guests |
| Windows 11 Home | Option 2: Oracle VirtualBox | Free, open-source platform package, runs on every Windows 11 x86_64 edition |
| You want an unattended Windows or Linux install | Oracle VirtualBox | Installs the OS from the ISO automatically when the image supports it |
| You want a polished desktop hypervisor with encryption built into the wizard | Option 3: VMware Workstation Pro | Free for personal, educational and commercial use since November 11, 2024 |
| You only need to test one app or file and throw it away | Windows Sandbox | Starts in seconds and deletes everything on close; Pro, Enterprise and Education only |
| Memory integrity or another Hyper-V based feature is on | Hyper-V, or VMware Workstation Pro 15.5.5 or later | Both run alongside the Windows hypervisor; VirtualBox slows down noticeably there |
Method 1: Run a virtual machine with Hyper-V
Hyper-V needs membership of the local Administrators or Hyper-V Administrators group. Download the ISO for your guest system before you start.
- Enable Hyper-V: open Turn Windows features on or off, tick Hyper-V (it contains Hyper-V Platform and Hyper-V Management Tools), select OK and restart.
- Create a virtual switch: open Hyper-V Manager, select Virtual Switch Manager in the Actions pane, choose External, select Create Virtual Switch, name it, pick your network adapter and select OK, then Yes at the connectivity warning.
- Start the wizard: in the left pane select your computer's name, then select New > Virtual Machine and Next.
- Name and generation: enter a name and folder on Specify Name and Location, then choose Generation 2 on Specify Generation unless the guest is a 32-bit or legacy BIOS-only system.
- Memory and network: enter the startup memory on Assign Memory (optionally tick Dynamic Memory), then pick your switch on Configure Networking.
- Disk and ISO: choose Create a virtual hard disk and set its size, then on Installation Options select Install an operating system from a bootable image file and browse to the ISO.
- Adjust Secure Boot if needed: for a Linux guest, open the VM's Settings and set the Secure Boot template to Microsoft UEFI Certificate Authority; Windows guests keep the default Microsoft Windows template.
- Start the VM and install the OS: right-click the VM, select Connect…, then Action > Start and follow the guest's installer.
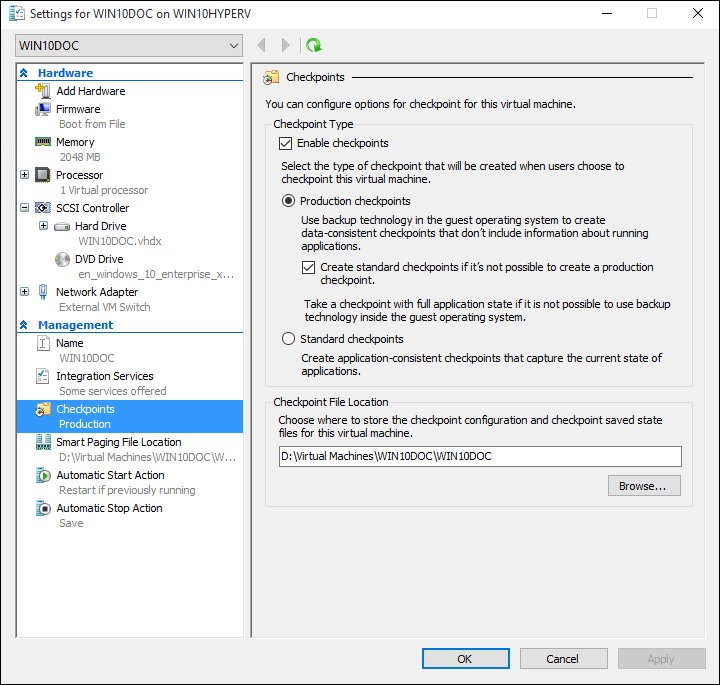
- Use checkpoints before risky changes: right-click the VM and select Checkpoint; to roll back, right-click the checkpoint and select Apply.
Enable Hyper-V from PowerShell instead
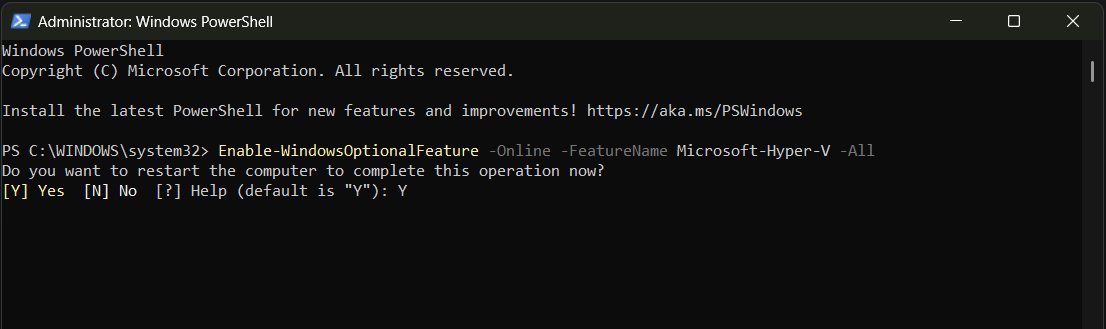
This does the same as the Windows features dialog in one line. First open PowerShell as administrator, then run the command below.
Enable-WindowsOptionalFeature -Online -FeatureName Microsoft-Hyper-V -AllTurns on the Hyper-V platform and management tools on the running system (-Online), including every parent feature they depend on (-All). The DISM equivalent is DISM /Online /Enable-Feature /All /FeatureName:Microsoft-Hyper-V.
You should see: PowerShell asks to restart; enter Y. After the restart, Hyper-V Manager appears in the Start menu.
Method 2: Run a virtual machine with VirtualBox
VirtualBox 7.2 runs on Windows 11 with x86_64 processors; Windows 11 on Arm is an experimental host. The base package is GPLv3; the optional Extension Pack is free only for personal and educational use.
- Install VirtualBox: download the Windows hosts package from virtualbox.org's Download page and run the installer, keeping the USB and Networking driver components.
- Create a new VM: open VirtualBox Manager, select Home, then New. If the workflow does not appear, switch the experience level to Basic.
- Name and ISO: enter a name, choose the VM Folder, and select the ISO. VirtualBox fills in the OS type when it recognises the image.
- Choose the install mode: leave Install OS Using Unattended Installation ticked to let VirtualBox install the system, entering a user name, password and product key, or untick it to install by hand.
- Specify virtual hardware: set Base Memory, Processors (no more than half the host's threads) and Disk Size, and tick Use EFI for Windows 11 and other UEFI systems.
- Configure Windows 11 VM settings: open Settings > System > Motherboard, set TPM Version to 2.0 and make sure Secure Boot is on.
- Install the guest operating system: select Start and complete setup inside the VM window.
- Install Guest Additions: in the running VM, select Devices > Insert Guest Additions CD Image and run the installer that opens inside the guest, then restart the guest.
Method 3: Run a virtual machine with VMware Workstation Pro
Broadcom made Workstation Pro free for all users on November 11, 2024. Versions 15.5.5 and later run on a PC where Hyper-V is enabled, which requires Windows 10 20H1 build 19041.264 or newer and an Intel Sandy Bridge or AMD Bulldozer CPU or newer.
- Install VMware Workstation Pro from Broadcom's website and open it.
- Create a VM: select File > New Virtual Machine, choose Typical and select Next.
- Pick the source: select Installer disc image file (iso) and browse to your ISO, or choose Install the guest operating system later.
- Choose the guest type: for Windows 11, select Windows 11 x64, then enter a name and folder for the VM files.
- Set encryption for Windows 11: choose to encrypt all files or only the files the vTPM needs, and enter or generate a password. Windows stores a remembered password in Credential Manager.
- Size the disk: set the virtual disk size and choose whether to split it into multiple files, then select Customize Hardware to change memory or processors.
- Finish: tick Power on this virtual machine after creation and select Finish, then complete the guest installer.
- Install VMware Tools: from the virtual machine menu, select Install VMware Tools; the VM's CD drive connects to the Tools ISO and the Windows installer detects the guest version.
How much RAM, CPU, and disk space should you assign?
Memory given to a running VM is taken away from Windows, so size each VM against what the host can spare. These are recommended starting points you can change later in the VM's settings.
| Guest | RAM | Virtual CPUs | Disk |
|---|---|---|---|
| Windows 11 | 4 GB minimum | 2 or more | 64 GB or more |
| Windows 10 | 4 GB | 2 | 64 GB |
| Other guests, including Linux | At least 1 to 2 GB to install and boot; follow the distribution's own minimum | 1 or more | The distribution's stated minimum, plus room for snapshots |
| Any guest, upper limit | Leave enough for Windows itself so it does not swap to disk | No more than half the host's threads | Keep free space in the VM folder for snapshots |
Use dynamically expanding disks unless you need maximum write speed. VirtualBox's dynamically allocated disks start small and grow as data is written, while a fixed-size 10 GB disk takes the full 10 GB immediately. Hyper-V's Dynamic Memory and VMware's split-disk option serve the same space-saving purpose.
Virtual machine networking options explained
Each hypervisor uses different names for the same three ideas. Pick the mode by who needs to reach the VM.
| Mode | Hyper-V name | VirtualBox name | VM can reach the internet | Other PCs can reach the VM | Use it for |
|---|---|---|---|---|---|
| NAT | Internal switch plus a NAT network | NAT (the default) | Yes | No, unless you add port forwarding | Browsing, downloads and updates inside the guest |
| Bridged or external network | External switch | Bridged Adapter | Yes | Yes, the VM gets its own address on your LAN | Servers and anything other devices must reach |
| Host-only or internal network | Internal switch | Host-only Adapter | No | Only the host and other VMs | Testing between the host and a VM without the LAN |
| Isolated VM-to-VM | Private switch | Internal Network | No | Only VMs on the same network | Untrusted software and lab networks |
| No network | Not connected | Not attached | No | No | Opening suspicious files |
VMware Workstation Pro offers the same bridged, NAT and host-only choices in the VM's network adapter settings.
Useful VM features you should know
| Feature | Hyper-V | VirtualBox | VMware Workstation Pro | What it gives you |
|---|---|---|---|---|
| Restore points | Checkpoints (standard or production) | Snapshots, taken while running or stopped | Snapshots | Roll the VM back after a bad update or test |
| Guest drivers | Integration services | Guest Additions | VMware Tools | Better graphics, resolution that follows the window, smoother mouse |
| Shared clipboard and drag and drop | Not covered here | Devices > Shared Clipboard and Drag and Drop | Provided by VMware Tools | Copy text and files between host and guest |
| Shared folders | Not covered here | Devices > Shared Folders | Shared folders | Open host files from inside the guest |
| Seamless windows | Not available | Host key + L | Not covered here | Guest apps appear as normal host windows |
| Export and move | Export a VM or a checkpoint | Export as OVF, which other hypervisors can import | Import OVF | Copy a VM to another PC |
| Release mouse and keyboard | Not needed once integration services run | Host key (right Ctrl by default) | Not needed once VMware Tools run | Return control to Windows |
Windows 11 virtual machines and TPM requirements
A Windows 11 guest has the same bar as a physical PC: UEFI firmware with Secure Boot, TPM 2.0, 4 GB of memory, two virtual processors and 64 GB of disk. The host processor must also meet Windows 11's CPU list. The rule has applied since Microsoft extended the TPM 2.0 requirement to VMs in 2021.
| Hypervisor | Firmware and Secure Boot | How to add TPM 2.0 |
|---|---|---|
| Hyper-V | Generation 2 VM; Secure Boot is on by default. A Generation 1 VM cannot be upgraded to Windows 11 in place. | With the VM off, run Set-VMKeyProtector -VMName "Win11" -NewLocalKeyProtector, then Enable-VMTPM -VMName "Win11" in an admin PowerShell. The virtual TPM works even if the host has no TPM. |
| VirtualBox | Tick Use EFI when creating the VM and turn on Secure Boot on the Motherboard tab. | Settings > System > Motherboard > TPM Version 2.0. Not available for Arm VMs. |
| VMware Workstation Pro | Choose UEFI firmware and tick UEFI Secure Boot in a custom setup. | Select Windows 11 x64 as the guest; the wizard adds a vTPM and asks for an encryption password. Do not remove the vTPM or encryption after install. |
How to check the virtual machine is running correctly
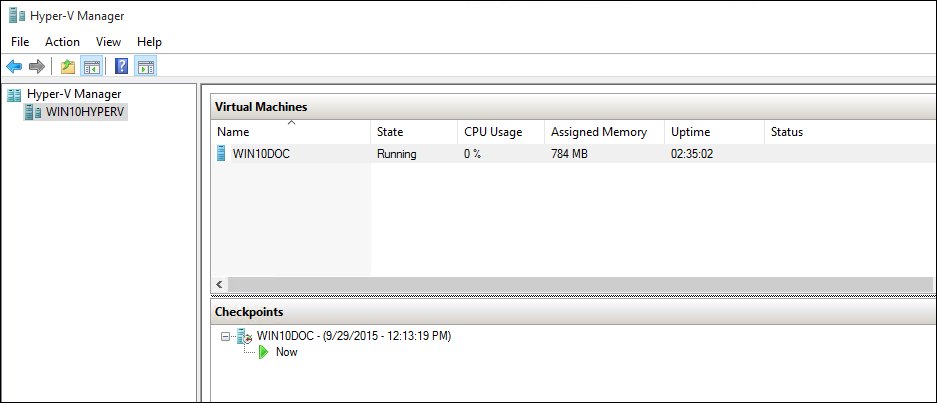
- In Hyper-V Manager, VirtualBox Manager or Workstation Pro's library, confirm the VM is listed as running.
- Inside the guest, open a web page to confirm the network adapter works.
- Resize the VM window; the guest resolution should follow once you install VirtualBox Guest Additions or VMware Tools.
- For a Windows 11 guest, confirm setup finished without a hardware requirements error, which proves Secure Boot and TPM 2.0 are in place.
- Take a checkpoint or snapshot now so you have a clean state to return to.
Troubleshooting common virtual machine problems
Hyper-V is missing from Turn Windows features on or off
The PC runs Windows 11 Home, or the CPU lacks a Hyper-V requirement; you may see only Windows Hypervisor Platform.
- Check the edition in Settings > System > About.
- On Home, use VirtualBox or VMware Workstation Pro instead (Methods 2 and 3), or upgrade Windows 11 Home to Pro to get Hyper-V.
- On Pro or Enterprise, run
systeminfo.exeand fix any Hyper-V requirement that reads No.
The VM will not start and systeminfo shows virtualization disabled
Intel VT or AMD-V is turned off in the PC's BIOS or UEFI.
- Restart into the firmware setup using the key your PC maker lists.
- Turn on the option named Intel Virtualization Technology, Intel VT-x, SVM or AMD-V.
- Save, restart and run
systeminfo.exeagain to confirm the change.
VirtualBox is very slow or shows a green turtle icon
Hyper-V or a feature built on it is running, so VirtualBox falls back to the Windows hypervisor.
- If you do not use them, turn off Hyper-V, Virtual Machine Platform and Windows Hypervisor Platform in Turn Windows features on or off, then restart.
- If memory integrity must stay on, keep it on and run the VM in Hyper-V or VMware Workstation Pro instead.
- Never run VMs from two hypervisors at the same time; Oracle warns this can crash the host.
Windows 11 setup refuses to install inside the VM
The VM lacks UEFI, Secure Boot or a TPM 2.0, or has too little memory or disk.
- In Hyper-V, check the VM is Generation 2; otherwise create a new one.
- Add the virtual TPM using the steps in the TPM section above.
- Raise memory to 4 GB, set two or more virtual processors and give the disk 64 GB or more.
A Linux VM will not boot on Hyper-V
Secure Boot is using the Microsoft Windows template, which only trusts Windows boot loaders.
- Turn the VM off and open its Settings.
- Change the Secure Boot template to Microsoft UEFI Certificate Authority.
- Start the VM again.
The VM has no internet
No virtual switch was chosen in Hyper-V, or the VirtualBox adapter is set to Not attached or an isolated mode.
- In Hyper-V, create an External switch in Virtual Switch Manager and pick it in the VM's network adapter settings.
- In VirtualBox, open Settings > Network and set the adapter to NAT.
- Restart the guest's network connection or the guest itself.
The mouse and keyboard are stuck inside the VM
The guest has captured input because guest drivers are not installed yet.
- In VirtualBox, press the Host key, which is the right Ctrl key by default.
- Install Guest Additions or VMware Tools so the pointer moves freely between host and guest.
Security tips for running virtual machines
A VM isolates software from the host, but networking and shared folders can still expose your files and LAN.
| Tip | Why it matters |
|---|---|
| Use a private switch, internal network or no network for untrusted software | A bridged VM sits on your LAN like any other PC |
| Share host folders read-only, or not at all | Malware in the guest can write to any writable shared folder |
| Take a checkpoint or snapshot before opening anything risky | You can return to a clean state in seconds |
| Keep Hyper-V's Secure Boot on and give Windows guests a virtual TPM | The vTPM lets the guest use BitLocker on its own disk |
| Protect a VMware vTPM encryption password | The encrypted VM cannot be opened without it |
| Use Windows Sandbox with networking turned off for one-off files | Sandbox networking is on by default, and closing it discards everything |
| Keep memory integrity and other Windows security features on | Oracle notes that turning off Device Guard features weakens the host |
How to shut down, pause, or delete a VM
Hyper-V
Hyper-V Manager's right-click menu and these PowerShell cmdlets do the same jobs.
- Shut down through the guest OS with
Stop-VM -Name "Win11"; add-TurnOffonly as a last resort, since it is like pulling the power cord. - Save the running state with
Stop-VM -Name "Win11" -Save. - Pause with
Suspend-VM -Name "Win11"and continue withResume-VM -Name "Win11". - Delete with
Remove-VM -Name "Win11". This removes the configuration and merges checkpoints but leaves the .vhdx disk, which you delete from its folder yourself.
VirtualBox
Closing the VM window offers three choices.
- Click the window's close button or press Host key + Q, then choose Save State to resume later, Shut Down to send an ACPI shutdown, or Power Off to stop immediately.
- To pause, right-click the VM in VirtualBox Manager and choose Pause; choose it again to continue.
- To delete, stop the VM, right-click it and choose Remove, then pick whether to delete its files or only remove it from the list.
Virtual machines on Windows 11: frequently asked questions
Can I run a virtual machine on Windows 11 Home?
Yes, but not with Hyper-V or Windows Sandbox, which need Pro, Enterprise or Education. Install Oracle VirtualBox or VMware Workstation Pro instead. Both are free and run on Windows 11 Home, as long as virtualization is turned on in the PC's firmware.
How do I run a virtual machine in Hyper-V?
Turn on Hyper-V in Turn Windows features on or off, restart, and open Hyper-V Manager. Select New > Virtual Machine, choose Generation 2, set memory, attach an ISO, then right-click the VM, choose Connect and select Action > Start.
How do I run a virtual machine on Windows 10?
The steps are the same as on Windows 11. Hyper-V is available on Windows 10 Pro and Enterprise, and VirtualBox and VMware Workstation Pro run on every 64-bit Windows 10 edition. Only a Windows 11 guest needs the extra TPM and Secure Boot settings.
How do I run a virtual machine on my PC if it has little RAM?
Give the VM only what Windows can spare and run one VM at a time. A lightweight Linux guest needs 1 to 2 GB, while a Windows 11 guest needs at least 4 GB, so a PC with 8 GB or less is tight for Windows guests.
How do I run Debian in a virtual machine?
Download the Debian ISO, create a VM in VirtualBox or Hyper-V, and attach the ISO as the boot disk. In Hyper-V, use a Generation 2 VM and set the Secure Boot template to Microsoft UEFI Certificate Authority, or the installer will not boot.
Can virtual machines run multiple systems at once?
Yes. Hyper-V, VirtualBox and VMware Workstation Pro can each run several VMs at the same time, limited mainly by RAM and disk space. Windows Sandbox is the exception: it allows only one instance at a time.
Can a virtual machine run faster than the host PC?
No. A VM shares the host's processor, memory and disk, so it always runs somewhat slower than the same system installed directly. Installing Guest Additions or VMware Tools, storing the VM on an SSD and giving it enough RAM close most of the gap.
Why run a virtual machine?
A VM lets you test software, updates and settings without risking your main system, run Linux or an older Windows next to Windows 11, and open untrusted files in isolation. A checkpoint or snapshot returns the VM to a clean state in seconds.
How does a virtual machine work?
A hypervisor carves out a share of the host's processor, memory and storage and presents it to a guest operating system as virtual hardware. Hyper-V runs directly on the hardware underneath Windows, while VirtualBox is a hosted hypervisor that runs as an app on Windows.
Can I run a virtual machine on a Mac?
Yes. VirtualBox runs on Intel Macs and on Apple silicon Macs, where it runs Arm guests such as Windows 11 on Arm and Arm Linux. VMware Fusion is also free for all users. Hyper-V is a Windows-only feature.
Running a virtual machine on Windows 11: bottom line
Use Hyper-V on Windows 11 Pro or Enterprise, and VirtualBox on Windows 11 Home or when you want an unattended install. Hyper-V needs no download and handles Windows 11 guests with Secure Boot and a virtual TPM, while VirtualBox is free on every edition and fills in sensible hardware defaults from the ISO.