To make a fill-in the blank line in Word, press Tab where the blank should go, select the tab character and press Ctrl + U to underline it.
This guide covers five ways to build blanks, from underlined tabs and tab leaders to table borders, content controls and text boxes, plus how to lock the finished form and fix lines that jump or stretch across the page.
1. Creating simple fill-in-the-blank lines using underlines
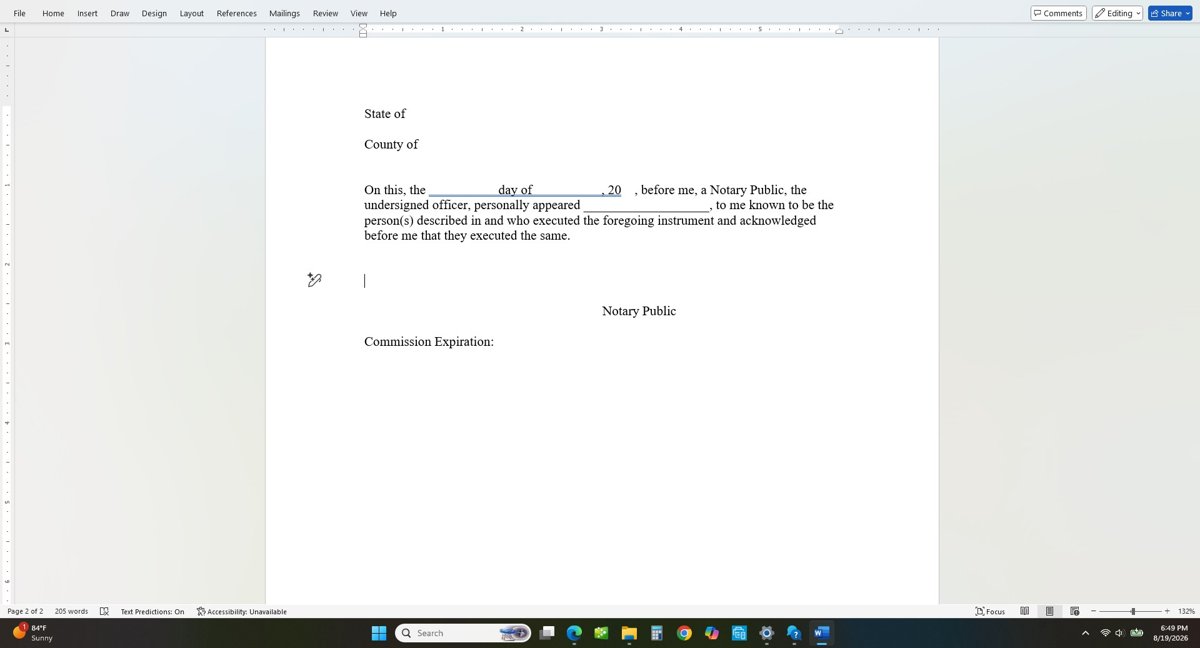
Underlined tab characters are the cleanest blank for a printed Word worksheet or quiz. They line up better than rows of underscores, and each tab gives a line of predictable length.
- Open the document and select Home > Show/Hide ¶ so you can see spaces and tab marks.
- Type the label or question text, such as Name:, and add a space after it.
- Press Tab once or more until the gap is as long as you want the blank.
- Select the tab characters. Each one looks like a small arrow.
- Press Ctrl + U to underline them.
- Select Show/Hide ¶ again to hide the marks and check the line.
You can also hold Shift and press the hyphen key to type underscores. Microsoft notes these are hard to line up, and three or more in a row can turn into a border line across the whole paragraph.
Which fill-in-the-blank line method fits your Word document?
| Your document | Use this method | Why |
|---|---|---|
| Printed worksheet, quiz or handout | Underlined tab characters (method 1) | Fast, and the lines print exactly where you put them |
| Many lines that must end at the same point | Tab stop with a line leader (method 2) | Every line stops at the same ruler position |
| Form people fill in on screen | Table cell with only a bottom border (method 3) | The line stays in place while someone types on it |
| Form with set answers, dates or check boxes | Developer tab content controls (method 4) | Gives drop-down lists, date pickers and placeholder text |
| Answer area placed beside an image or diagram | Text box (method 5) | You can drag the box anywhere on the page |
| Word for Mac | Developer tab Text Box, Check Box or Combo Box | The Mac Developer tab offers these legacy form fields |
| Word for the web | Build the form in desktop Word | Word for the web does not support creating fillable forms |
2. Using underlining for precise control
A tab stop with a leader draws the line for you and ends it at an exact ruler position. This keeps a column of blanks perfectly even, which plain underlined tabs do not always do.
- Place the cursor in the paragraph where the blank lines will go.
- Select Layout (or Page Layout in older versions).
- Select the Paragraph dialog launcher, then select Tabs.
- In Tab stop position, type where the line should end, in inches.
- Under Alignment, keep Left or choose Right.
- Under Leader, choose the solid line option.
- Select Set, then OK.
- Type your label and press Tab. A line runs from the cursor to the tab stop.
The leader carries over to each new paragraph you start with Enter. To stop it, open Tabs again and choose none under Leader.
For a thicker, dotted or colored underline, select the underlined text, open the Font dialog launcher on the Home tab (or press Ctrl + D), and pick from Underline style and Underline color.
3. Creating fill-in-the-blank lines with tables
Microsoft recommends this method for fillable forms completed on screen. Text typed into the cell sits on the border, so the line does not move or stretch.
- Click where the blank line should go and select Insert > Table.
- Select the upper-left box for a 1×1 table, or choose a 2×1 table if you want a label such as Name before the line.
- Point at the right edge of the table until the resize pointer appears, then drag to set the line length.
- Click in the cell that will hold the answer (the second cell in a 2×1 table).
- Select the Table Design tab, then Borders > Borders and Shading.
- Under Setting, select None, then pick the line style, color and width under Style.
- In the Preview diagram, click between the lower margin markers so only the bottom border shows, then select OK.
The light gray gridlines do not print. To hide them on screen too, select the table, open Table Layout and select View Gridlines.
4. Using the Developer tab for interactive fill-in fields
Content controls turn a blank into a real form field with placeholder text such as Click here to enter your name. The placeholder disappears when the person types. The boxes around content controls do not print.
- Select File > Options > Customize Ribbon.
- Under Main Tabs, select the Developer check box, then select OK.
- Click where the blank should go in the document.
- On the Developer tab, in the Controls group, select Plain Text Content Control for unformatted answers or Rich Text Content Control for formatted, multi-paragraph answers.
- Select Design Mode, click the placeholder text in the control and type your own instruction.
- Select Design Mode again to turn it off and keep the instruction.
- To change a control's options, select it and select Developer > Properties.
The Controls group also has Drop-Down List Content Control, Combo Box Content Control, Date Picker Content Control and Check Box Content Control. Older documents can use Legacy Forms fields instead.
On a Mac, the Developer tab offers Text Box, Check Box and Combo Box fields. Select a field and choose Options to set default text, a maximum length or help text.
5. Using text boxes for fill-in spaces
A text box is a floating object, so it suits an answer area placed beside a picture, a map or a labeled diagram. For blanks inside running text, the earlier methods are easier to keep aligned.
- Select Insert > Text Box > Draw Text Box.
- Click in the document and drag to draw the box at the size you want.
- Click inside the box to type any label or leave it empty for the answer.
- Select the box and use the Shape Format tab to change or remove its border, for example leaving only an outline to write in.
- Point at the box border until the move pointer appears, then drag it into position.
- To duplicate it, select the border, press Ctrl + C, click a new spot and press Ctrl + V.
Keyboard route: press and release Alt, N, then X, choose a text box with the arrow keys and press Enter. Press Esc to return to the document text.
Using templates and pre-made fill-in-the-blank documents
A ready-made form template already has the labels, lines and content controls in place. Edit its wording instead of building the layout from scratch.
- Select File > New.
- In Search for online templates, type Forms or the kind of form you need, such as worksheet, and press Enter.
- Right-click a template in the results and select Create.
- Replace the sample labels and questions with your own text.
- Add or remove blanks with any of the five methods above.
- Save the file under a new name so the original template stays untouched.
On a Mac, select File > New from Template, search for form and double-click the template you want.
Finalizing your fill-in-the-blank document
Locking the form stops people from changing the questions and labels while they fill in the blanks. Do this last, after every line and control is in place.
- Open the finished form and select Developer > Restrict Editing, or Review > Restrict Editing.
- Under Editing restrictions, select Allow only this type of editing in the document and choose the restriction you want.
- To protect only part of the form, choose Select Sections and pick the sections. The form needs section breaks for this.
- Under Start enforcement, select Yes, Start Enforcing Protection.
- Type a password in Enter new password (optional), confirm it and select OK.
- Save the document and send it, or print it for handwritten answers.
Without a password, anyone can turn the restrictions off. Microsoft cannot recover a forgotten password, so store it somewhere safe. On a Mac, select Developer > Protect Form instead.
How to check your fill-in-the-blank lines work in Word
- Select Home > Show/Hide ¶ and confirm each blank is made of underlined tab arrows, a tab leader, a table cell or a content control, not loose spaces.
- Click in each blank and type a sample answer. A table-border line or content control should stay put, and the placeholder text should vanish.
- Delete the sample answers so the blanks are empty again.
- If you protected the form, close it, reopen it and try to edit a label. Word should block the change and still let you fill in the blanks.
- Print one copy or check the print preview to confirm the lines print and the gridlines do not.
Additional tips for effective fill-in-the-blank documents
| Tip | How to apply it in Word |
|---|---|
| Limit answers to set choices | Use Drop-Down List Content Control, then add each choice under Drop-Down List Properties with Add |
| Allow a set choice or a typed answer | Use Combo Box Content Control instead of a drop-down list |
| Collect dates in one format | Use Date Picker Content Control and set the display format in Properties |
| Yes or no questions | Use Check Box Content Control |
| Stop a field from being deleted | In Properties, under Locking, select Content control cannot be deleted |
| Keep users able to pick from a list | Leave Contents cannot be edited cleared on drop-down lists, or nobody can choose an item |
| Share with people on older Word versions | Use the Legacy Forms fields on the Developer tab |
Formatting tips for professional-looking fill-in-the-blank lines
| Change | Where to do it |
|---|---|
| Underline style, such as double or thick | Home > Font dialog launcher > Underline style |
| Underline color | Home > Font dialog launcher > Underline color |
| Equal line lengths down the page | Set one tab stop with a line leader and press Tab once per line |
| Thicker or colored table-border line | Table Design > Borders > Borders and Shading, then Style, color and width |
| Hide table gridlines on screen | Select the table, then Table Layout > View Gridlines |
| Text box outline only, no fill | Select the box and change its border and fill on the Shape Format tab |
| Underline labels word by word without the gaps | Font dialog > Underline style > Words only |
How to remove fill-in-the-blank lines and fields in Word
- To remove an underline, select the underlined tabs or text and press Ctrl + U. For double or styled underlines, press Ctrl + U twice.
- To remove a tab leader line, open Layout > Paragraph dialog launcher > Tabs, select the tab stop and choose none under Leader, then select Set and OK.
- To remove a table line, select the table and open Borders and Shading, then select None under Setting.
- To remove a content control, right-click it and select Remove content control.
- To delete a text box, select its border, not the text inside, and press Delete.
- To unlock a protected form, select Review > Restrict Editing > Stop Protection and enter the password if asked.
Troubleshooting common issues
Typing underscores turns into a line across the whole page
The AutoFormat Border Lines option converts three or more underscores into a paragraph border.
- Press Backspace right after the line appears to undo it and keep the characters.
- To stop it for good, select File > Options > Proofing > AutoCorrect Options.
- Open the AutoFormat As You Type tab and clear Border Lines, then select OK.
- Better still, use underlined tabs or a tab leader for blanks instead of underscores.
The blank line moves or shortens when someone types on it
Underscores and underlined tabs are text, so typed answers push them along the line.
- Delete the underscore or tab line.
- Insert a 1×1 or 2×1 table and give the answer cell only a bottom border, as in method 3.
- Or replace the line with a Plain Text Content Control from the Developer tab.
Fill-in lines do not line up down the page
Spaces and underscores vary in width, so lines built from them end at different points.
- Select all the lines you want aligned.
- Open the Tabs dialog and set one tab stop with a line leader at the end position.
- Retype each blank as a single Tab press.
The Developer tab is missing from the ribbon
Word hides the Developer tab on the ribbon by default.
- Select File > Options > Customize Ribbon.
- Under Main Tabs, select Developer and select OK.
"This modification is not allowed because the selection is locked"
The form is protected and you clicked a part you are not allowed to edit.
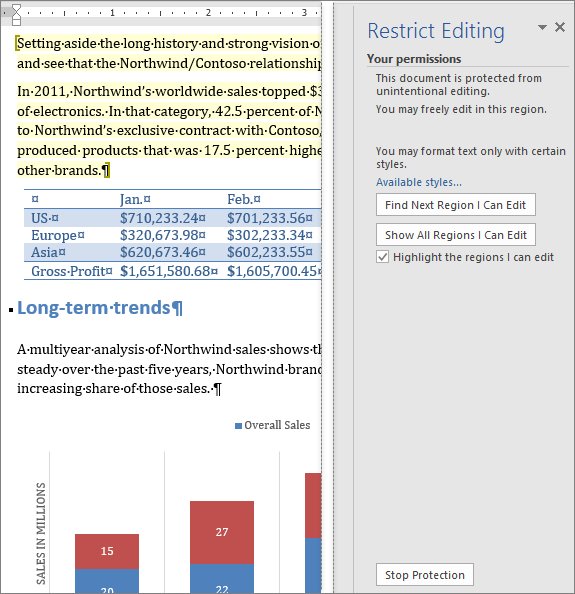
- Select Review > Restrict Editing.
- Select Find Next Region I Can Edit or Show All Regions I Can Edit to jump to the blanks.
- If you own the form and need to change the labels, select Stop Protection and enter the password.
Fill-in-the-blank lines in Word FAQ
How do you make a fill-in-the-blank line in a Word document?
Press Tab where the blank goes, select the tab character and press Ctrl + U. Turn on Show/Hide ¶ first so you can see the tab arrows. This gives a clean underline that prints at a fixed length.
How do I make a fill-in-the-blank form in Word?
Show the Developer tab from File > Options > Customize Ribbon, then insert content controls such as Plain Text Content Control where each answer goes. Finish with Restrict Editing so people can fill in the fields but not change the questions.
How do fill-in-the-blanks work in a Word form?
Each blank is a content control with placeholder instructions. When someone clicks the control and types, the placeholder disappears and their answer takes its place. Drop-down, date picker and check box controls limit the answer to set formats.
How do I make a fill-in-the-blank worksheet or quiz in Word?
Type each question and press Tab where the answer goes, then underline the tabs with Ctrl + U. For even lines, set a tab stop with a line leader so every blank ends at the same ruler position before you print.
Why does typing three underscores make a line across the page in Word?
AutoFormat's Border Lines option replaces three or more underscores with a paragraph border. Press Backspace immediately to undo it, or clear Border Lines under File > Options > Proofing > AutoCorrect Options > AutoFormat As You Type.
How do I make a blank line that does not move when someone types on it?
Insert a 1×1 table, set its borders to None, then add only the bottom border in Borders and Shading. Text typed into the cell sits on the line, so the line keeps its length and position.
Can I make a fill-in-the-blank form in Word for the web?
No. Word for the web does not support creating fillable forms. Build the form in the Word desktop app for Windows or Mac, save it, and then open it in Word for the web to see the result.
Do content control boxes show up when a Word form is printed?
No. The boxes around content controls do not print, so only the text inside them appears on paper. If you want visible lines on a printed copy, use underlined tabs, a tab leader or a table bottom border.
Bottom line: which fill-in-the-blank lines should you use in Word?
Use underlined tabs or a tab leader for anything printed, and table bottom borders or content controls for forms filled in on screen. Printed blanks only need a line of the right length, while on-screen answers need a line that stays in place and, for content controls, placeholder text and locking that survive sharing.