To add a font in Windows 10, right-click a TrueType (.ttf) or OpenType (.otf) font file and select Install, or Install for all users to make it available to every account on the PC.
This guide covers that route plus the Font Previewer, the Fonts folder, Microsoft Store fonts and language fonts, then shows how to use, manage, remove and troubleshoot what you installed.
Installing fonts in Windows 10
The right-click menu is the fastest way to add a font file you have already downloaded. It works for one file or for several selected at once.
- Open File Explorer and go to the folder holding the font, usually Downloads.
- If the font arrived as a .zip file, right-click it, select Extract All and open the extracted folder.
- Select the .ttf or .otf files you want. Hold Ctrl and click to select several styles, such as regular, bold and italic.
- Right-click the selection and select Install. To add the font for every account on the PC, select Install for all users instead.
- If User Account Control asks to allow changes and you trust the source of the file, select Yes.
- Close and reopen any app that was already running, then pick the new font from its font list.
Windows installs the font immediately; there is no restart. Apps that were open during the install only see the font after they are restarted.
Understanding fonts in Windows 10
A font is a file, and Windows treats installed fonts as a system-wide resource. Any app on the PC that supports the format can use a font once it is installed.
Office apps, for example, do not install fonts themselves. They read whatever is installed in Windows, so a font added once appears in Word, Excel and PowerPoint together.
| Item | What it is | What it means for you |
|---|---|---|
| TrueType font (.ttf) | A common font file format | Installs directly with right-click Install |
| OpenType font (.otf) | A newer font format built on TrueType | Installs the same way as a .ttf file |
| Compressed font (.zip) | A download that bundles one or more font files | Extract it first; Windows cannot install a font from inside a .zip |
| Font family | A set of related styles such as Light, Regular and Bold | Install every style file you want to use, not just one |
| C:\Windows\Fonts | The folder where Windows stores fonts | Dropping a font file here also installs it |
| Settings > Personalization > Fonts | The Fonts page in Settings | Lists, previews and uninstalls installed fonts |
| Optional font packages | Extra fonts for specific scripts, such as Arabic, Devanagari or Japanese | Added through language settings or Optional features, not as loose files |
Which way to add a font in Windows 10 should you use?
| Your situation | Use this method | Why |
|---|---|---|
| You have a downloaded .ttf or .otf file | Right-click Install | One step, and it handles many files at once |
| You want to see the font before installing | Double-click the file to open Font Previewer | Shows sample text in that font, with an Install button at the top |
| You have a whole folder of font files | Drag them into C:\Windows\Fonts | Windows installs every file you drop in |
| You want a font without hunting through websites | Get more fonts in Microsoft Store | Store fonts download and install automatically |
| You need text in another script, such as Myanmar, Chinese or Hindi | Add the language or an optional font package | Windows downloads the matching fonts for that script |
Sources for downloading fonts
Fonts come as files, so they can come from the web, a disc or your organization's network. Some are sold commercially, some are shareware and some are free.
Only download a font from a source you trust, because you approve a system change when you install it.
| Source | What you get | Licensing note |
|---|---|---|
| Microsoft Store | Free and paid fonts that install automatically | Shown on each font's Store listing |
| Google Fonts | Free, open source font families as .ttf downloads | Mostly SIL Open Font License; commercial use is allowed |
| Font foundries | Commercial typefaces from the companies that design them, or from subscription libraries such as Adobe Fonts | Paid licences, often with separate desktop, web and app terms |
| Free font websites | Large catalogs of free and shareware fonts | Terms vary per font; some restrict commercial use |
| CD, DVD or a company network share | Font files supplied with software or by your IT team | Follow the terms that came with the software or your organization |
| Windows language settings | Fonts for non-Latin scripts | Covered by the Windows licence |
The Microsoft Typography site on Microsoft Learn lists registered font vendors, which is a reliable starting point for commercial typefaces.
Preparing to install fonts
- Confirm the file ends in .ttf or .otf. Turn on View > File name extensions in File Explorer if the extension is hidden.
- Extract any .zip download so the font files sit in a normal folder.
- Read the licence file that came with the font, usually named LICENSE, OFL or README, and check it allows your intended use.
- Decide who needs the font. Install adds it for your account; Install for all users needs administrator approval.
- Save open documents and note which apps should use the font, so you can restart them after installing.
Install a font in Windows 10 from Font Previewer
Double-clicking a font file opens it in Font Previewer, which shows the alphabet and sample sentences at several sizes. This is the safest way to check a font before adding it.
- Find the font file in File Explorer. Extract it first if it is inside a .zip file.
- Double-click the .ttf or .otf file.
- Check the sample text in the Font Previewer window.
- Select Install at the top of the window.
- Close Font Previewer and open the app where you want to use the font.
Add fonts to Windows 10 by dragging them into the Fonts folder
Windows stores all fonts in C:\Windows\Fonts. Any font file you drop into that folder is installed automatically, which suits a large batch of files.
- Press Win + R, type
C:\Windows\Fontsand press Enter. You can also open Control Panel > Appearance and Personalization > Fonts. - Open a second File Explorer window at the folder holding your extracted font files.
- Select the font files and drag them into the Fonts window.
- Select Yes if Windows asks for administrator permission.
- Wait for the install progress to finish, then restart the apps that should use the fonts.
To preview a font already in the Fonts folder, right-click it and select Preview.
Installing fonts via Microsoft Store or third-party apps
The Fonts page in Settings links straight to the font collection in Microsoft Store. Store fonts download and install without any file handling.
- Select Start > Settings > Personalization > Fonts.
- Select Get more fonts in Microsoft Store.
- Open the font you want to see its listing and price.
- Select Get for a free font or Buy for a paid one.
- Wait for the download to finish. The font installs automatically and appears under Available fonts.
Font manager apps and design suites can also add fonts, but they install them through Windows in the end. If such an app's fonts only show inside that app, install the font files with right-click Install so every program can use them.
Add Myanmar and other language fonts in Windows 10
Fonts for many scripts ship in optional packages rather than as files. Windows Update usually adds them when you enable the language or install its language pack, for example by adding its keyboard.
Myanmar Text, the Windows font for Myanmar script, is part of the standard Windows 10 desktop font set, so you only need the language for typing.
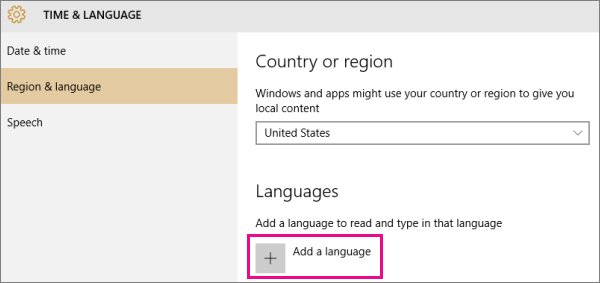
- Select Start > Settings > Time & Language.
- Select Language (labelled Region & language on older builds), then Add a language.
- Pick the language, such as Myanmar, Chinese or Hindi, and finish the wizard. Windows downloads the fonts associated with it.
- To add a font package without adding a language, open Settings > System > Optional features on Windows 10 22H2, or Settings > Apps > Apps & features > Optional features on older versions.
- Select Add a feature, search for the script name, such as Japanese Supplemental Fonts, and install it.
Adding a language does not change your Windows display language. It only adds the language and its related fonts.
How to check a new font is installed in Windows 10
- Select Start > Settings > Personalization > Fonts.
- Type the font name in the search box under Available fonts. The font should appear as a tile with a preview.
- Select the tile. The page should list each style you installed, such as Regular and Bold, with the file details.
- Open WordPad or Word, type a line and pick the font from the font list. The text should change to the new typeface.
If the font is in Settings but missing from one app, the font is installed correctly and the app is the issue. The troubleshooting section below covers that case.
Managing installed fonts
The Fonts page in Settings handles day-to-day font management. The older Fonts folder in Control Panel shows the same fonts as files.
| Task | Where to do it | What happens |
|---|---|---|
| See every installed font | Settings > Personalization > Fonts, under Available fonts | Tiles show each family with a preview |
| Find one font | Search box on the Fonts page | Filters the list as you type |
| Preview sizes and faces | Select a font tile | Shows sample text at different sizes and styles |
| Uninstall a font | Select the font on the Fonts page, then Uninstall | Removes the font from Windows and every app |
| Find the font's designer or foundry | Select the font tile in Settings | Shows the designer and manufacturer details |
Do not uninstall fonts that came with Windows, such as Segoe UI or Arial. Windows and apps rely on them for menus and documents.
Applying the installed fonts in applications
An installed font appears in the font list of any app that reads Windows fonts. Not all apps support custom fonts, so test in a second app if one does not show it.
- Close the app completely if it was open during the install, then start it again.
- Select the text you want to change.
- Open the font list. In Word, PowerPoint and Excel it is on the Home tab.
- Type the first letters of the font name to jump to it, then select it.
- Save the document. If you plan to share it, embed the font or tell recipients which font it uses.
A document formatted with a font the recipient does not have opens in a substitute, often Times New Roman or the default font. Word and PowerPoint can embed fonts in the file to avoid this, within the limits of each font's licence.
Troubleshooting common font installation issues
The new font does not show up in Word or another app
The app was open during the install, or the app does not support custom fonts.
- Close the app completely and start it again.
- Check Settings > Personalization > Fonts to confirm the font is listed under Available fonts.
- If it is listed, open a different app, such as WordPad, and look for the font there.
- If it works in the second app, the first app does not support that font; check the app's own font settings.
- If it is not listed, install the file again with right-click Install.
There is no Install option when you right-click the file
The font is still inside a .zip file, or the file is not a TrueType or OpenType font.
- Check whether the file sits inside a compressed folder. If so, right-click the .zip and select Extract All.
- Turn on View > File name extensions in File Explorer.
- Confirm the file ends in .ttf or .otf, then right-click it again.
- If the download contains only web font formats, return to the source and download the desktop font files instead.
Windows asks for permission or an administrator password
Install for all users and copying files into C:\Windows\Fonts change system-wide settings.
- Select Yes in the User Account Control prompt if you trust the font's source.
- On a work or school PC without admin rights, ask your IT administrator to install the font for all users.
- Never install a font from a source you do not trust just to clear the prompt.
Letters appear out of order or an old version of the font still shows
The font cache is stale, or an older copy of the same family is still installed.
- Open Settings > Personalization > Fonts and search for the family name.
- Uninstall every installed style of that family.
- Restart the PC.
- Install the latest font files from the original source.
Myanmar or other non-Latin text shows boxes instead of characters
The font for that script is not installed, or the document uses a font your PC lacks.
- Open Settings > Time & Language > Language and select Add a language.
- Add the language the text is written in, such as Myanmar.
- Wait for Windows to download the related fonts, then reopen the document.
A document looks different on someone else's computer
Custom fonts work only on the PC where they are installed, so the other PC substitutes a default font.
- Embed the fonts in the file from the app's save options, where the font's licence allows it.
- Or ask the recipient to install the same font from its original source.
- For a fixed layout that cannot change, share a PDF copy of the document.
Best practices for font management in Windows 10
| Practice | Why it matters |
|---|---|
| Download fonts only from sources you trust | Installing a font means approving a change to Windows |
| Keep the original font files and licence in one folder | You can reinstall after a reset or move the font to a new PC you are licensed for |
| Install only the styles you use | A shorter font list is faster to scroll in every app |
| Uninstall fonts you no longer need from the Fonts page | Frees space and keeps font menus tidy |
| Leave the fonts that came with Windows in place | Menus, dialogs and documents depend on them |
| Remove an old version before installing a new one | Two versions of one family can cause odd glyphs and spacing |
| Use language settings for non-Latin scripts | Windows picks the correct optional font packages automatically |
Legal and licensing considerations
Installing a font does not grant you every right to use it. The licence that comes with the font decides what you may do with it, and free fonts are not always free for every use.
| Font type | What you can usually do | What you cannot do |
|---|---|---|
| Fonts supplied with Windows | Print, make graphics and logos, sell printed output, embed in documents from compliant apps such as Word | Copy the font files to other computers or servers, convert them to other formats or modify them |
| Google Fonts (open source) | Use commercially and redistribute under the font's licence, most often the SIL Open Font License | Ignore the licence's redistribution conditions |
| Free fonts from other sites | Whatever that font's own licence states | Assume commercial use or embedding is allowed; some licences forbid it or require attribution |
| Commercial fonts from a foundry | Use within the purchased licence, often per computer or per user | Install on more PCs than the licence covers or ship the font inside an app |
To find who owns an installed font, select it in Settings > Personalization > Fonts and check the designer and manufacturer details. Extended rights for many Microsoft-owned fonts are licensed through Monotype.
Windows 10 font installation FAQ
How do I add fonts to Windows 10?
Download the font, extract it if it is in a .zip file, then right-click the .ttf or .otf file and select Install. Select Install for all users to add it for every account. The font then appears in all apps that support it.
How do I install a font in Windows 10 without right-clicking?
Double-click the font file to open Font Previewer and select Install at the top. You can also drag font files into the C:\Windows\Fonts folder, which installs them automatically, or get fonts from Microsoft Store through Settings > Personalization > Fonts.
How do I add a TrueType font to Windows 10?
Right-click the .ttf file and select Install, or double-click it and select Install in Font Previewer. TrueType and OpenType fonts install the same way. If the .ttf file is inside a .zip folder, extract it first.
How do I add a font to Windows 10 Pro?
Windows 10 Pro adds fonts exactly like Windows 10 Home: right-click the font file and select Install. On a managed work PC, installing for all users may need an administrator, so ask IT if the User Account Control prompt asks for a password.
How do I add a Myanmar font in Windows 10?
Windows 10 already includes Myanmar Text, the Windows font for Myanmar script. To type in Myanmar, open Settings > Time & Language > Language, select Add a language and add Myanmar. For a different Myanmar font, install its .ttf file with right-click Install.
How do I add a font in Windows 11?
The same right-click Install and Install for all users options work in Windows 11. Windows 11 also lists, previews and uninstalls fonts under Settings > Personalization > Fonts, with a Get more fonts in Microsoft Store link on the same page.
How do I apply a font in Windows 10?
Open the app, select your text and choose the font from the app's font list, such as the font box on Word's Home tab. Restart the app first if it was open while you installed the font, because apps load the font list at startup.
How do I increase the font size in Windows 10?
Press Win + U to open Ease of Access, select Display, and drag the Make text bigger slider to the right. Select Apply and Windows enlarges text in title bars, menus and icon labels. This changes text size, not the font itself.
Where are fonts stored in Windows 10?
Windows stores fonts in the C:\Windows\Fonts folder. You can open it from the Run box or through Control Panel > Appearance and Personalization > Fonts. Settings > Personalization > Fonts shows the same installed fonts with previews.
How do I remove a font from Windows 10?
Open Settings > Personalization > Fonts, select the font under Available fonts and select Uninstall. The font disappears from every app. Avoid removing fonts that came with Windows, because menus and documents rely on them.
Conclusion: the best way to add a font in Windows 10
Use right-click Install for downloaded font files, and choose Install for all users only when other accounts on the PC need the font. It is the quickest built-in method, handles many files at once and makes the font available to every app that supports custom fonts. Use language settings instead for non-Latin scripts, and check each font's licence before using it in commercial work.