Windows Update Cleanup is the Disk Cleanup option that deletes old, superseded versions of updates which Windows keeps in the component store (the WinSxS folder) so you can roll an update back.
This guide shows how to run it from Disk Cleanup, Storage settings, Task Scheduler, DISM and PowerShell, what each route removes, and how to fix a cleanup that will not delete, runs for hours or leaves the space in use.
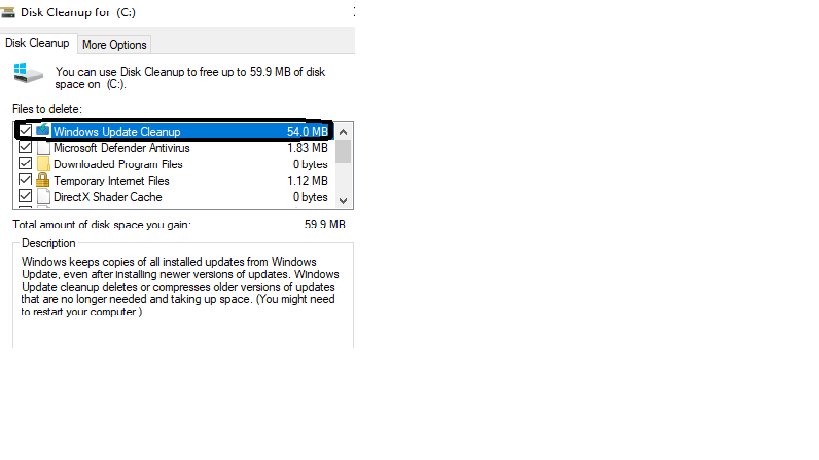
How to run Windows Update Cleanup in Disk Cleanup
Disk Cleanup is the quickest route on both Windows 11 and Windows 10. The Windows Update Cleanup box only appears after you switch to system files, and it needs an administrator account.
The same pass can clean up other system files, such as Delivery Optimization files and temporary setup files.
- In the search box on the taskbar, type disk cleanup, then select Disk Cleanup from the results.
- Select the drive Windows is installed on, usually C:, then select OK.
- Select Clean up system files, select the same drive again, then select OK.
- On the Disk Cleanup tab, tick Windows Update Cleanup. Tick Delivery Optimization Files as well if you want the downloaded update cache gone.
- Select OK, then select Delete Files in the confirmation window.
- Restart the PC when the window closes. Part of the cleanup can only finish during a restart.
What is Windows Update Cleanup?
Windows keeps earlier versions of updated components in the component store, even after a newer update supersedes them. That is what lets you uninstall an update and fall back to the previous file versions.
Windows Update Cleanup removes those superseded versions. Once they are gone, you may not be able to roll back to a superseded update; you would have to install that update again manually.
| Question | Answer |
|---|---|
| Where the files live | The component store, C:\Windows\WinSxS |
| What gets removed | Superseded versions of updated components that a newer update has replaced |
| What stays | The current versions of every component, which Windows needs to run, repair and update itself |
| When the option appears | Only when Disk Cleanup detects update files you no longer need, and only for an administrator |
| The trade-off | You may lose the ability to uninstall older updates that the cleanup removed |
| Does Windows do it anyway? | Yes. The StartComponentCleanup task removes old versions automatically, at least 30 days after the newer component was installed |
Understanding Windows updates and their impact on storage
Update data sits in several places, and each one is cleaned by a different tool. Knowing which folder holds the space stops you deleting the wrong thing.
Microsoft puts typical free-space needs at 6 GB to 11 GB or more for a feature update and 2 GB to 3 GB or more for a quality update. Extra space is also held for about 10 days after an update so it can be removed.
| Location | What it holds | How to clean it |
|---|---|---|
C:\Windows\WinSxS (component store) |
Current and superseded component versions, backups and cache data | Windows Update Cleanup, StartComponentCleanup task or DISM. Never delete files here by hand |
%windir%\SoftwareDistribution\Download |
Update packages Windows Update has downloaded | Managed by Windows. Clear it manually only when it stays large after updates install |
| Delivery Optimization cache | Update files shared with other PCs | Clears itself automatically, or tick Delivery Optimization Files in Disk Cleanup |
Windows.old (Previous Windows installation) |
The earlier Windows version after an upgrade | Storage settings > Temporary files > Previous Windows Installation(s) |
| Reserved storage | Space Windows sets aside so updates have room to install | Used by updates first; not something you delete |
Why should you clean up Windows Update files?
Running out of space is the main reason. A full system drive slows the PC and can stop the next update from installing at all.
| Reason | What cleaning changes |
|---|---|
| Low disk space warning | Superseded updates and cached downloads often free several gigabytes on the system drive |
| A feature update will not install | Windows checks for free space before it starts and asks you to free some up if there is not enough |
| The WinSxS folder looks huge | Cleanup cuts the real overhead, though File Explorer overstates the folder size because of hard links |
| After a big cumulative update | Old cumulative update content stays on disk until component cleanup removes it |
| You plan to keep the current updates | Removing the rollback copies costs you nothing if you will not uninstall those updates |
Methods of cleaning up Windows Update files
All built-in routes clean the same component store, except the manual SoftwareDistribution clear. Pick the one that matches how much control you want.
| Your situation | Use this | Why |
|---|---|---|
| You want the space back now with a mouse | Disk Cleanup > Clean up system files | Shows the size first and has a tick box per category |
| You are on Windows 11 and prefer Settings | Storage Sense and Cleanup recommendations | Cleans temporary files and old Windows installations from one page |
| You want Windows to do it on its schedule | StartComponentCleanup task in Task Scheduler | Waits 30 days after an update and has a 1-hour timeout |
| You want superseded versions gone immediately | Dism.exe /online /Cleanup-Image /StartComponentCleanup |
No 30-day grace period and no timeout |
| You want the smallest possible component store | DISM with /ResetBase |
Removes every superseded version, but current updates can no longer be uninstalled |
| You work in PowerShell scripts | Repair-WindowsImage -Online -StartComponentCleanup |
The DISM module equivalent of the DISM command |
| The download folder stays large after updates install | Manual clear of SoftwareDistribution\Download |
Removes downloaded packages that Windows has not cleared |
Clean up Windows Update files with Storage Sense in Windows 11
Windows 11 moves much of Disk Cleanup's job into Storage settings and Cleanup recommendations. Microsoft lists this as its recommended way to free space for updates.
Storage Sense works on the system drive only, and it runs only while you are signed in and online.
- Select Start > Settings > System > Storage.
- Set Storage Sense to On so Windows clears temporary files when space runs low.
- Select Cleanup recommendations.
- Review Temporary files, Large or unused files, Files synced to the cloud and Unused apps, and tick the items you want to remove.
- Select Clean up under each section you changed.
- To remove an old Windows version, go back to Storage, select Temporary files, tick Previous Windows Installation(s) and select Remove files.
Removing Previous Windows Installation(s) deletes Windows.old. You cannot go back to the earlier Windows version afterwards.
Manual cleanup of update files in the SoftwareDistribution folder
The %windir%\SoftwareDistribution\Download folder holds the update packages Windows Update downloads. Windows normally manages it, so clear it by hand only when it stays large after every available update has installed and the PC has restarted.
This is the only safe manual delete. Never delete files from the WinSxS folder: Microsoft warns that it can leave the PC unable to boot or to update.
- Install all available updates in Settings > Windows Update, then restart the PC.
- Open Command Prompt as administrator.
- Type
net stop wuauservand press Enter to stop the Windows Update service. - In File Explorer, paste
%windir%\SoftwareDistribution\Downloadinto the address bar and press Enter. - Select everything in the folder and delete it. Leave the Download folder itself in place.
- Back in Command Prompt, type
net start wuauservand press Enter to start the service again.
Windows Update cleanup using command line: practical tips
DISM gives the same result as the scheduled cleanup task, with two differences: superseded versions are deleted immediately rather than after 30 days, and there is no 1-hour timeout.
Run it from an elevated Command Prompt or an elevated PowerShell window. Expect it to take several minutes on a PC that has not been cleaned for a while.
Dism.exe /online /Cleanup-Image /StartComponentCleanup/online targets the running copy of Windows; /Cleanup-Image /StartComponentCleanup uninstalls and deletes component versions that newer updates have superseded.
You should see: The progress bar reaches 100.0% and DISM prints: The operation completed successfully.
Run the analysis command in the check section below before and after, so you can see how much the cleanup actually freed.
DISM StartComponentCleanup with /ResetBase to remove all superseded updates
Adding /ResetBase removes every superseded version of every component in the store. It frees the most space of any built-in option.
The cost is permanent: none of the updates already installed can be uninstalled afterwards. Updates you install later can still be removed.
Dism.exe /online /Cleanup-Image /StartComponentCleanup /ResetBase/StartComponentCleanup removes superseded components; /ResetBase resets the base so every superseded version goes, not only the ones past the grace period.
You should see: DISM ends with The operation completed successfully, and a later analysis shows Number of Reclaimable Packages : 0.
Use it only once the PC has run the current updates for a while without problems.
Windows Update cleanup with PowerShell Repair-WindowsImage
The DISM PowerShell module exposes the same cleanup through Repair-WindowsImage. Its -StartComponentCleanup switch cleans up superseded components, and -ResetBase resets the base of superseded components for the extra space.
Open PowerShell as administrator before you run it.
Repair-WindowsImage -Online -StartComponentCleanup-Online targets the running Windows installation; -StartComponentCleanup cleans up superseded components to reduce the size of the component store. Add -ResetBase only if you accept that installed updates can no longer be uninstalled.
You should see: The cmdlet returns to the prompt without an error after the progress bar completes.
Run the StartComponentCleanup task in Task Scheduler
This is the task Windows runs on its own when the PC is idle. Running it by hand keeps the 30-day wait after an update, and it stops after 1 hour, so it may not clean everything in one run.
- Type Task Scheduler in the taskbar search box and open it.
- In the console tree, expand Task Scheduler Library > Microsoft > Windows > Servicing.
- Select StartComponentCleanup.
- Under Selected Item in the right pane, select Run.
- To start the same task from an elevated Command Prompt instead, run
schtasks.exe /Run /TN "\Microsoft\Windows\Servicing\StartComponentCleanup".
Automating Windows Update cleanup with cleanmgr batch scripts
Disk Cleanup has command-line switches that save a set of tick boxes under a number and run that set later. Put the run command in a batch file or a scheduled task and the cleanup repeats without the dialog.
The number can be any value from 0 to 9999. The settings are stored in the registry, so pick the boxes once.
- Open Command Prompt as administrator.
- Run
cleanmgr /sageset:1to open the Disk Cleanup Settings dialog. - Tick the categories you want cleaned, including Windows Update Cleanup when it is listed, then select OK.
- Run
cleanmgr /sagerun:1to clean every drive with the boxes you saved under 1. - Save
cleanmgr /sagerun:1as a line in a.batfile, or add it as the action of a task in Task Scheduler to run on a schedule.
cleanmgr /tuneup:1 runs the settings dialog and the cleanup for the same number in one go.
Check WinSxS size after cleanup with DISM AnalyzeComponentStore
File Explorer overstates the WinSxS folder size, because many of its files are hard links that also appear in System32 and other folders. DISM reports the real figures.
The actual overhead is Backups and Disabled Features plus Cache and Temporary Data; Shared with Windows is space Windows needs anyway.
Dism.exe /Online /Cleanup-Image /AnalyzeComponentStoreReports the Explorer-reported size, the actual size, the part shared with Windows, backups, cache data, the date of the last cleanup and how many packages cleanup could still reclaim.
You should see: Date of Last Cleanup shows today, Number of Reclaimable Packages : 0 and Component Store Cleanup Recommended : No.
Utilizing third-party tools for Windows Update cleanup
Use the tools built into Windows (Disk Cleanup, Storage Sense, the StartComponentCleanup task and DISM) rather than a third-party cleaner for update files. Every location that holds update data has a built-in cleaner, and Microsoft warns that deleting files from the WinSxS folder can leave a PC unable to boot or update. A cleaner that removes component store files directly takes exactly that risk, and it cannot clean anything the built-in tools miss.
Best practices for Windows Update cleanup
| Practice | Why it matters |
|---|---|
| Install pending updates and restart first | Files for an update that is still installing are in use and will not delete |
| Wait 10 days after a feature update before removing the old version | Windows.old is your only way back to the previous Windows version |
Run /AnalyzeComponentStore before cleaning |
It tells you whether cleanup is recommended and how many packages it can reclaim |
Keep /ResetBase for a stable PC |
It makes every installed update permanent |
| Never delete WinSxS files by hand or move the folder | The component store must stay on the system volume, and deleting from it can stop Windows booting or updating |
| Leave automatic component cleanup turned on | Microsoft strongly recommends not disabling it; it removes old update files on its own |
| Back up important files before a big cleanup | A cleanup removes rollback options, so a backup is your safety net |
Troubleshooting common issues during Windows Update cleanup
Windows Update Cleanup is not deleting, or the same size shows again
Part of the removal finishes only during a restart, and files for a pending update stay in use.
- Restart the PC, then open Disk Cleanup and select Clean up system files again.
- Install any pending updates in Settings > Windows Update and restart once more.
- Run
Dism.exe /online /Cleanup-Image /StartComponentCleanupfrom an elevated Command Prompt. - Run
Dism.exe /Online /Cleanup-Image /AnalyzeComponentStoreand check Number of Reclaimable Packages.
Windows Update Cleanup is taking a long time or looks stuck
The cleanup uninstalls superseded packages one by one, and it keeps working in the background.
- Leave the PC plugged in and let Disk Cleanup run; do not force the window closed.
- Restart when it finishes, because the last part of the cleanup can run during startup.
- When the bar stops moving for an hour or more, work through the fixes for a stuck Disk Cleanup.
- Use the DISM command instead, which shows its own percentage progress.
Windows Update Cleanup option is missing
The option appears only on the system files view, only for administrators, and only when there are unneeded update files.
- Sign in with an administrator account.
- Open Disk Cleanup, select Clean up system files and pick the Windows drive.
- If the box still does not appear, there are no superseded updates to remove right now.
Update failures after cleanup
Cleanup removes only superseded versions; a failing update usually points at damaged Windows Update components.
- Select Start > Settings > System > Troubleshoot > Other troubleshooters, then select Run next to Windows Update.
- Restart and select Check for updates in Settings > Windows Update.
- If it still fails, run
net stop wuauserv, thenrd /s /q %systemroot%\SoftwareDistribution, thennet start wuauservfrom an elevated Command Prompt. - If you need an update that cleanup removed, install it again manually.
Cannot delete update files because they are in use
The Windows Update service holds files in the download folder while it runs.
- Run
net stop wuauservfrom an elevated Command Prompt. - Delete the contents of
%windir%\SoftwareDistribution\Download. - Run
net start wuauservto start the service again.
Persistent disk space usage after cleanup
File Explorer counts hard-linked files twice, and Disk Cleanup has a history of reporting impossible Windows Update Cleanup sizes.
- Run
Dism.exe /Online /Cleanup-Image /AnalyzeComponentStoreand compare Actual Size of Component Store with the Explorer-reported size. - Check Settings > System > Storage to see which category really holds the space.
- Remove Previous Windows Installation(s) under Temporary files if the upgrade is more than 10 days old and you will not roll back.
- Uninstall optional features and languages you do not use; each language can take about 175 MB to over 300 MB during updates.
Windows Update cleanup additional considerations: Windows.old, reserved storage and uninstalling updates
| Consideration | What to know |
|---|---|
| Uninstalling updates later | Installed updates are listed in Settings > Windows Update > Update history > Uninstall updates. Some updates cannot be uninstalled, and cleanup can remove older ones from that option |
| Previous Windows installation | Listed as removable for 10 days after an upgrade. Deleting it removes Windows.old and the way back |
| Reserved storage | Updates use reserved storage first before taking other disk space |
| Space during a feature update | Windows temporarily turns off hiberfil.sys and pagefile.sys to make room, then turns them back on |
| Not enough space even after cleanup | Select Fix issues in Settings > Windows Update and use an external drive with at least 10 GB free |
| Microsoft Store temp files filling the drive | Run wsreset.exe and the Windows Update troubleshooter if a Low Disk Space error returns right after a cleanup |
Windows Update Cleanup FAQ
What is Windows Update Cleanup?
Windows Update Cleanup is a Disk Cleanup option that deletes superseded versions of updated components from the component store. Windows keeps those copies so you can uninstall an update; once a newer update replaces them and you no longer need the rollback, they only take up space.
Is Windows Update Cleanup important?
It is not required for Windows to run, because the StartComponentCleanup task removes old component versions automatically after 30 days. It matters when your system drive is short on space or a feature update refuses to install, since it frees the space immediately.
Should you delete Windows Update Cleanup files?
Yes, if the PC is working well with its current updates. Deleting them is safe for Windows itself; the only cost is that you may not be able to uninstall older updates the cleanup removed. Keep them for a few days after an update you are unsure about.
How do you clean up Windows Update files?
Search for Disk Cleanup, open it, select Clean up system files, choose the Windows drive, tick Windows Update Cleanup and select OK, then Delete Files. On Windows 11, Settings > System > Storage > Cleanup recommendations covers temporary files and old Windows installations.
How do you remove Windows Update Cleanup from Disk Cleanup?
Tick Windows Update Cleanup on the system files view and delete it, then restart the PC. If the same size returns, install pending updates, restart again and run Dism.exe /online /Cleanup-Image /StartComponentCleanup from an elevated Command Prompt to remove the superseded packages.
How do you clear Windows Update Cleanup manually?
Run Dism.exe /online /Cleanup-Image /StartComponentCleanup from an elevated Command Prompt, or run the StartComponentCleanup task in Task Scheduler. Do not delete files from the WinSxS folder yourself; Microsoft warns that doing so can stop Windows booting or updating.
Why won't Windows Update Cleanup delete?
The cleanup often finishes only after a restart, and files for an update that is still pending stay in use. Restart, install outstanding updates, then run Disk Cleanup or the DISM StartComponentCleanup command again and check the reclaimable package count with AnalyzeComponentStore.
Why is Windows Update Cleanup taking a long time?
It uninstalls each superseded package rather than simply deleting files, so a PC that has not been cleaned for months can take a long while. It runs in the background and may need a restart to finish; leave it running instead of closing it.
Does Windows Update Cleanup delete my personal files?
No. It only removes superseded update components from the component store. Your documents, photos and apps are untouched, and the current versions of every Windows component stay in place, so the PC keeps running and updating normally.
Bottom line: should you run Windows Update Cleanup?
Run Windows Update Cleanup from Disk Cleanup whenever the system drive is short on space and your current updates are working, and keep DISM /ResetBase for a PC you know is stable. It removes only superseded update copies, it frees space Windows needs for the next update, and the one thing it costs you is the option to roll back updates you have already decided to keep.



![How to find word count in Microsoft Word [updated 2026]](https://techdows.com/wp-content/uploads/2026/10/Word-Review-tab-with-the-Word-Count-menu-and-Show-Word-Count-ticked-600x252.jpg)