To add Mystic Light to MSI Center, install MSI Center from the Microsoft Store, open its Feature Sets page, install Mystic Light there, and then open it to control your RGB lighting.
This guide covers what you need first, how to get fans and other RGB parts detected, how to save lighting profiles, how to turn Mystic Light off, and what to do when it is not working.
How to add Mystic Light to MSI Center from Feature Sets
MSI Center's Microsoft Store listing describes it as a platform that lets you install and uninstall MSI's exclusive features, which are listed on its Feature Sets page. Mystic Light, MSI's RGB lighting control, is added the same way, so it is not present until you install it.
- Open Microsoft Store, search for MSI Center, and select Get or Install on the listing published by MICRO-STAR INTERNATIONAL CO., LTD.
- Open MSI Center from the Start menu once the install finishes.
- Go to the Feature Sets page.
- Find Mystic Light in the list of available features and install it. If your version of MSI Center names the page differently, look for Mystic Light wherever it lists features to install.
- Wait for the install to complete, then open Mystic Light from MSI Center.
- Pick an effect and color for a detected device and apply it to confirm the lights respond.
Understanding Mystic Light and its benefits
Mystic Light is MSI's RGB lighting control. Inside MSI Center it replaces the need for a separate lighting tool for each MSI part in the PC.
| Benefit | What it means for you |
|---|---|
| One app for MSI lighting | Motherboard, graphics card and supported MSI peripherals are controlled from the same MSI Center window. |
| Install only what you use | MSI Center lets you install and uninstall its features, so Mystic Light can be added without the rest of the feature set. |
| Matching effects across parts | Apply one effect and color to every detected device instead of setting each part separately. |
| Saved looks | Keep more than one lighting setup and switch between them instead of rebuilding colors each time. |
| Works alongside Windows lighting | On Windows 11, Dynamic Lighting can also drive compatible RGB devices, and you choose which app has control. |
Prerequisites for adding Mystic Light to MSI Center
MSI Center only does something useful on MSI hardware. The Microsoft Store listing states that it requires an MSI product and an additional MSI Center SDK component.
| Requirement | Detail |
|---|---|
| Windows version | Windows 11, or Windows 10 version 17134 (1803) or later |
| Windows 10 in S mode | Not supported |
| Memory | 1 GB minimum |
| Intel motherboards | X299 and 300, 400, 500, 600 series chipsets or newer |
| AMD motherboards | X399, TRX40, A320 and 400, 500 series chipsets or newer |
| Laptops | MSI Gaming Series with Intel 11th gen or AMD Ryzen 5000 series CPUs or newer |
| Desktops | MEG and MPG Gaming, Creator and PRO Series desktops and Modern Series all-in-ones with Intel 11th gen CPUs or newer |
| Graphics cards | Select MSI GeForce RTX 40, 30, 20 and GTX 16 Series models and select Radeon RX 6000 and 5000 Series models |
| Gaming gear | Select VIGOR keyboards, CLUTCH mice and IMMERSE headsets |
If your board or card is older than these lines, MSI Center will not list it, and Mystic Light has nothing to control.
Step-by-step guide to adding Mystic Light to MSI Center
Use this full walk-through on a new build or after a clean Windows install, when nothing MSI-related is on the PC yet.
- Install MSI Center. Get it from the Microsoft Store listing for MSI Center, or install it from the command line with the winget command in the next section.
- Launch MSI Center and access Mystic Light. Open MSI Center, go to Feature Sets, install Mystic Light, and open it once the install completes.
- Detect compatible devices. Let Mystic Light finish scanning; each MSI part it can control appears in the Mystic Light window. Anything missing is covered in the troubleshooting section below.
- Customize your lighting. Select a device, choose an effect, then set the color, brightness and speed the effect offers.
- Save and apply settings. Apply the change so the hardware takes it, and save the setup as a profile if you want to return to it later.
- Additional tips. Restart the PC once after the first setup and check the lights come back with your settings.
Install MSI Center with winget before adding Mystic Light
If you prefer a terminal, Windows Package Manager installs MSI Center straight from the Microsoft Store source. Run it in Terminal, PowerShell or Command Prompt.
winget install --id 9NVMNJCR03XV -s msstore–id 9NVMNJCR03XV is MSI Center's Microsoft Store product ID, and -s msstore restricts the search to the Microsoft Store source. Store IDs are unique, so the exact-match switch is not needed.
You should see: winget reports that the package installed successfully, and MSI Center appears in the Start menu. Open it and add Mystic Light from Feature Sets.
How to add fans and devices to MSI Mystic Light
Mystic Light only lists hardware that MSI Center can see. A fan or LED strip shows up when it is wired to a lighting header on a supported MSI motherboard, or when it is a supported MSI device in its own right.
- Shut down the PC and switch off the power supply before touching any cables.
- Connect the fan or strip's RGB cable to a matching lighting header on the MSI motherboard, using the header type and pin layout given in your motherboard manual.
- Power on, sign in to Windows and open MSI Center.
- Open Mystic Light and wait for the device scan to finish.
- Select the new header or device in Mystic Light and apply an effect to confirm it responds.
- If it still does not appear, close any other RGB app that controls the same part, then reopen MSI Center.
Configuring Mystic Light settings
Every lighting change in Mystic Light follows the same pattern: pick the device, pick the effect, set the details, then apply. The table maps each task to where it happens.
| Task | What to do in Mystic Light | Tip |
|---|---|---|
| Accessing Mystic Light in MSI Center | Open MSI Center and open Mystic Light; if it is missing, install it from Feature Sets first | Pin MSI Center to Start so lighting is two clicks away |
| Choosing lighting modes | Select a device, then choose an effect from the effect list | Pick a single-color effect when you want a fixed look |
| Customizing colors | With a single-color effect selected, set the color and the brightness | Use the same color on every device for a matched build |
| Creating lighting profiles | Save the current setup as a profile and give it a clear name such as Work or Gaming | Keep one plain profile as a fallback when testing new effects |
| Applying and managing settings | Apply the change, switch between saved profiles, and delete ones you no longer use | Delete test profiles once you settle on a look |
Sync Mystic Light with other RGB devices using Windows Dynamic Lighting
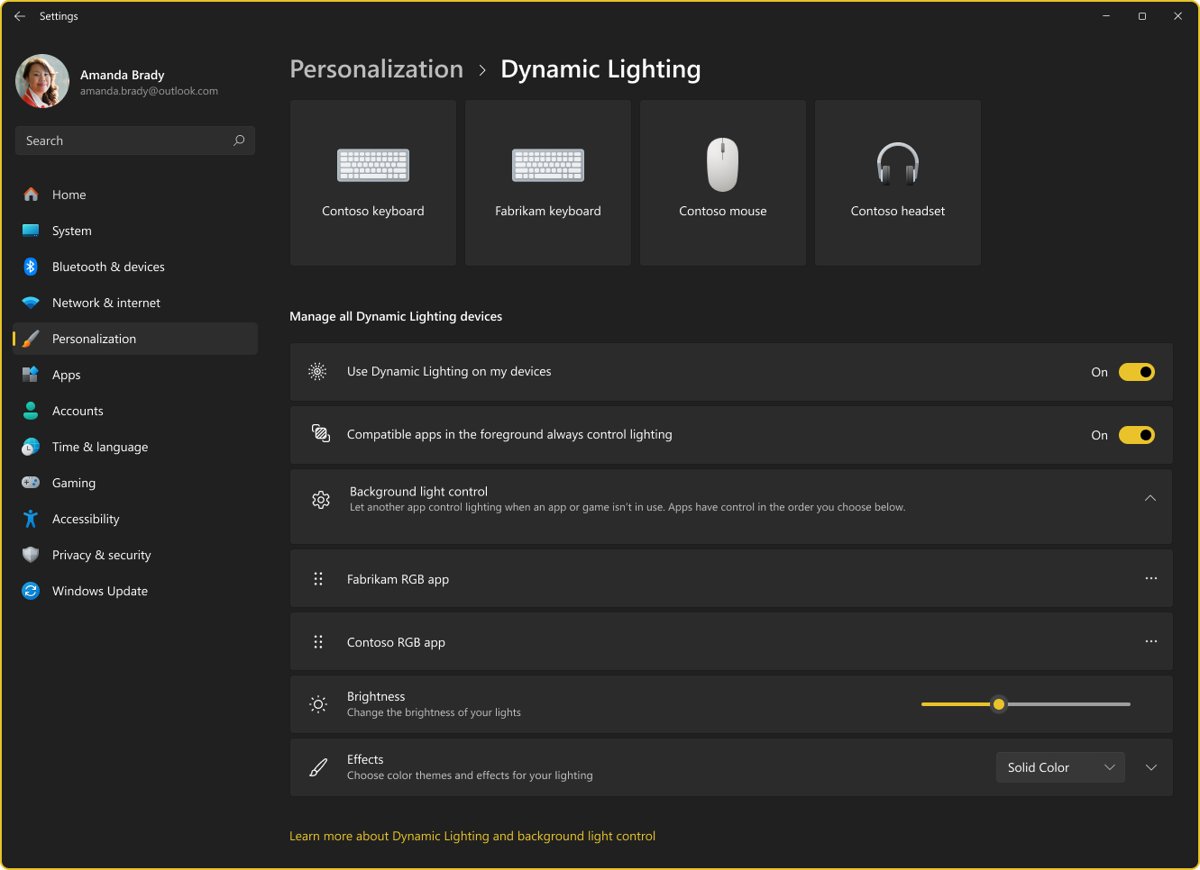
Windows 11 has its own RGB control, Dynamic Lighting, for devices that support the open HID LampArray standard. It can drive mixed-brand devices together, and it decides which app controls the lights when more than one wants to.
- Open Settings and select Personalization, then Dynamic Lighting.
- Check the device cards at the top of the page; each one is a compatible device Windows can light.
- Switch Use Dynamic Lighting on my devices to On to let Windows control them, or Off to leave them to their own software.
- Expand Background light control and drag the app you want in charge, such as MSI Center, to the top of the list.
- Set Brightness and Effects if Windows should drive the lighting itself.
- Turn on Compatible apps in the foreground always control lighting if a game or app should take over while it is open.
Priority is tied to the device and the USB port it uses, so a device moved to another port shows up as new and needs reordering.
How to check Mystic Light is working in MSI Center
- Open MSI Center and confirm Mystic Light opens without an error.
- Check that every MSI part with lighting is listed in Mystic Light: motherboard, graphics card and any connected fans or strips.
- Apply a solid single color to all devices; every LED in the case should change to that color at once.
- Restart the PC and check the same color returns after Windows loads.
- If one device keeps a different effect, open Settings > Personalization > Dynamic Lighting and check which app sits first under Background light control.
Additional tips for Mystic Light customization
| Tip | How to apply it |
|---|---|
| Utilize preset lighting modes | Start from a built-in effect and adjust only color and speed before building a look from scratch |
| Customize colors and effects manually | Set colors per device when parts sit in different zones of the case, such as a white motherboard and a red graphics card |
| Create multiple profiles | Save separate profiles for daytime, gaming and night so a switch takes one click |
| Sync with other RGB devices | Use Windows Dynamic Lighting to line up compatible non-MSI devices with the same effect, and give one app priority so they do not fight |
| Update firmware and software | Keep MSI Center current through the Microsoft Store, and update motherboard BIOS and device firmware from MSI's support page for your exact model |
| Additional tips | Run only one RGB app per device, and keep lighting cables away from fan blades when routing them |
How to turn off or disable Mystic Light
There are two levels: switching the lights off for now, or removing Mystic Light from MSI Center altogether.
- To darken the lights, open Mystic Light, select all devices, set brightness to its lowest value or choose an off effect, and apply it.
- To remove Mystic Light only, open MSI Center, go to Feature Sets, and uninstall Mystic Light.
- To remove MSI Center entirely, open Settings > Apps > Installed apps, select More (three dots) next to MSI Center, then select Uninstall.
- If Windows Dynamic Lighting was controlling the devices, switch Use Dynamic Lighting on my devices to Off so they return to their default behavior.
Troubleshooting common issues when adding Mystic Light to MSI Center
Mystic Light is not working or not listed in MSI Center
Ensure compatibility and updated software: the hardware is outside MSI Center's supported lines, or MSI Center is out of date.
- Compare your motherboard chipset, laptop or card against the prerequisites table above.
- Open Microsoft Store and select Check for updates to bring MSI Center to the latest release.
- Open MSI Center, go to Feature Sets, and install Mystic Light if it is not installed.
- Restart the PC and open Mystic Light again.
Fans, LED strips or other devices do not show in Mystic Light
Verify device connections: the part is not on an MSI lighting header, or it sits on a hub controlled by other software.
- Shut down and switch off the power supply.
- Reseat the lighting cable on the motherboard header your manual names for that cable type.
- Check the device's own controller or hub is not handling it instead of the motherboard.
- Power on, open Mystic Light and let the scan finish.
Lighting changes revert or do nothing
Address software conflicts: another RGB app or Windows Dynamic Lighting has priority over MSI Center for the same device.
- Close other RGB control apps that manage the same parts.
- Open Settings > Personalization > Dynamic Lighting.
- Expand Background light control and drag MSI Center to the top, or switch Use Dynamic Lighting on my devices to Off.
- Apply the effect in Mystic Light again.
MSI Center or Mystic Light will not open or keeps crashing
Reset and reinstall software: the MSI Center install or its feature package is damaged.
- Open Settings > Apps > Installed apps, select More next to MSI Center, then select Advanced options.
- Select Repair, then try MSI Center again.
- If it still fails, select Reset on the same page.
- If that does not help, uninstall MSI Center, reinstall it from Microsoft Store > Library, and add Mystic Light from Feature Sets again.
Mystic Light still not working after every fix
Consult support resources: a firmware or hardware fault that only the manufacturer can diagnose.
- Note the exact motherboard or card model and the MSI Center version.
- Check MSI's support page for that model for a BIOS or firmware update and install it.
- Contact MSI support through its website with the model, version and what you have tried.
MSI Mystic Light FAQ
How do I install Mystic Light?
Install MSI Center from the Microsoft Store, open it, go to the Feature Sets page and install Mystic Light from the list of features. Once it finishes installing, open Mystic Light from inside MSI Center to start setting effects and colors.
Where do I download Mystic Light?
Mystic Light comes inside MSI Center, so download MSI Center from the Microsoft Store and add Mystic Light from its Feature Sets page. Avoid third-party download sites, which repackage installers and can bundle unwanted software.
How do I open or access Mystic Light?
Open MSI Center from the Start menu and select Mystic Light. If Mystic Light is not there, it has not been installed yet; go to the Feature Sets page in MSI Center and install it first, then open it.
How do I add devices to MSI Mystic Light?
Connect the device to a supported MSI motherboard lighting header, or use a supported MSI device, then reopen MSI Center and let Mystic Light scan. It only lists hardware MSI Center can see, so parts on another brand's hub stay under that hub's software.
How do I add fans to Mystic Light?
Power off, plug the fan's RGB cable into the matching lighting header on your MSI motherboard as the manual shows, then start Windows and open Mystic Light. The fan appears with that header once the scan completes.
How do I control Mystic Light?
Select a device in Mystic Light, choose an effect, set its color, brightness and speed, and apply it. Save the result as a profile to switch back to it later without rebuilding the settings.
Why isn't Mystic Light working?
The usual causes are unsupported hardware, an outdated MSI Center, a loose lighting cable, or another RGB app with priority. Update MSI Center, check the cable, close other RGB apps and check Background light control in Windows Dynamic Lighting settings.
How do I turn off Mystic Light?
Set all devices to the lowest brightness or an off effect in Mystic Light and apply it. To remove it entirely, uninstall Mystic Light from the Feature Sets page, or uninstall MSI Center from Settings > Apps > Installed apps.
How do I use MSI Mystic Light with Windows Dynamic Lighting?
On Windows 11, open Settings > Personalization > Dynamic Lighting and expand Background light control. Drag MSI Center to the top to let Mystic Light lead, or let Windows apply its own effects to compatible devices.
Bottom line: is Mystic Light in MSI Center worth adding?
Add Mystic Light from MSI Center's Feature Sets page if your MSI board, card or laptop is on the supported list, and keep it as the only app in charge of those lights. It gives one place to set and save lighting for every MSI part, and most failures come from unsupported hardware, an outdated MSI Center or a second RGB app fighting for the same device.


![How to find word count in Microsoft Word [updated 2026]](https://techdows.com/wp-content/uploads/2026/10/Word-Review-tab-with-the-Word-Count-menu-and-Show-Word-Count-ticked-600x252.jpg)