To use the iPhone 12 camera like a pro, take control of focus and exposure yourself, turn on the grid, and let Night mode, Portrait mode and Smart HDR 3 handle difficult light.
This guide covers the dual 12MP camera hardware, the settings worth changing, shooting techniques, Night and Portrait modes, Dolby Vision video, editing in Photos and sharing your shots.
How to use the iPhone 12 camera for better photos in one minute
These five steps fix most average iPhone 12 photos. They work in Photo mode with the rear or front camera.
- Swipe left on the Lock Screen, or tap Camera on the Home Screen, to open the camera.
- Tap the screen on your subject to set the focus area there.
- Drag the sun icon next to the focus area up or down to brighten or darken the shot.
- Touch and hold the focus area until AE/AF Lock appears if you want to keep that focus and exposure for several shots.
- Tap the Shutter button or press either volume button to take the photo.
- Tap the thumbnail in the lower-left corner to check the result.
Those habits matter more than any single mode. The sections below add the hardware facts, settings and modes that build on them.
Understanding the iPhone 12 camera system
The iPhone 12 has a dual 12MP rear camera system, Main and Ultra Wide, plus a 12MP TrueDepth camera on the front. Knowing what each lens does tells you which one to pick for a scene.
| Camera specification | iPhone 12 value | What it means when you shoot |
|---|---|---|
| Main camera | 12MP, f/1.6 aperture, optical image stabilization, 100% Focus Pixels | Your best lens for low light, people and everyday shots |
| Ultra Wide camera | 12MP, f/2.4 aperture, 120-degree field of view, lens correction | Fits whole rooms, buildings and landscapes into the frame |
| Zoom | 2x optical zoom out; digital zoom up to 5x for photos and 3x for video | There is no telephoto lens, so zooming past 1x crops the image |
| TrueDepth front camera | 12MP, f/2.2, Portrait mode, Night mode, Deep Fusion, Smart HDR 3 | Selfies get the same processing as the rear camera |
| Night mode and Deep Fusion | Built into the camera system | Night mode brightens dark scenes; Deep Fusion is processing, not a mode you pick |
| Smart HDR 3 | On by default | Blends several exposures to keep detail in skies and shadows |
| Flash | True Tone flash with Slow Sync | Balances flash light with ambient light in dim scenes |
| Video | HDR video with Dolby Vision up to 4K at 30 fps; 4K up to 60 fps | Bright, high-contrast video that looks best on HDR screens |
| Image formats | HEIF and JPEG photos; HEVC and H.264 video | HEIF and HEVC save space compared with JPEG and H.264 |
Apple ProRAW, the telephoto lens, the LiDAR Scanner and Night mode portraits belong to the iPhone 12 Pro models, not the standard iPhone 12.
How to open the iPhone 12 camera and switch camera modes
Camera opens in Photo mode. Each mode is one swipe away along the bar above the Shutter button.
- Open Camera from the Home Screen, by swiping left on the Lock Screen, from Control Center, or by asking Siri to open Camera.
- Swipe left or right on the screen to move between Photo, Video, Time-lapse, Slo-mo, Portrait and Pano.
- Tap 0.5x to switch to the Ultra Wide camera, or 1x to return to the Main camera.
- Touch and hold the zoom control, then drag the dial for finer zoom steps.
- Tap the camera-switch button to use the front TrueDepth camera for a selfie.
A green dot in the top-right corner shows that the camera is in use. To open Camera in your last-used mode instead of Photo, turn on Camera Mode under Settings > Camera > Preserve Settings.
iPhone 12 basic camera settings to change first
Most useful options live in the Settings app, not in Camera itself. Open Settings, then tap Camera to find every item below.
| Setting | Where | Why change it |
|---|---|---|
| Grid and Level | Settings > Camera > Grid and Level | Shows guide lines for composition and keeps horizons straight |
| Formats | Settings > Camera > Formats | Choose High Efficiency (HEIF/HEVC) to save space |
| Record Video | Settings > Camera > Record Video | Pick 4K at 24, 25, 30 or 60 fps, or 1080p HD, and turn HDR Video on or off |
| Record Slo-mo | Settings > Camera > Record Slo-mo | Choose 1080p at 120 fps or 240 fps for the back camera |
| Preserve Settings | Settings > Camera > Preserve Settings | Keeps your last mode, filter, lighting, depth, exposure and Live Photo choices |
| Use Volume Up for Burst | Settings > Camera | Hold the volume up button to fire a burst of photos |
| Smart HDR | Settings > Camera > Smart HDR | Turn it off to get a manual HDR button on the camera screen |
| Scene Detection | Settings > Camera > Scene Detection | On iPhone 12 models, it applies a tailored look to the scene; turn it off for a neutral result |
| Mirror Front Camera | Settings > Camera > Mirror Front Camera | Saves selfies as you see them in the preview instead of reversed |
| Record Stereo Sound | Settings > Camera > Record Stereo Sound | Uses several microphones for stereo audio in video |
| Lens Correction | Settings > Camera > Lens Correction | Straightens distortion from the Ultra Wide and front cameras; on by default |
iPhone 12 shooting techniques: focus, exposure, light and angles
Pro-looking shots come from controlling what the camera decides automatically. The camera sets focus and exposure itself, and face detection balances exposure across faces, but you can override both.
- Turn on Grid in Settings > Camera, then place your subject on a line or where two lines cross.
- Shoot with the light falling on your subject, such as facing a window, rather than with a bright window behind it.
- Tap your subject to focus, then drag the sun icon down slightly to protect bright skies from blowing out.
- Touch and hold the subject until AE/AF Lock appears before you recompose or wait for action.
- Swipe up from the camera modes, tap Aspect and choose 1:1, 4:3 or 16:9 to match where the photo will be posted.
- Try a low angle with 0.5x for buildings and landscapes, and step closer at 1x instead of zooming for portraits.
- Swipe up from the camera modes, tap Timer and choose 3, 5 or 10 seconds for steady shots on a tripod or a group photo.
To lock exposure for every shot until you close Camera, swipe up from the modes, tap Exposure and drag the slider. Turn on Exposure Adjustment in Preserve Settings to keep it even after you close Camera.
The Flash button above the frame switches between Auto, On and Off. Natural light usually looks better, so try Off first indoors.
How to use Night mode on iPhone 12
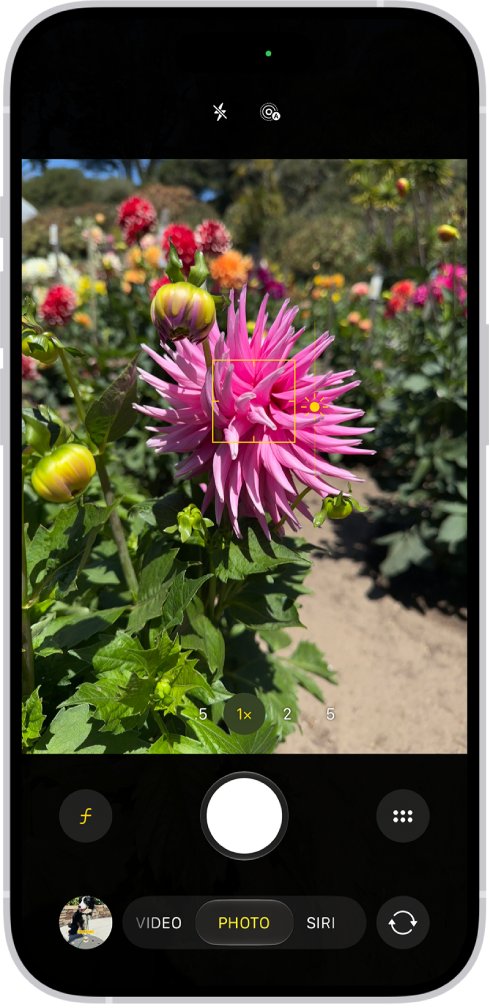
Night mode turns on automatically in low light, on the rear cameras and the front TrueDepth camera. The phone sets the exposure time itself, and you need to hold still while it captures.
- Open Camera in Photo mode in a dark scene so Night mode turns on automatically.
- Tap the Night mode icon to turn it off or on.
- Swipe up from the camera modes, tap Night Mode, and choose a longer exposure option for more detail.
- Brace your arms, rest the phone on something solid, or use a tripod.
- Tap the Shutter button and hold the phone still until the capture finishes.
- If crosshairs appear, align them to reduce motion, or tap Stop to cancel the capture.
Night mode also works in Time-lapse on the iPhone 12, which captures brighter low-light time-lapse video when the phone sits on a tripod. Night mode portraits need the LiDAR Scanner on iPhone 12 Pro models.
How to use Portrait mode and Portrait Lighting on iPhone 12
Portrait mode keeps the subject sharp and blurs the background. The iPhone 12 offers it on both the rear and front cameras, with Depth Control and six lighting effects.
- Open Camera and swipe to Portrait mode.
- Drag the lighting control to choose Natural Light, Studio Light, Contour Light, Stage Light, Stage Light Mono or High-Key Light Mono.
- Swipe up from Portrait mode, tap Depth, and drag the Depth Control slider to set how blurred the background is.
- Swipe up again, tap Intensity, and drag the slider to strengthen or soften the lighting effect.
- Tap the Shutter button to take the portrait.
Turn on Depth Control and Creative Controls in Preserve Settings if you want your blur and lighting choices kept for next time.
iPhone 12 camera advanced features explained
Several advanced features run in the background, and a few have switches worth knowing. This table covers what each does and where to control it.
| Advanced feature | What it does | How to control it |
|---|---|---|
| Smart HDR 3 | Takes several exposures in rapid succession and blends them for highlight and shadow detail | Turn off Smart HDR in Settings > Camera, then tap HDR on the camera screen to control it per shot |
| Deep Fusion | Image processing for texture and detail, listed in the specs for the rear and front cameras | No separate mode or switch; shoot normally in Photo mode |
| Night mode | Brightens low-light photos and captures more detail | Night mode icon in Camera, or Night Mode in the camera tools menu |
| Live Photos | Records the moments just before and after the photo, including audio | Swipe up from Photo mode, tap Live, choose Auto, On or Off |
| Burst mode | Takes photos in rapid succession for moving subjects | Swipe the Shutter button left and hold; lift your finger to stop |
| QuickTake video | Records video without leaving Photo mode | Touch and hold the Shutter button; slide it right onto the lock for hands-free recording |
| Filters | Applies a look such as Vivid or Dramatic before you shoot | Swipe up from the camera modes, tap Filter, swipe through the options |
| Panorama | Stitches a wide scene into one photo of up to 63MP | Choose Pano, tap the Shutter button and pan slowly along the center line |
After a Burst, tap its thumbnail, tap Burst, and tick the frames to keep; gray dots mark the suggested best shots. Photographic Styles are not available on iPhone 12 models, so filters are the in-camera look control.
How to record 4K Dolby Vision HDR video on iPhone 12
The iPhone 12 records HDR video with Dolby Vision up to 4K at 30 fps. Other devices that do not support HDR receive a standard dynamic range version when you share.
- Go to Settings > Camera > Record Video and choose a format such as 4K at 30 fps.
- Check that HDR Video is on in the same screen if you want Dolby Vision HDR.
- Open Camera and tap Video.
- Tap the resolution and frame rate values at the top of the screen to change format without leaving Camera.
- Tap the Record button or press either volume button to start.
- Tap the white Shutter button to take a still photo while recording.
- Tap the Record button again to stop.
Faster frame rates and higher resolutions create larger files. Use Slo-mo for 120 or 240 fps slow motion, and choose a later section to play slowly in Photos.
Editing your iPhone 12 photos in the Photos app
The Photos app handles basic adjustments and more advanced edits without a third-party app. You can revert edits later, and with iCloud Photos they sync to your other devices.
- Open Photos, tap a photo, then tap the edit button.
- Tap the auto-enhance button for a quick fix of light and color.
- Tap Adjust, swipe left under the photo, and drag sliders such as Exposure, Brilliance or Highlights.
- Tap the filters button and choose a filter such as Vivid or Dramatic, or tap Original to remove one applied in Camera.
- For a portrait, use the Depth Control slider to change the blur, or tap Portrait to turn the effect off.
- Tap Done to save, or tap Cancel and Discard Changes to back out.
For a consistent style across a set, edit one photo, tap the more button, tap Copy Edits, then select the other photos and tap Paste Edits.
Clean Up and the other Apple Intelligence editing tools need an iPhone 15 Pro or later, so they do not appear on iPhone 12.
Sharing your iPhone 12 photos and protecting your work
Every photo and video you take is saved in the Photos app. Share from there, and decide first whether you want location data attached.
- Tap the thumbnail in Camera, or open the photo in Photos.
- Tap the share button.
- Choose AirDrop, Mail, Messages or a social app to send the photo.
- Swipe up and tap Print to send it to an AirPrint printer.
- Turn on iCloud Photos in Settings > Apps > Photos to back up every shot and see it on your other devices.
When Location Services is on, photos and videos are tagged with location data that apps and photo-sharing websites can read. Review which apps can use your location in Settings > Privacy & Security > Location Services before you post publicly.
How to check your iPhone 12 camera settings are working
- Open Camera and confirm the grid lines appear over the frame after you turn on Grid.
- In a dark room, confirm the Night mode icon is active before you shoot.
- Take a Live Photo, open its thumbnail, and touch and hold the screen; it should play with sound.
- Open a portrait in Photos, tap the edit button, and confirm the Portrait toggle and Depth Control slider appear.
- Close and reopen Camera; it should open in the mode or exposure you chose under Preserve Settings.
iPhone 12 camera problems and fixes
Night mode photos come out blurry
The phone moved during the multi-second Night mode exposure.
- Rest the iPhone on a solid surface or a tripod.
- Align the crosshairs if they appear in the frame.
- Hold still until the capture finishes before you lower the phone.
Photos look over-processed or the colors look wrong
Scene Detection, Smart HDR or a filter is changing the look.
- Go to Settings > Camera and turn off Scene Detection.
- Turn off Smart HDR and use the HDR button only when a scene needs it.
- In Camera, swipe up from the modes, tap Filter and choose Original.
Selfies are saved flipped
The front camera saves the image reversed from the preview by default.
- Go to Settings > Camera.
- Turn on Mirror Front Camera.
Camera settings reset every time you open Camera
Preserve Settings is off for that control.
- Go to Settings > Camera > Preserve Settings.
- Turn on Camera Mode, Creative Controls, Exposure Adjustment or Live Photo as needed.
Video will not record
Video recording is not available during a phone or FaceTime call.
- End the call.
- Open Camera, tap Video and start recording again.
HDR video looks washed out on another device
The other device or app does not support Dolby Vision HDR.
- Go to Settings > Camera > Record Video.
- Turn off HDR Video for clips you plan to share with older devices.
iPhone 12 camera FAQ
How do I use the iPhone 12 camera?
Open Camera, tap your subject to focus, drag the sun icon to adjust brightness, and tap the Shutter button or press a volume button. Swipe across the screen to switch between Photo, Video, Portrait, Pano, Slo-mo and Time-lapse modes.
Is the iPhone 12 camera good?
The iPhone 12 has a dual 12MP Main and Ultra Wide system with Night mode, Deep Fusion, Smart HDR 3 and Dolby Vision HDR video up to 4K at 30 fps. It has no telephoto lens or ProRAW, which are on the iPhone 12 Pro models.
Is using the iPhone 11 camera different from the iPhone 12?
The steps are largely the same. Both models handle HDR the same way: turn off Smart HDR in Settings > Camera to get a manual HDR button. Filters work the same on both, since Photographic Styles arrived on later models.
How do I use the iPhone 13, iPhone 16 or iPhone 17 Pro camera?
The basics match the iPhone 12: tap to focus, drag to set exposure and swipe between modes. Newer models add features such as Photographic Styles in place of filters and, on supported models, the Camera Control button for opening Camera and adjusting settings.
What iOS does the iPhone 12 use?
The iPhone 12 is compatible with iOS 27, so it gets the current Camera and Photos app features that its hardware supports. Check your version in Settings > General > About, and update in Settings > General > Software Update.
Does the iPhone 12 use USB-C or a Lightning cable?
The iPhone 12 uses a Lightning connector, not USB-C. It shipped with a USB-C to Lightning cable that supports fast charging, and it also charges wirelessly with MagSafe up to 15W or Qi up to 7.5W.
Does the iPhone 12 use eSIM?
Yes. The iPhone 12 supports Dual SIM with a nano-SIM and an eSIM. eSIM is not supported in every region, and not every carrier supports it, so check with your carrier before you switch.
Final thoughts on using the iPhone 12 camera like a pro
Set up the grid and Preserve Settings once, then make tap-to-focus and exposure adjustment a habit on every shot. The iPhone 12 already applies Smart HDR 3, Deep Fusion and Night mode automatically, so manual focus, exposure and good light are the controls that make the biggest difference to your results.