To do Harvey balls in PowerPoint, draw a circle with Insert > Shapes, lay a filled Pie shape of the same size on top, drag the Pie's adjustment handle to the fill level you need, then group the two and copy the set.
PowerPoint has no built-in Harvey ball tool, so this guide covers the shape method, icons, Unicode symbols, SmartArt, add-ins and the Excel icon set, plus alignment and fill fixes.
Using Shapes and Fill Colors to Create Harvey Balls in PowerPoint
This is Method 1: Using Shapes and Fill Colors. It gives crisp, editable balls that scale without blurring.
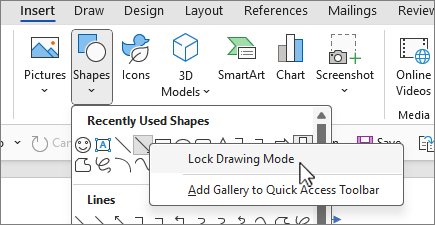
- Step 1: Insert a circle shape. On the Insert tab, select Shapes, pick the oval, then press and hold Shift while you drag to draw a perfect circle.
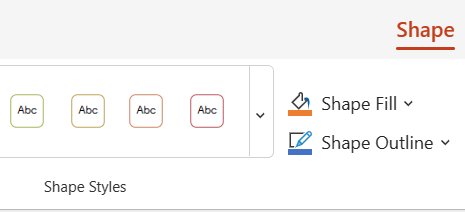
- Step 2: Format the circle. On the Shape Format tab, open Shape Fill and choose No Fill or white, then set a dark Shape Outline.
- Step 3: Create filled portions to represent progress. Insert the Pie shape, a circle with a slice missing, holding Shift so it stays round.
- Give the Pie the same size as the circle in the Height and Width boxes on Shape Format, and fill it with the outline colour.
- Step 4: Adjust fill level. Drag the Pie's adjustment handles until it covers a quarter, half or three quarters, starting from 12 o'clock.
- Hold Shift, select the circle and the Pie, then select Align > Align Center and Align > Align Middle so they sit exactly on top of each other.
- With both selected, select Group > Group on the Shape Format tab.
- Copy the group and change only the Pie for each level: empty circle, 25%, 50%, 75% and a fully filled circle.
Additional tips: build all five levels once on a spare slide and copy from that master set. Never redraw a ball from scratch mid-deck.
Methods to Create Harvey Balls in PowerPoint
Choose your design method by how often the ratings change and whether others will edit the file.
| Your situation | Use this | Why |
|---|---|---|
| You want full control of colour and size | Method 1: Using shapes and fill colors | Editable vector shapes, no extra software |
| You want a ready-made look | Method 2: Using icons or images | Insert > Icons gives recolourable SVG graphics |
| Harvey balls sit inside table text | Unicode symbols via Insert > Symbol | They flow with the text and take its colour and size |
| Your team already has a slide toolkit | Method 3: Using PowerPoint add-ins | Add-ins can insert balls in one click |
| You started from a SmartArt diagram | SmartArt converted to shapes | Keeps the diagram layout, then edit each shape |
| The ratings live in a spreadsheet | Excel icon sets, then copy to PowerPoint | Balls update as the numbers change |
What Are Harvey Balls?
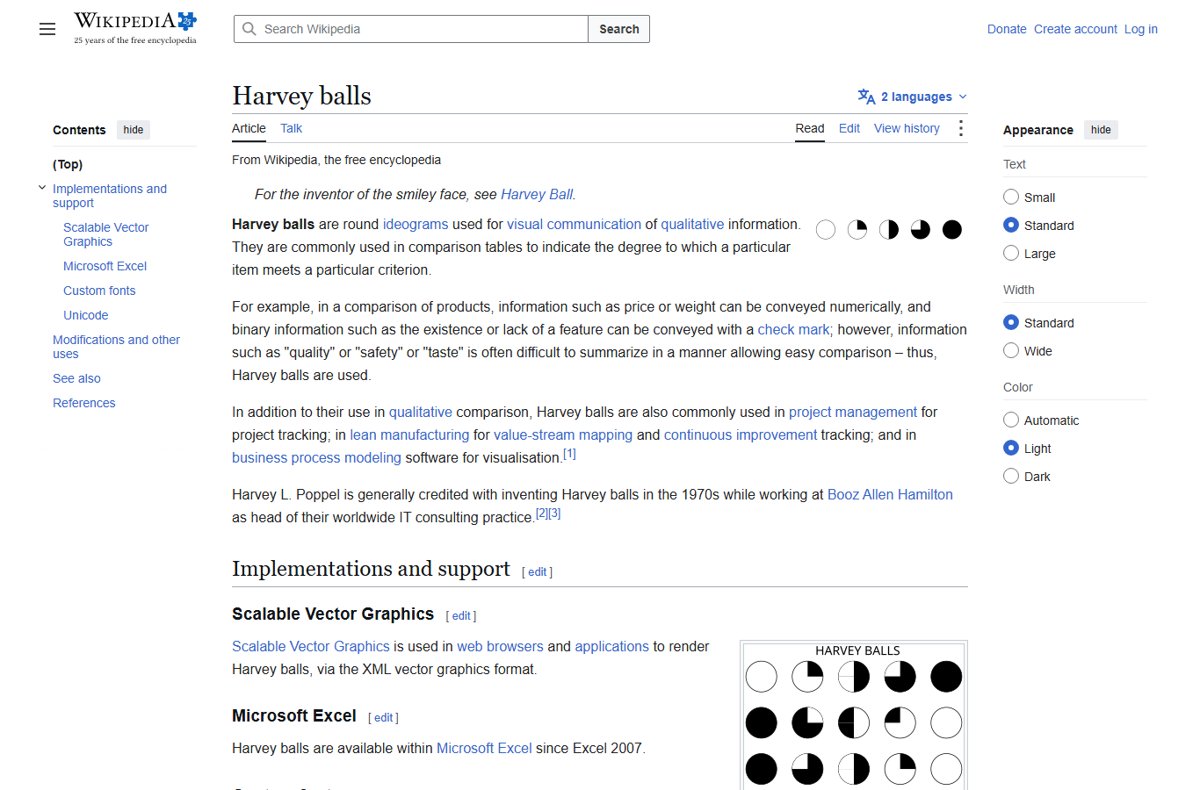
Harvey balls are round ideograms that show qualitative information, such as quality or completeness, in comparison tables. Harvey L. Poppel is generally credited with inventing them in the 1970s at Booz Allen Hamilton.
| Ball | Level | Typical meaning | Unicode symbol |
|---|---|---|---|
| Empty circle | 0% | None, not started | U+2B58 heavy circle |
| Quarter filled | 25% | Low, partial | U+25D4 |
| Half filled | 50% | Medium, halfway | U+25D1 or U+25D0 |
| Three quarters filled | 75% | High, nearly done | U+25D5 |
| Full circle | 100% | Complete, fully meets | U+2B24 black large circle |
They are named after Harvey Poppel, not Harvey Ball, the designer credited with the smiley face.
Benefits of Using Harvey Balls in PowerPoint
| Benefit | Where it helps |
|---|---|
| Compares qualities that have no clean number | Product, vendor or option comparison tables |
| Reads faster than text ratings | Dense slides viewed from the back of a room |
| Shows progress at a glance | Project tracking and status slides |
| Works in black and white | Printed handouts and greyscale PDFs |
| Takes little space | Tables with many rows and columns |
Preparing to Create Harvey Balls in PowerPoint
| Step | What to decide |
|---|---|
| Gather your data and define your scale | List what you rate and fix what 0%, 25%, 50%, 75% and 100% mean before drawing anything |
| Choose your design method | Shapes, icons, symbols, SmartArt or an add-in, using the table above |
| Set your color scheme and style | One fill colour and one outline colour from the deck's theme, plus outline weight |
| Prepare your slide layout | Insert the table or grid first so you know the cell size for each ball |
| Add a legend | Plan room for a small key that explains each level |
Using Icons and Symbols to Create Harvey Balls in PowerPoint
This is Method 2: Using Icons or Images. Icons are SVG graphics, so they recolour and resize cleanly.
- Step 1: Insert shapes or icons. Select Insert > Icons, search for a circle or pie, select it and choose Insert.
- Step 2: Customize the icons. With the icon selected, open the Graphics Format tab and use Graphics Fill to set your colour.
- Step 3: Fill or remove parts for different levels. Lay a Pie shape over the icon, or use an empty and a filled circle icon for 0% and 100%.
- Step 4: Save as a reusable graphic. Group each finished level with Group > Group and keep the set on a spare slide or in your template.
- For text-only tables, select Insert > Symbol and pick the circle characters listed above, or copy them from Windows Character Map.
Additional tips: PowerPoint cannot convert typed Unicode codes with Alt+X, so use Insert > Symbol or Character Map instead.
Using SmartArt Graphics to Create Harvey Balls in PowerPoint
SmartArt has no Harvey ball layout. It only helps if you want a SmartArt diagram's arrangement and then edit the circles by hand.
- Step 1: Insert SmartArt graphic. Select Insert > SmartArt and choose a layout built from circles.
- Step 2: Customize SmartArt for Harvey balls. Select the graphic, then on the SmartArt Design tab select Convert > Convert to Shapes.
- Step 3: Adjust segments to represent data. Lay a Pie shape over each circle and set its fill level with the adjustment handle.
- Step 4: Final touches. Apply your fill and outline colours, then group each ball.
Once converted, the shapes cannot be turned back into SmartArt, so keep a copy of the original slide.
Method 3: Using PowerPoint Add-ins
- In PowerPoint, select Home > Add-ins, or File > Get Add-ins.
- Select More Add-ins and open the Store tab.
- Search for Harvey balls or a slide toolkit and read the add-in's description and permissions.
- Select Add to install it.
- Insert the balls from the add-in's pane, then check they are normal shapes others can edit.
Recipients without the add-in still see the shapes, but may not be able to use the add-in's own editing tools.
How to do Harvey balls in Excel
Excel has offered Harvey balls through conditional formatting icon sets since Excel 2007.
- Enter each rating as a number, such as 0 to 4 or 0 to 100.
- Select the cells.
- Select Home > Styles > Conditional Formatting > Icon Sets and choose the set of quarter-filled circles.
- To set your own cut-offs, open Conditional Formatting > Manage Rules, edit the rule and change the threshold values.
- Tick Show Icon Only in the same rule to hide the numbers.
- Copy the cells and paste them into PowerPoint.
Customizing Harvey Balls for Your Presentation
| Task | How to do it |
|---|---|
| Creating basic Harvey balls | Circle plus Pie shape, grouped, one copy per level |
| Using PowerPoint icons or images | Insert > Icons, then Graphics Fill on the Graphics Format tab |
| Applying color customization | Shape Fill and Shape Outline on the Shape Format tab; More Fill Colors for exact or transparent colours |
| Adjusting sizes and positions | Type the same Height and Width on Shape Format; use Align and Distribute |
| Adding labels or percentages | Add a text box beside the ball, or a legend row that maps each ball to its percentage |
Theme colours from Shape Fill update if you change the deck's theme; colours picked under More Fill Colors do not.
Best Practices for Incorporating Harvey Balls
| Practice | Why it matters |
|---|---|
| Choose consistent sizes and styles | Different sizes read as different importance |
| Use clear color coding | One fill colour; let the fill amount carry the meaning |
| Limit the number of categories | Five levels is the standard; more slices are hard to tell apart |
| Position strategically | Centre each ball in its cell and keep columns aligned |
| Leverage templates and tools | Keep a master set on a hidden slide or in your template |
| Include a legend | Readers need the key to know what each level means |
Tips for effective use of Harvey balls: use them for qualitative ratings, and show exact numbers as numbers.
How to check your Harvey balls read correctly
- Switch to Slide Show and view the slide at full size.
- Confirm every ball of the same level is the same size and fill.
- Select a row and check Align Middle keeps the balls level.
- Print a greyscale preview or export a PDF and confirm the levels are still distinct.
- Check that the legend matches the scale you defined.
Troubleshooting Common Issues When Creating Harvey Balls in PowerPoint
1. Harvey balls not displaying correctly
Unicode symbols need a font that contains them; without it they show as boxes.
- Replace the symbols with shape-based balls, which display on any PC.
- Or use a common font that includes the characters and test the file on another device.
2. Alignment issues
Balls were placed by eye.
- Hold Shift and select the balls in a row.
- Select Shape Format > Align > Align Middle.
- With three or more selected, select Align > Distribute Horizontally.
3. Difficulties in creating multiple Harvey balls
Each ball is being drawn from scratch.
- Build one grouped ball per level.
- Copy and paste those groups into every cell.
- Keep the master set on a spare slide.
4. Inconsistent fill levels
Pie handles were dragged by hand on each copy.
- Delete the odd balls.
- Paste copies from the master set instead of adjusting each one.
5. Compatibility and add-ins
Another user lacks the add-in or opens the deck in a different app.
- Use plain shapes for files you share.
- Group shapes so they move as one in any version.
- Avoid custom fonts unless everyone has them installed.
Frequently asked questions
What are Harvey balls?
Harvey balls are round symbols that show a level, from an empty circle to a full one, usually in quarters. They are used in comparison tables and project tracking to rate qualities that are hard to express as a number.
Why are they called Harvey balls?
They are named after Harvey L. Poppel, who is generally credited with inventing them in the 1970s while leading the IT consulting practice at Booz Allen Hamilton. They are unrelated to Harvey Ball, the smiley face designer.
Where are Harvey balls in PowerPoint?
PowerPoint has no Harvey ball button. You build them from Insert > Shapes using a circle and a Pie shape, insert circle icons, type Unicode circle symbols with Insert > Symbol, or install an add-in that provides them.
How do I make a Harvey ball in PowerPoint?
Draw a circle with Shift held, add a Pie shape of the same size, fill the Pie and drag its handle to the level you need. Align the two shapes, group them, and copy the group for each level.
How do I do Harvey balls in Excel?
Enter ratings as numbers, select the cells and choose Home > Conditional Formatting > Icon Sets, then pick the quarter-filled circle set. Use Manage Rules to set thresholds and Show Icon Only to hide the numbers.
How do I add Harvey balls to text?
Use the Unicode circle characters, such as U+25D4 for a quarter and U+25D5 for three quarters. In PowerPoint, insert them with Insert > Symbol or copy them from Character Map, because PowerPoint cannot convert codes with Alt+X.
How do I add Harvey balls to a PowerPoint table?
Build or paste one grouped ball per level, place one in each cell, then use Align Middle and Distribute Horizontally to line them up. Add a legend that states what each fill level means.
Additional Resources and Tools for Creating Harvey Balls in PowerPoint
- Add shapes — Insert shapes and draw a perfect circle with Shift
- Add a fill or effect to a shape — Shape Fill, No Fill and transparency
- Align or arrange objects — Align and Distribute commands
- Group or ungroup shapes — Lock a ball's circle and Pie together
- Use conditional formatting in Excel — Icon sets for Harvey balls in Excel
Conclusion
Build Harvey balls from a circle and a Pie shape, make one grouped master per level, and copy those everywhere. Shapes display on every PC without fonts or add-ins, stay sharp at any size, and copying a master set keeps every fill level identical.




![Clear or refresh cache in Google Chrome [Windows 11]](https://techdows.com/wp-content/uploads/2026/10/Google-Chrome-Help-page-listing-steps-to-delete-browsing-data-on-a-computer-600x338.jpg)