You can convert HEIC to JPG on a Mac without installing any software. The quickest methods are Preview for individual images and Finder’s built-in Convert Image Quick Action when you need to convert several HEIC files at once.
macOS has supported HEIC images since High Sierra, so current Macs can open and convert them directly. Converting to JPG is useful when a website, Windows app, older device, or image editor does not accept HEIC files.
This guide covers single-image conversion, bulk HEIC to JPG conversion, Photos and iCloud methods, JPEG quality settings, and how to make an iPhone save future photos as JPG.
How to Convert HEIC to JPG on Mac Using Preview
Preview is the simplest option when you have one HEIC image or want control over JPEG quality. It comes with macOS and does not require an internet connection.
- Double-click the .heic file to open it in Preview.
- Choose File > Export from the menu bar.

- Open the Format menu.
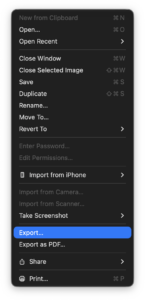
- Select JPEG.
- Adjust the Quality slider if needed.
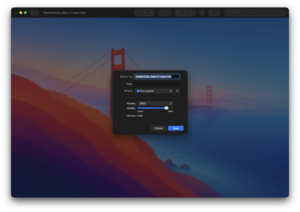
- Choose a filename and destination.
- Click Save.
Preview creates a new JPG file and leaves the original HEIC image unchanged unless you deliberately save over another file.
Best JPEG quality setting for HEIC conversion
Move the Quality slider toward Best when image quality matters more than file size. This works well for photos you plan to edit, print, archive, or upload where compression is not a concern.
Use a lower quality setting when you need a smaller image for email or a website. JPEG uses lossy compression, so repeatedly converting or resaving the same JPG can reduce image quality.
How to Batch Convert HEIC to JPG on Mac
You do not need to convert HEIC files individually. Finder can convert a folder of images to JPEG in one operation using the built-in Convert Image Quick Action.
- Open Finder.
- Select all the HEIC images you want to convert.
- Control-click or right-click the selected files.
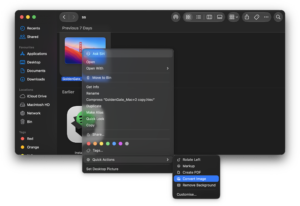
- Choose Quick Actions > Convert Image.
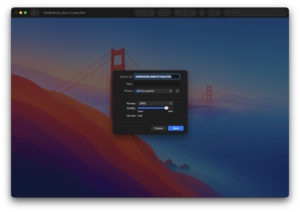
- Set Format to JPEG.
- Choose the image size you want.
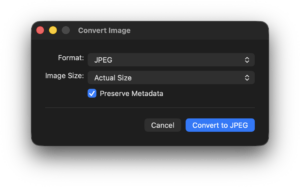
- Click Convert to JPEG.
The converted JPG files appear in the same folder as the originals. This is usually the fastest way to convert dozens or hundreds of iPhone HEIC photos on a Mac.
Convert HEIC to JPG at full size
Select Actual Size in the Finder conversion window when you want to preserve the image dimensions. The other size options create smaller copies, which can be useful for web uploads but are not ideal when you want the highest available resolution.
Convert HEIC to JPG without deleting the originals
Finder’s Convert Image action creates new JPEG copies. Your HEIC originals remain in the folder, so you can confirm that the JPG files look correct before deleting or moving anything.
Batch Convert HEIC to JPG Using Preview
Preview also supports converting several HEIC files at the same time and gives you more control over JPEG quality than Finder’s Quick Action.
- Select the HEIC files in Finder.
- Right-click them and choose Open With > Preview.
- Choose View > Thumbnails if the sidebar is not visible.
- Press Command + A in the thumbnail sidebar to select all the images.
- Choose File > Export Selected Images.
- Choose the destination folder.
- Click Options if needed.
- Select JPEG as the format.
- Choose the JPEG quality and complete the export.
Use Finder when speed matters. Use Preview when you want more control over the exported image quality.
How to Convert HEIC to JPG in the Photos App on Mac
If your iPhone photos are already stored in the Mac Photos library, you can export them directly as JPEG without first locating their HEIC files in Finder.
- Open Photos on your Mac.
- Select one or more photos.
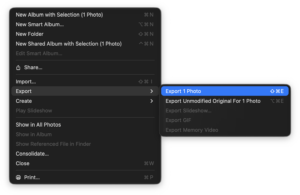
- Choose File > Export > Export [number] Photos.
- Set Photo Kind to JPEG.
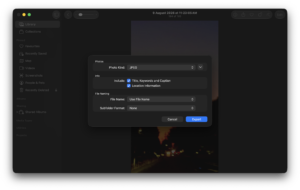
- Choose the JPEG quality and size.
- Click Export.
- Select the folder where you want the JPG files saved.
This method is particularly useful when you use iCloud Photos because you can select images from your library and export JPEG copies without manually searching for their original files.
JPEG versus Export Unmodified Original
Do not choose Export Unmodified Original when your goal is to create JPG files. That option preserves the original image format, which means an HEIC photo normally remains HEIC.
Choose the regular Export Photos command and set Photo Kind to JPEG instead.
How to Convert HEIC to JPG with Finder Quick Actions
Finder’s Convert Image tool is worth using even for a single photo because you can convert the file without opening an app.
Select an HEIC file, right-click it, then choose:
Quick Actions > Convert Image > JPEG
You can choose one of the available image sizes before conversion. Select Actual Size if you do not want Finder to reduce the image dimensions.
Convert Image is missing from Finder
If you do not see Convert Image, check that you selected an image file and look under both Quick Actions and Services in the right-click menu.
You can also review enabled Finder extensions from macOS System Settings. The exact location varies slightly between macOS versions, but Apple places Quick Action controls among the system extension settings.
How to Download HEIC Photos from iCloud as JPG
If the photo is stored in iCloud and you do not want to download the HEIC original first, iCloud.com can provide a more compatible JPEG version.
- Open iCloud.com in your browser.
- Sign in to your Apple Account.
- Open Photos.
- Select one or more photos.
- Open the download options.
- Select Most Compatible.
- Download the files.
Apple’s Most Compatible download option uses JPEG for photos and H.264 for video. This is useful when you need files for software or devices that do not support HEIC.
Convert HEIC to JPG on Mac Without Software
You do not need an online converter or third-party Mac app for normal HEIC to JPG conversion. Preview, Finder, Photos, and iCloud already cover the most common situations.
| Method | Best for | Internet required |
|---|---|---|
| Preview | One image or precise JPEG quality control | No |
| Finder Convert Image | Fast bulk conversion | No |
| Photos | Images stored in a Photos library or iCloud Photos | Only if the original needs to download from iCloud |
| iCloud.com | Downloading compatible JPG copies directly from iCloud | Yes |
Keeping conversion local on your Mac also avoids uploading private photos to an unknown image-conversion website.
How to Convert HEIC to JPG Without Losing Quality
JPEG and HEIC use different compression systems, so a conversion cannot produce a mathematically identical file. You can still avoid visible quality loss by exporting at a high JPEG quality and keeping the original dimensions.
For the best result:
- Use Preview and move JPEG Quality toward Best.
- Do not resize the image unless you need smaller dimensions.
- Keep the original HEIC file as your master copy.
- Avoid repeatedly opening and resaving the resulting JPG.
HEIC generally stores comparable image quality in less space than JPEG, so the JPG version can be larger even when both images have the same pixel dimensions.
How to Convert HEIC to JPG on Mac for Free
All of the built-in methods covered above are free. Preview, Finder, and Photos come with macOS, while iCloud’s web download tools are available with your Apple Account.
A paid converter only becomes useful when you need specialist batch workflows, automated folder monitoring, metadata processing, or formats not supported by Apple’s built-in tools.
How to Make iPhone Photos Save as JPG Instead of HEIC
If you regularly transfer iPhone photos to systems that require JPG, you can change the iPhone camera format so future photos use JPEG.
- Open Settings on your iPhone.
- Tap Camera.
- Tap Formats.
- Select Most Compatible.
New standard photos will then use JPEG instead of HEIF. Apple calls the HEIF option High Efficiency because it generally stores images more efficiently.
This setting applies to new photos. It does not convert HEIC images already stored on the iPhone or Mac.
Should You Convert HEIC to JPG?
Convert HEIC to JPG when compatibility is the priority. JPEG works with virtually every website, operating system, photo editor, document editor, and older device.
Keeping HEIC makes sense when you mainly use modern Apple devices and want smaller files without unnecessarily converting your photo library. You can keep the HEIC originals and create JPG copies only when another service requires them.
Frequently Asked Questions
What is the easiest way to convert HEIC to JPG on Mac?
For one photo, open the HEIC file in Preview and choose File > Export > JPEG. For several photos, select them in Finder and choose Quick Actions > Convert Image > JPEG.
Can Mac convert HEIC to JPG without an app?
Yes. Finder includes a Convert Image Quick Action, so you can convert HEIC files to JPEG without opening a separate application. Preview and Photos are also built into macOS.
How do I convert multiple HEIC files to JPG on Mac?
Select all the HEIC images in Finder, right-click the selection, and choose Quick Actions > Convert Image. Set the format to JPEG and choose Actual Size if you want to retain the original dimensions.
Can Preview batch convert HEIC to JPG?
Yes. Open multiple HEIC files in one Preview window, select the images in the thumbnail sidebar, then use the export command to save the selected images as JPEG files.
Does converting HEIC to JPG reduce image quality?
JPEG uses lossy compression, so some image data changes during conversion. Using a high JPEG quality setting and retaining the original dimensions keeps visible quality loss to a minimum.
Why are my iPhone photos HEIC instead of JPG?
iPhones use Apple’s High Efficiency camera setting by default on supported models. It saves photos as HEIF or HEIC files because they generally require less storage than comparable JPEG images.
Can I change a HEIC file to JPG by renaming the extension?
No. Changing .heic to .jpg only changes the filename. The image data remains HEIC, and some apps will refuse to open the renamed file. You need to export or convert the image.
Can I convert HEIC to JPG using Photos on Mac?
Yes. Select the photos, choose File > Export > Export Photos, and select JPEG from the Photo Kind menu.
How do I download JPG instead of HEIC from iCloud?
Open iCloud Photos in a browser, select the images, open the download options, and choose Most Compatible. Apple uses JPEG for the compatible photo download.
Will converting HEIC to JPG delete the original?
No. Preview export, Finder Convert Image, and Photos export create new files. Keep the HEIC originals until you confirm that the JPG copies have been saved correctly.
Why is my JPG larger than the original HEIC?
HEIC uses more efficient compression than JPEG, so a converted JPEG can consume more storage even when it has the same resolution and appears visually similar.
Can I convert HEIC to JPG offline on Mac?
Yes. Preview and Finder perform the conversion locally and do not require an internet connection.
Do I need a HEIC to JPG converter for Mac?
No for normal conversions. macOS already includes Preview, Finder Convert Image, and Photos, which handle single and bulk HEIC to JPEG conversion.